Page 1 of 11
AS9.1-2 | Intravenous Access and Central Venous Access in Simulation — SDL Guide
CLINICAL SCENARIO
A 45-year-old man with severe septic shock arrives in the emergency department. His peripheral veins are collapsed, his blood pressure is 70/40 mmHg, and he needs immediate large-volume resuscitation and vasopressors. Two nurses have already failed to cannulate peripheral veins. The anaesthesiologist steps in — within minutes a central venous catheter is in place in the right internal jugular vein, drugs are running, and the patient stabilises. Vascular access is not merely a technical ritual; it is a life-saving clinical skill that every anaesthesiologist must be able to perform with speed, precision, and anatomical confidence. In the simulation environment you will build that competence before the stakes are real.
WHY THIS MATTERS
Anaesthesiologists establish vascular access for virtually every patient they care for — induction of anaesthesia, intraoperative fluid management, vasopressor infusions, central venous pressure monitoring, rapid transfusion, total parenteral nutrition, and long-term drug delivery all rely on reliable intravenous routes. Peripheral intravenous (PIV) cannulation is the most frequently performed procedural skill in medicine. Central venous catheterisation (CVC) is essential in critical care, major surgery, and whenever peripheral access is impossible or inadequate. Competency in both is therefore a foundational requirement of anaesthetic training under the NMC 2024 curriculum (AS9.1–AS9.2). Errors in technique — wrong site, non-sterile insertion, unrecognised arterial placement — carry serious morbidity. Simulation-based training allows deliberate practice of anatomical landmark identification, needle-wire-dilator sequencing, and real-time ultrasound guidance before managing real patients.
RECALL
Before proceeding, review the following from your prior learning:
- Upper extremity venous anatomy: cephalic, basilic, and median cubital veins in the antecubital fossa; dorsal metacarpal veins
- Deep cervical anatomy: internal jugular vein lies lateral to the carotid artery within the carotid sheath; subclavian vein passes beneath the clavicle anterior to the subclavian artery
- Aseptic technique: hand hygiene, sterile gloves, draping — applied during any invasive procedure
- Seldinger technique (wire-guided catheter placement): the principle that a hollow needle can be exchanged for a catheter over a flexible guidewire
- Basic haemodynamics: venous pressure, the difference between venous and arterial blood, and why misdirected CVC placement into an artery is dangerous
Clinical Indication and Relevance of Vascular Access
Vascular access is defined as the establishment of a reliable conduit — either peripheral or central — between the external environment and the intravascular compartment, enabling drug delivery, fluid administration, blood sampling, and haemodynamic monitoring. The selection of access type and site is a clinical decision driven by patient physiology, urgency of care, anticipated duration, and the nature of infusate.
Peripheral intravenous cannulation (AS9.1) is indicated for the vast majority of elective and urgent surgical patients. A short (20–22 G) cannula in the antecubital fossa or forearm suffices for induction, maintenance fluids, and standard drug delivery. When large-volume, high-pressure infusion is required — such as major haemorrhage or rapid fluid resuscitation — large-bore peripheral access (14–16 G) in the antecubital fossa provides higher flow rates than most central lines because flow is proportional to the fourth power of radius and inversely proportional to length (Poiseuille's law).
Central venous catheterisation (AS9.2) is indicated when (1) peripheral access is impossible or inadequate; (2) infusion of concentrated vasopressors, concentrated potassium, or caustic chemotherapy agents is required (peripheral veins cannot tolerate these without phlebitis); (3) central venous pressure (CVP) monitoring is needed; (4) pulmonary artery catheter placement is planned; or (5) a multi-lumen catheter for simultaneous drug infusions is necessary in ICU. The choice of central site — internal jugular (IJ), subclavian (SC), or femoral — depends on operator experience, patient anatomy, bleeding risk (subclavian compressibility is poor), and infection risk (femoral highest).
In simulated practice, both skills are trained under faculty supervision with mannequins and phantom models, allowing learners to make and correct errors — wrong needle angle, inadvertent arterial puncture, kinking of guidewire — without harming patients.
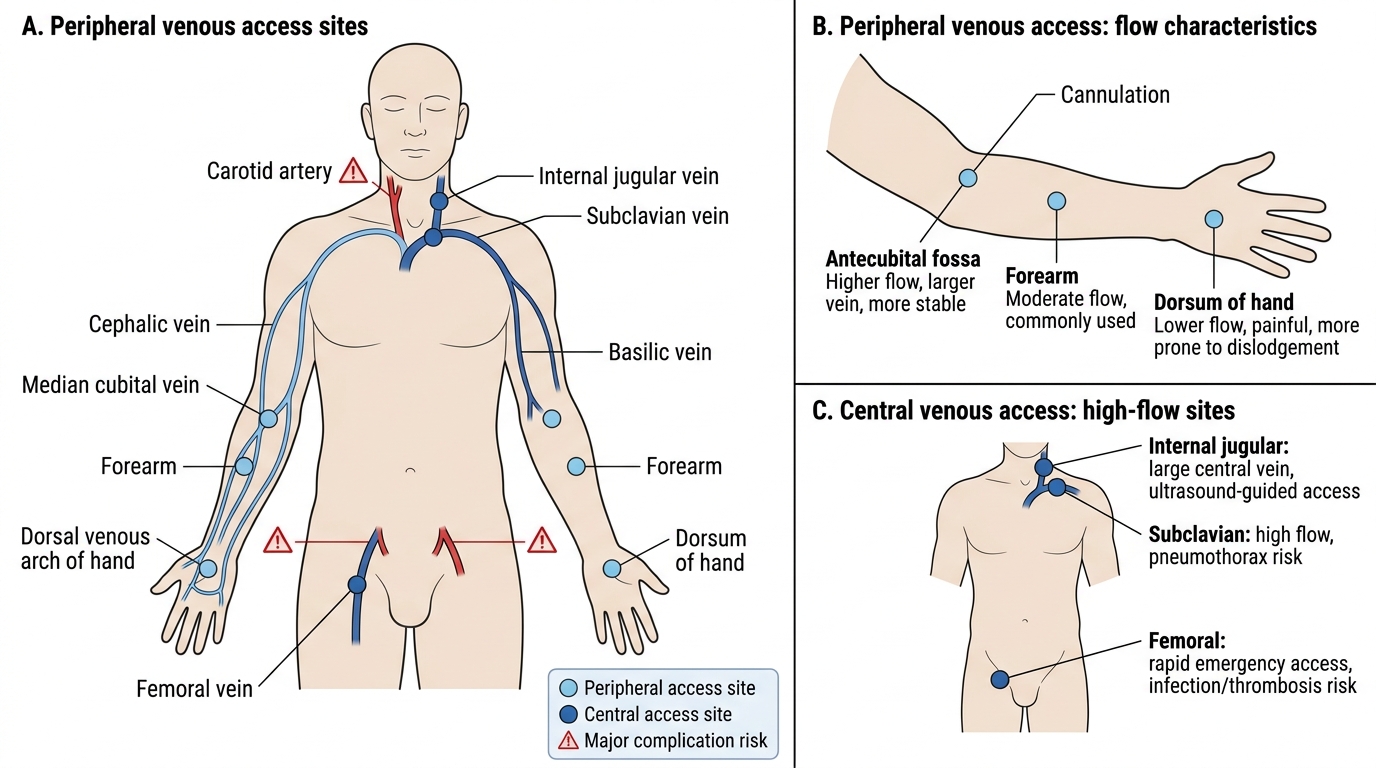
Peripheral and Central Venous Access Sites
Anatomy and Governing Principles of Venous Access
A thorough command of surface and deep venous anatomy is the bedrock of safe vascular access. Errors in landmark identification account for the majority of serious procedural complications, including arterial puncture, haemothorax, and nerve injury.
Peripheral venous anatomy relevant to cannulation includes: the cephalic vein running along the lateral forearm and arm, accessible at the antecubital fossa and wrist; the basilic vein on the medial arm, larger but deeper; and the median cubital vein crossing the antecubital fossa, commonly used for cannulation because it is superficial, large, and anchored by fascia. The dorsal venous arch of the hand provides additional sites but is more painful and prone to dislodgement. In the lower limb, long saphenous veins at the medial ankle and dorsal foot veins serve as emergency alternatives.
Central venous anatomy:
- Internal jugular vein (IJV): Exits the skull at the jugular foramen, runs within the carotid sheath (lateral to the common carotid artery, anterior to the vagus nerve), and enters the brachiocephalic vein after joining the subclavian at the sternal end of the clavicle. The apex of the triangle formed by the two heads of sternocleidomastoid (SCM) and the clavicle defines the needle entry point for the classic landmark approach. Ultrasound confirms the vein compresses with probe pressure (arteries do not); the IJV appears anterolateral to the carotid artery in cross-section.
- Subclavian vein (SCV): Runs posterior to the medial third of the clavicle, anterior to the subclavian artery and the anterior scalene muscle (separating vein from artery), and inferior to the first rib. It joins the IJV to form the brachiocephalic vein. Access is either infraclavicular (needle 1 cm lateral to the midpoint of the clavicle angled toward the sternal notch) or supraclavicular. The SCV offers the lowest infection rate but the highest risk of pneumothorax.
- Femoral vein: Lies immediately medial to the femoral artery at the mid-inguinal point (midway between anterior superior iliac spine and pubic symphysis). The mnemonic NAVEL (lateral to medial: Nerve, Artery, Vein, Empty space, Lymph) aids recall. Femoral access avoids thoracic complications but carries the highest catheter-related bloodstream infection risk.
Governing principles of safe insertion: always locate the vein before advancing the dilator; use real-time ultrasound guidance whenever available (reduces mechanical complications by ~50% for IJV); confirm venous position of the guidewire fluoroscopically or with transduction before dilating; apply maximal sterile barrier precautions; and confirm CVC tip position at the cavoatrial junction by post-procedure chest X-ray.
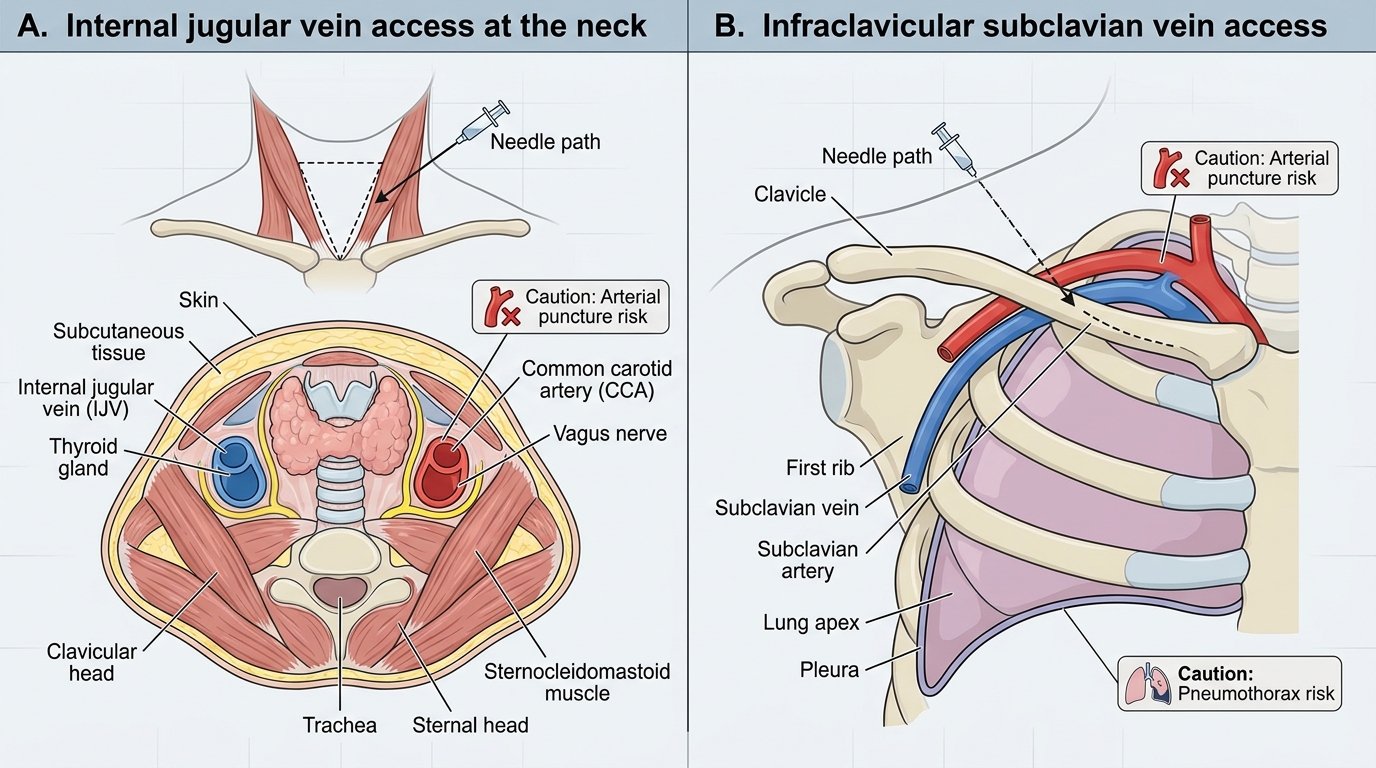
Central Venous Access Anatomy: Internal Jugular and Subclavian Veins
Procedure and Technique for Peripheral and Central Venous Access
Procedural competence demands a sequential, disciplined technique. Deviating from the standard sequence — even when under time pressure — increases the risk of malpositioning, infection, and mechanical injury. Both peripheral IV cannulation and central venous catheterisation follow a logical progression that mirrors the anatomy of the vessel being accessed. The learner who internalises the rationale behind each step — why the tourniquet goes proximal, why the guidewire must be controlled at all times, why the dilator is rotated rather than pushed — will troubleshoot failures far more effectively than one who has memorised steps without understanding them. The steps below represent the standard technique as practised in simulation and as recommended by current anaesthesiology guidelines; small variations in approach exist across institutions but the underlying anatomical and mechanical principles do not change.
Peripheral IV cannulation (AS9.1) — step-by-step:
1. Gather equipment: appropriate-gauge cannula (18–20 G routine; 14–16 G for rapid infusion), tourniquet, alcohol swab, transparent dressing, flush syringe.
2. Apply tourniquet 10–15 cm proximal to the intended site; ask the patient to open and close the fist.
3. Identify and palpate the vein. Clean the site with 70% isopropyl alcohol; allow to dry (30 seconds).
4. Stretch the skin distal to the vein with the non-dominant hand. Insert the cannula bevel-up at 15–30°, watching for a flashback of blood into the catheter hub.
5. Lower the angle to near-flat; advance the cannula 2 mm further into the vein, then slide the plastic cannula off the needle while holding skin traction. Release the tourniquet simultaneously.
6. Occlude the vein with digital pressure proximal to the tip, remove the needle, attach the injection cap or giving set, and flush with 5–10 mL normal saline to confirm patency. Secure with a transparent dressing.
Central venous catheterisation (AS9.2) — Seldinger technique for internal jugular:
1. Position: head-down (Trendelenburg, 15°) to engorge the vein and reduce air embolism risk; head turned 45° away from the site.
2. Apply maximal sterile barrier precautions: cap, mask, sterile gown, gloves, full body drape.
3. Cleanse skin with chlorhexidine–alcohol (2% chlorhexidine in 70% isopropyl); allow 30 seconds to dry.
4. Identify the triangle at the apex of SCM heads (or use ultrasound — probe transverse to neck, identify compressible IJV anterolateral to non-compressible carotid).
5. Anaesthetise the skin and deep track with 1% lidocaine. Insert the finder needle (21–22 G on a syringe) at 45–60° toward the ipsilateral nipple (landmark approach) or at 90° to skin directly over the vein (ultrasound approach), aspirating continuously until free dark-red venous blood flows.
6. Advance the access needle (18 G) on a 5 mL syringe along the same track; confirm venous blood.
7. Remove the syringe, occluding the hub with a thumb; introduce the J-tip guidewire through the needle, soft end first. It should advance without resistance. Monitor the ECG for ectopics (wire has reached the right heart — withdraw slightly).
8. Remove the needle over the wire, maintaining control of the wire at all times. Nick the skin with a No. 11 blade at the wire entry point. Advance the tissue dilator over the wire with a rotating motion, then remove it.
9. Thread the CVC over the wire (IJ: 15–17 cm depth from the skin; SCV: 12–15 cm), remove the wire, and confirm free aspiration of blood from all lumens. Flush each lumen with saline. Suture and apply sterile dressing.
10. Confirm tip position: post-procedure chest X-ray (tip should lie at the cavoatrial junction, not in the right atrium or subclavian vein).
Troubleshooting in simulation: if the wire does not advance, suspect the needle tip is not fully in the vein lumen — partially withdraw and reposition. If pulsatile bright-red blood appears at any stage, arterial puncture has occurred — remove the needle, apply firm pressure for 5–10 minutes (or longer if coagulopathic), and reattempt at a compressible site.
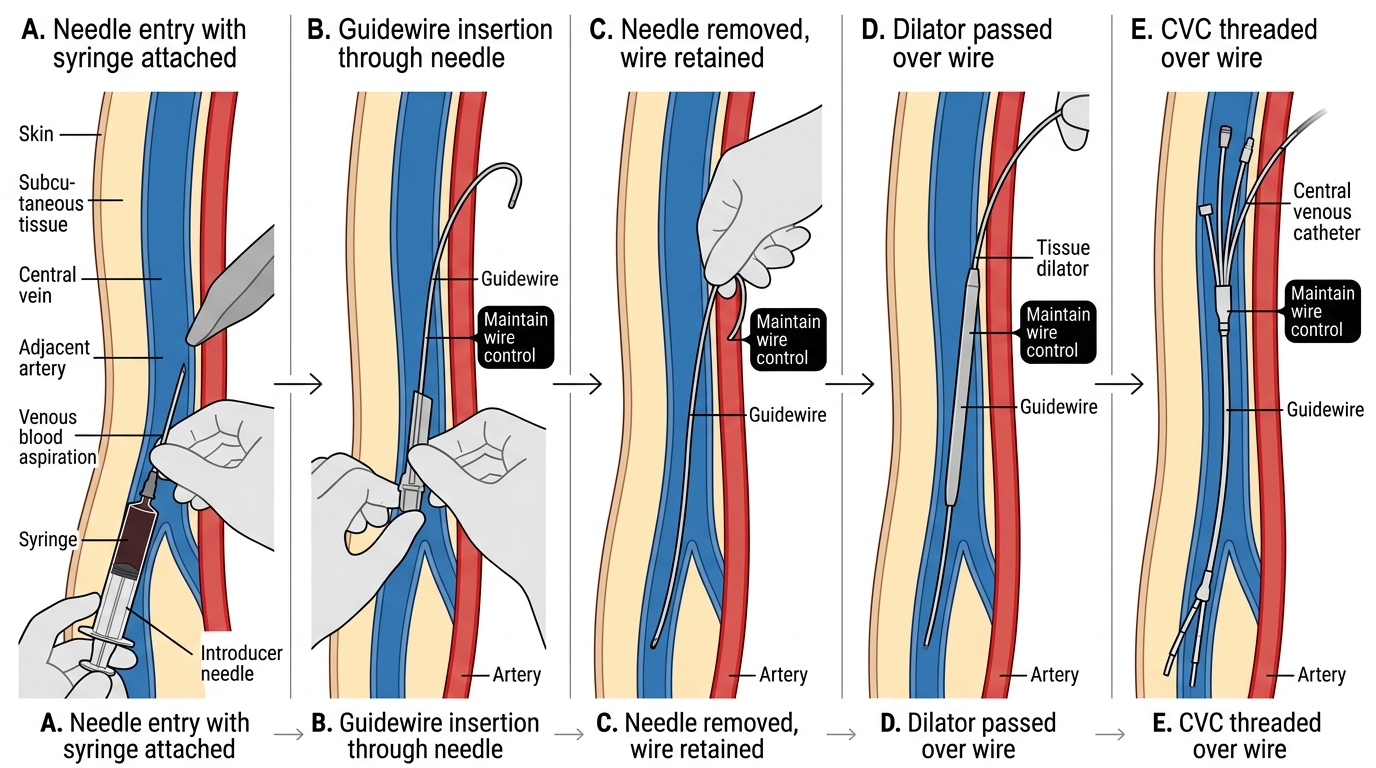
Stepwise Seldinger Technique for Central Venous Access