Page 13 of 23
IM11.19-20 | Diabetes Patient Skills and Counselling — SDL Guide
Learning Objectives
- Demonstrate and counsel patients on the correct technique to administer insulin, including site selection, injection technique, device types, rotation, and storage
- Demonstrate and counsel patients on the correct technique for self-monitoring of blood glucose (SMBG), including timing of tests, recording results, and interpreting patterns
INSTRUCTIONS
Insulin injection technique and self-monitoring of blood glucose are practical skills requiring both demonstration and supervised practice. This skills module teaches the theoretical basis, correct technique, common errors, and patient counselling for both procedures — essential competencies for every final-year student.
References
- Harrison's Principles of Internal Medicine, 21st ed., Ch. 406 — Insulin Therapy and Self-Monitoring (textbook)
- API Textbook of Medicine, 10th ed., Ch. 51 — Diabetes Mellitus: Self-Management Education (textbook)
- American Diabetes Association — Standards of Medical Care 2024, Section 7: Diabetes Technology (guideline)
- International Diabetes Federation — Guideline on Self-Monitoring of Blood Glucose in Non-Insulin-Treated Type 2 Diabetes, 2009 (guideline)
Version 1.0 | NMC CBUC 2024
CLINICAL SCENARIO
You have just prescribed insulin glargine 10 units at bedtime for Saraswathi, a 58-year-old teacher newly started on insulin for T2DM with HbA1c 9.8%. She looks at the pen device with anxiety: 'Doctor, I am scared of needles. Where exactly do I inject? How deep? What if I inject into a blood vessel? My friend said she injects in her thigh and it does not work — why? Do I need to put it in the fridge? What if I travel and there is no fridge?' One week later she returns: her fasting glucose has barely moved — from 198 to 182 mg/dL. You look at her injection sites and find a large firm lump the size of a walnut on her right abdomen. She has been injecting in the same spot every night. Now you understand exactly why her insulin is failing. Insulin technique is not a minor add-on to the prescription — it is the difference between insulin working and insulin failing. The same logic applies to self-monitoring: a patient who tests at the wrong time or misreads the result is making glycaemic decisions on incorrect data. These are not nursing tasks — they are clinical skills that the prescribing doctor must master, demonstrate, and teach.
WHY THIS MATTERS
The NMC competencies IM11.19 (insulin administration technique and counselling) and IM11.20 (self-monitoring of blood glucose technique and counselling) are KH-level competencies that require demonstration — you must be able to show the patient how to do these correctly, not just describe them verbally. In clinical practice, poorly taught insulin technique is one of the most underappreciated causes of glycaemic failure in T2DM and T1DM, and suboptimal SMBG practice leaves patients making incorrect dose adjustment decisions. In postgraduate entrance examinations, questions on insulin types, injection sites, lipohypertrophy, and SMBG timing are among the most reliably high-scoring topics from the diabetes section.
RECALL
Recall the classification of insulin types before proceeding. Rapid-acting analogues (lispro, aspart, glulisine): onset 10–15 minutes, peak 1–2 hours, duration 3–5 hours — given immediately before meals. Short-acting (regular/soluble): onset 30 minutes, peak 2–4 hours, duration 6–8 hours — given 30 minutes before meals. Intermediate-acting (NPH/isophane): onset 1–2 hours, peak 4–8 hours, duration 12–18 hours. Long-acting basal analogues (glargine: duration ~24 hours; detemir: ~18–22 hours; degludec: ~42 hours — given once or twice daily, no pronounced peak). Premixed (e.g., 30/70: 30% regular + 70% NPH): combine immediate mealtime coverage with extended effect. The absorption rate of insulin is influenced by injection site, depth, technique, and lipohypertrophy — the core practical issues covered in this module.
Insulin Injection Technique: Principles and Procedure
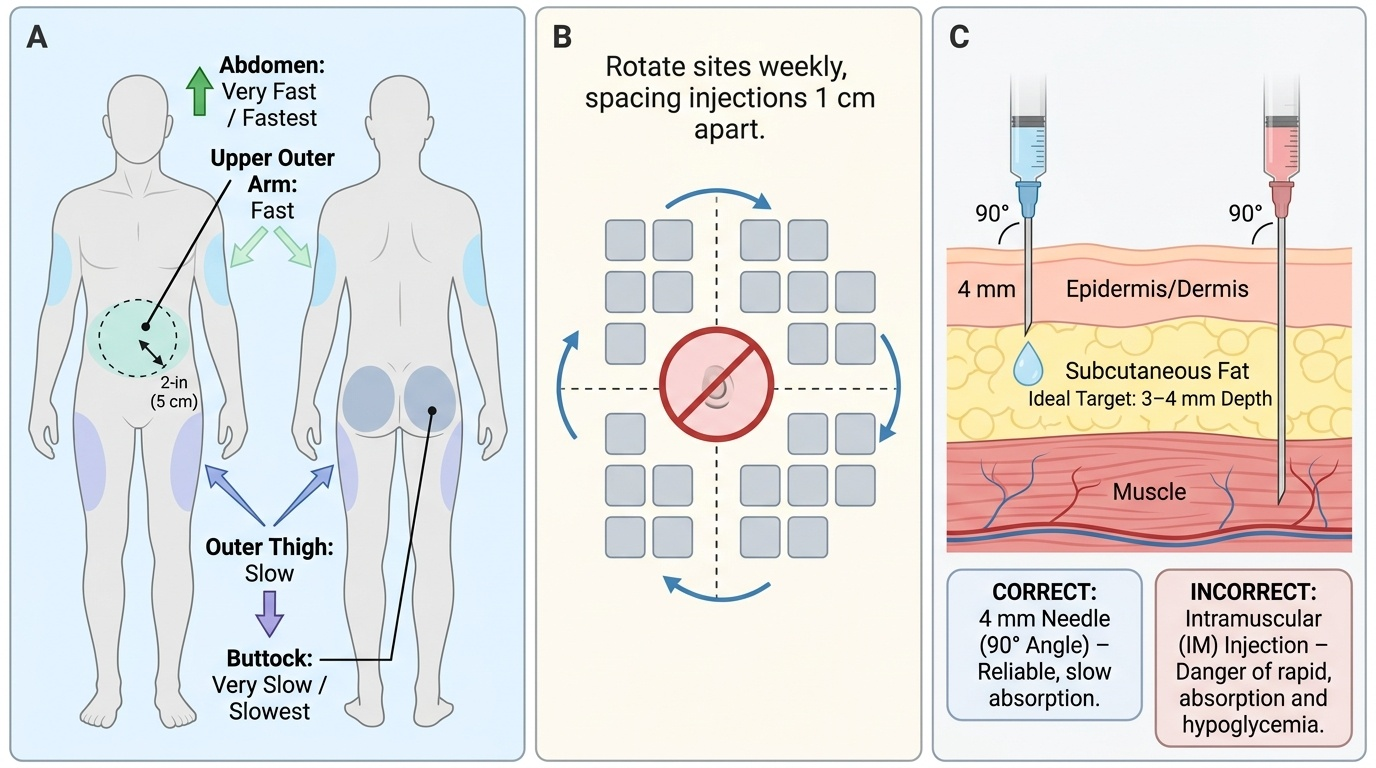
Correct insulin injection technique is the foundation of effective insulin therapy. The goal of every insulin injection is to deposit insulin reproducibly into the subcutaneous tissue (SC) — the layer of adipose tissue between the skin and the underlying muscle. The dermis is too shallow: an intradermal injection causes visible skin-level blebs, intense local pain, unpredictable absorption, and skin reactions. The muscle is too deep: an intramuscular (IM) injection causes faster, more erratic insulin absorption (due to higher vascularity and blood flow in muscle), an accelerated pharmacokinetic profile that does not match the intended action time of the insulin, and increased hypoglycaemia risk. The ideal target is 3–4 mm below the skin surface for most adults, and this determines everything about needle selection, injection angle, and whether a skinfold is needed. Understanding this anatomical target first makes every subsequent technical step logical rather than arbitrary. The technique also has to be reliable, reproducible, and safe enough to be performed by the patient alone, at home, multiple times each day — which places a premium on simplicity and precision in every step of the procedure.
Provided image
Insulin Delivery Devices:
Three device types are in common use:
- Insulin pen (most common): A reusable pen device accepting cartridges, or a disposable pre-filled pen. Doses are dialled up in 1-unit increments. Pen needles of 4–6 mm are recommended for most adults (4 mm is appropriate for most adults, including those who are overweight — studies show SC tissue depth averages 2.4 mm, making 4 mm adequate without a skinfold); 8 mm needles require a 45° angle or pinched skinfold to avoid intramuscular injection.
- Insulin syringe: The traditional delivery method. Uses a 1 mL syringe with U-100 insulin (100 units/mL). Appropriate for patients who cannot afford pen devices or when using mixed preparations from vials. Needle length 8–13 mm; use a skinfold and 45° angle.
- Insulin pump (CSII — continuous subcutaneous insulin infusion): An external device delivering basal insulin continuously with patient-programmed meal boluses via an indwelling subcutaneous cannula. Used in T1DM with poor control or frequent hypoglycaemia; requires intensive training and monitoring.
Injection Sites and Absorption:
The rate of insulin absorption varies by anatomical site, due to differences in subcutaneous blood flow and tissue depth:
1. Abdomen — fastest absorption (high vascularity); preferred site for rapid-acting insulin given before meals; avoid a 5 cm radius around the navel (thin SC tissue, umbilical vessels)
2. Outer thigh — intermediate absorption; acceptable for long-acting basal insulin (slower, more stable absorption profile is desirable)
3. Outer upper arm — intermediate absorption; convenient but requires assistance for accurate SC injection
4. Upper outer buttock/hip — slowest absorption; sometimes used for basal insulin
Step-by-step injection technique:
1. Wash hands thoroughly with soap and water or alcohol gel.
2. Check the insulin: Confirm the type and expiry date. For cloudy insulins (NPH, premixed), gently roll the pen between the palms 10 times and invert 10 times to re-suspend the suspension — do NOT shake vigorously (creates bubbles).
3. Attach a new pen needle: Remove the outer and inner needle cap. Use a new needle for every injection — reused needles become blunted, bent, and barbed, causing pain and lipohypertrophy. A new 4 mm or 6 mm pen needle is recommended.
4. Prime the pen (airshot): Hold the pen needle upward, dial 2 units, press the button until a droplet appears at the needle tip. This removes air from the cartridge and confirms the needle is functioning.
5. Dial the dose: Turn the dose dial to the prescribed number of units. Verify the dose window clearly shows the correct amount.
6. Select the injection site within the recommended rotation pattern (see below).
7. Clean the skin: For most patients in routine settings, cleaning with an alcohol swab is recommended and then waiting for the alcohol to dry. (Note: some guidelines now state that if skin is clean, alcohol is optional; follow local practice.)
8. For 4 mm needles in most adults: Insert the needle perpendicular (90°) to the skin. No skinfold is required for a 4 mm needle in most adults. For 8 mm needles: pinch a skinfold (thumb and index finger only — not a large pinch that includes muscle) and insert at 45°.
9. Inject slowly: Press the injection button completely and hold for 10 seconds before withdrawing the needle. This is critical — premature withdrawal before the full 10 seconds loses dose from the injection site.
10. Release the skinfold (if used) only after withdrawing the needle.
11. Dispose of the needle immediately into a sharps container. Never recap a used needle.
Site Rotation — Preventing Lipohypertrophy:
Systematic rotation is essential. Lipohypertrophy — the formation of firm, painless subcutaneous fatty nodules at overused injection sites (as found in Saraswathi's abdomen in the hook) — results from the local anabolic effect of insulin stimulating lipogenesis at the same site repeatedly. Lipohypertrophic tissue has reduced blood flow and erratic insulin absorption, causing unpredictable glycaemia. The internationally recommended rotation strategy uses a grid approach within one anatomical region: divide the abdomen into a grid of zones; move one 'square' with each injection; complete the whole grid before returning to the start. Rotate between zones (abdomen for mealtime insulin, thigh/buttock for basal), and also rotate between body sides (left vs right).
SELF-CHECK
A patient on insulin glargine 20 units at bedtime reports good fasting glucose levels (90–110 mg/dL) in the morning but erratic daytime control — some days very high (240 mg/dL), some days very low (55 mg/dL) with no change in diet or mealtime insulin. Examination reveals a large lipohypertrophic nodule on the right abdomen where she injects every night. The erratic control is MOST LIKELY because:
A. Insulin glargine has a pronounced peak that causes afternoon hypoglycaemia
B. The patient is injecting into muscle on some occasions, causing faster absorption
C. Lipohypertrophic tissue causes erratic insulin absorption due to reduced vascularity
D. The patient needs the dose increased further to achieve consistent control
Reveal Answer
Answer: C. Lipohypertrophic tissue causes erratic insulin absorption due to reduced vascularity
Lipohypertrophy causes erratic insulin absorption because the fatty nodular tissue has reduced vascularity and abnormal adipocyte function. On some injections, insulin is deposited in healthy SC tissue adjacent to the nodule (faster absorption → lower glucose); on others, it is deposited within the lipohypertrophic nodule (delayed, blunted absorption → higher glucose). This explains the apparently random swings. The solution is to avoid the lipohypertrophic area and implement strict site rotation. Insulin glargine has no pronounced peak (that is its key characteristic as a basal insulin). Increasing the dose would not address the underlying absorption problem and could worsen hypoglycaemia.
Insulin Storage, Travel, and Common Errors
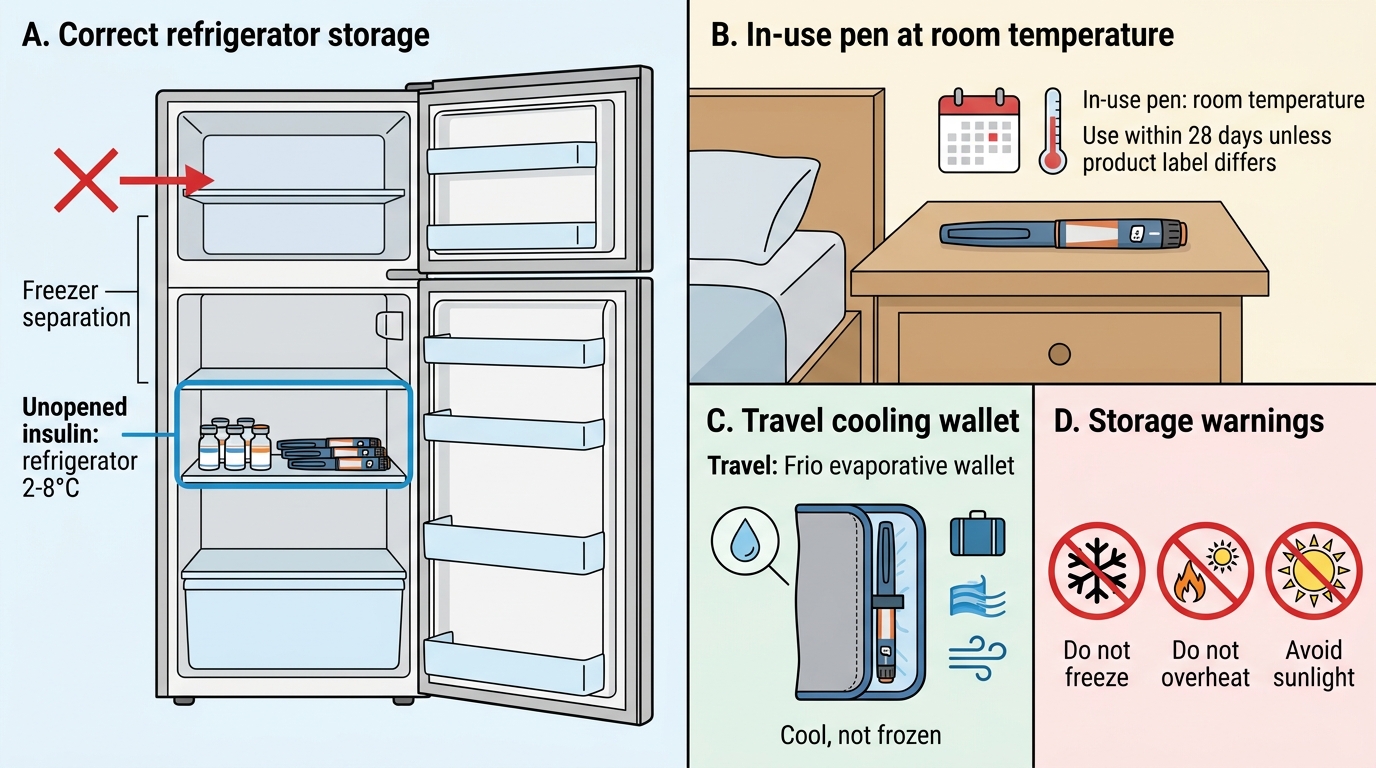
Proper insulin storage and handling is a critical but often-neglected component of insulin counselling. Insulin that is incorrectly stored or administered loses biological potency — the tertiary protein structure of insulin is sensitive to both heat and mechanical disruption — leading to hyperglycaemia that cannot be corrected by dose adjustment alone because the injected units are pharmacologically inactive. In India, this is a practically important issue: ambient temperatures in Chennai, Delhi, or Ahmedabad in summer routinely exceed 37°C, and insulin left in a car, a bag exposed to direct sunlight, or an unventilated room for even a few hours can degrade significantly. Power outages affecting domestic refrigerators are also common in many regions. Yet patients are rarely counselled on these storage nuances at the time of insulin initiation — the consequence is a patient who buys an expensive analogue insulin, handles it incorrectly within the first week, and concludes that 'insulin is not working' when in fact the insulin has been heat-damaged. The same practical issue applies to travel — international or domestic — where the cold chain is disrupted. Counselling patients on these practical aspects is therefore as clinically important as the injection technique itself, and must be part of the initial insulin education session.
Insulin Storage Guidelines:
All insulin types must be protected from two key damaging conditions: extreme heat (above 37°C — denaturing the protein structure) and freezing (0°C or below — forming ice crystals that destroy the protein). The recommended storage conditions are:
- Unopened insulin vials/pens: Refrigerate at 2–8°C (standard refrigerator setting). Do NOT place insulin in the freezer compartment or against the refrigerator wall (risk of freezing). Protect from direct light. Validity: up to the printed expiry date.
- In-use (opened) insulin: Can be stored at room temperature (up to 25–30°C — specific limit varies by product: glargine 28 days at room temperature; detemir 42 days; NPH 28 days; most pen devices specify 28 days once started). Storage at room temperature reduces the discomfort of injecting cold insulin and the stinging sensation that cold insulin causes at the injection site.
- Emergency storage: If refrigeration is not available (common in rural India, during travel, or power outages), insulin can safely be stored at temperatures below 30°C for the manufacturer-specified period. Use a cool, dark location (not exposed to direct sunlight); an insulated pouch, a clay pot, or a Frio® evaporative cooling wallet (a fabric wallet activated by water that maintains 18–26°C through evaporation) is effective for travel and hot climate storage.
Travel Counselling:
Patients on insulin who travel must carry:
1. Insulin supplies in carry-on baggage (aircraft cargo holds may freeze at altitude)
2. A cool pouch or Frio wallet for temperature maintenance
3. Twice the amount of insulin needed (in case of loss or damage)
4. A letter from the treating physician confirming the diagnosis and listing insulin and syringes/pen devices (required by airport security in some countries)
5. Knowledge of the 15-15 rule for hypoglycaemia and emergency glucagon kit if on intensive insulin regimen
When crossing time zones: as a rule of thumb, for eastward travel (day shortens), slightly reduce the insulin dose; for westward travel (day lengthens), slightly increase. A practical guideline: for each 3 time zones crossed, adjust insulin timing by 1 hour.
Common Injection Errors and Their Consequences:
| Error | Consequence | Correction |
|---|---|---|
| Injecting cold insulin | Pain, stinging, erratic absorption | Room temperature insulin; Frio wallet |
| Reusing needles | Pain, lipohypertrophy, infection risk | New needle every injection |
| Not rotating sites | Lipohypertrophy, erratic absorption | Systematic grid rotation |
| Not priming the pen | Air bubble, dose delivery error | 2-unit airshot before each injection |
| Withdrawing needle too early (<10 sec) | Dose loss at skin surface | Hold 10 seconds after full button press |
| Injecting at 90° with 8 mm needle (no skinfold) | Intramuscular injection, faster absorption | Use skinfold or switch to 4 mm needle |
| Mixing rapid and long-acting in same syringe | Variable PK depending on ratio | Separate injections or use pre-mixed preparations only |
Insulin Mixing Rules (for vial-based therapy):
If mixing insulin types in a syringe (now less common with pen devices), always follow: draw clear (short or rapid) insulin first, then cloudy (intermediate) insulin. The mnemonic is 'clear before cloudy.' Reason: injecting cloudy NPH into a vial of clear regular insulin contaminates the clear vial with protamine and zinc (which extend the NPH suspension), altering its pharmacokinetics. Basal analogues (glargine, detemir) should NEVER be mixed with other insulin types — their pH-based prolonged action mechanism is disrupted by mixing.
Insulin Storage Guide
Self-Monitoring of Blood Glucose: Technique and Counselling
Self-monitoring of blood glucose (SMBG) is the practice of patients measuring their own blood glucose at home using a glucometer and fingerstick. When performed correctly and at the right times, SMBG empowers patients to understand the impact of meals, physical activity, stress, and medications on their glucose, to detect hypoglycaemia early, and to titrate insulin doses based on patterns. When performed incorrectly, or when results are not acted upon, SMBG wastes resources and may create false reassurance. The clinician's role is to teach the correct technique, define a testing schedule tailored to the patient's regimen, and educate the patient in interpreting and responding to results.
Who Should Use SMBG and How Often:
SMBG is most valuable in patients on insulin (where it directly guides dose adjustment) and those on sulphonylureas (where hypoglycaemia is a real risk). For T2DM patients on diet/exercise alone or on metformin (low intrinsic hypoglycaemia risk), routine SMBG has less utility unless the patient is using it to monitor dietary impact or is newly diagnosed and learning their glucose pattern.
Recommended SMBG frequency:
- T1DM or T2DM on multiple daily injections (MDI): 4–7 times daily — before each meal, 2 hours after meals, at bedtime, and occasionally at 3 am (to detect nocturnal hypoglycaemia)
- T2DM on basal insulin: Fasting glucose daily (for basal insulin titration); 2-hour post-meal on 2–3 days/week
- T2DM on oral agents only: Fasting + 2-hour post-meal on 2–3 days/week for pattern assessment; reduce frequency once stable
- During illness, after exercise, before driving, before starting new medication: Ad hoc testing regardless of usual schedule
SMBG Technique (Correct Method):
The technique for SMBG is identical to the capillary blood glucose test described in the Diagnostics SDL, and the patient must be taught all the same steps:
1. Wash hands with soap and water (clean, dry hands — residual food or fruit juice on fingers causes falsely elevated readings; this is the most common source of patient-performed SMBG error)
2. Check glucometer: correct code or auto-coded, non-expired test strips, battery status
3. Use a lancet device with a fresh lancet — adjust penetration depth to skin thickness (elderly patients with thin skin need shallow setting; calloused hands need deeper)
4. Use lateral fingertip (less painful than pad); vary fingers and sides
5. After lancing: express blood gently with proximal pressure — do not squeeze the fingertip (dilutes with tissue fluid)
6. Apply blood to the test strip as directed by the device
7. Read the result within the machine's specified window and record in the logbook
8. Document: time of test, result in mg/dL, whether fasting or postprandial (and which meal), any relevant notes (exercise, illness, missed meal, new food)
Interpreting and Responding to SMBG Results:
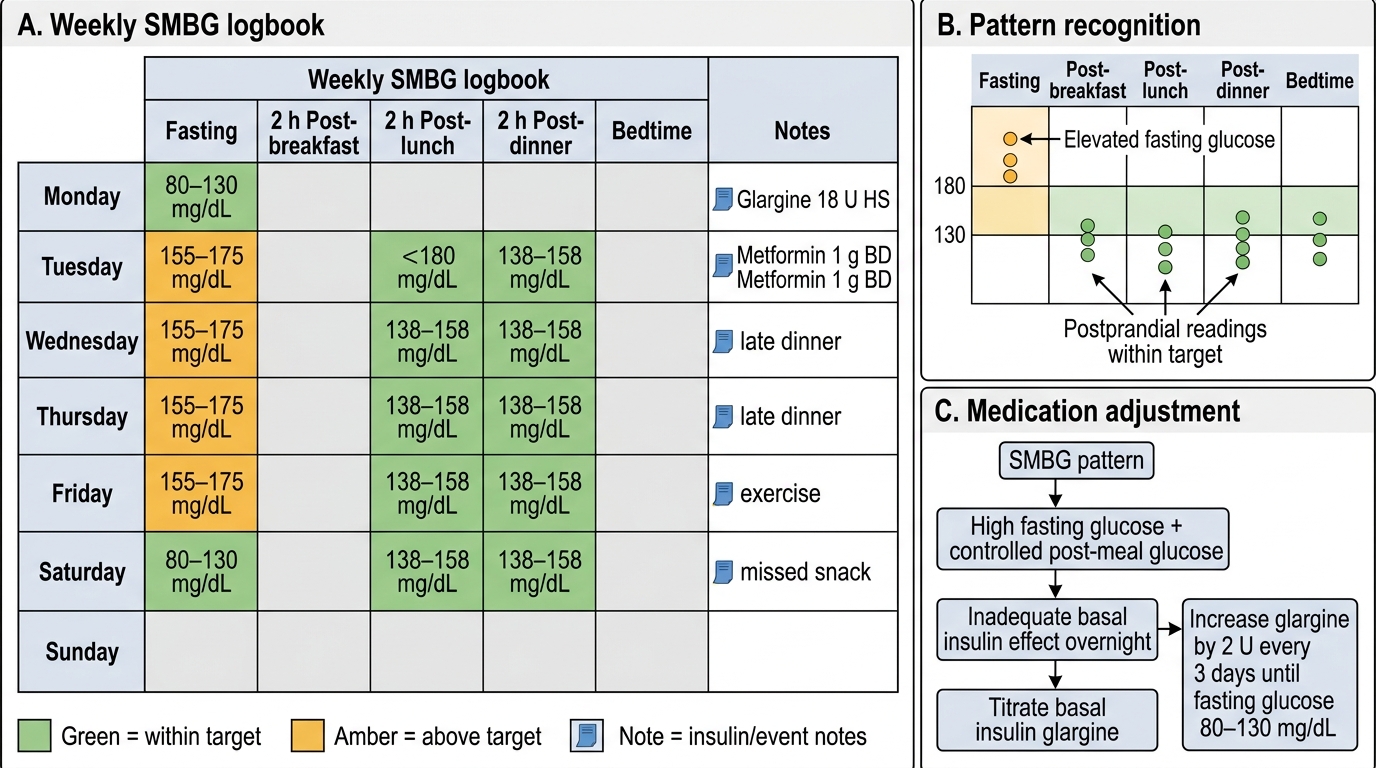
A single glucose reading is much less useful than a pattern. Teach patients to recognise and report:
- Consistent fasting glucose >130 mg/dL → may need basal insulin dose increase (titrate by 2 units every 3 days if on glargine/NPH)
- Consistent postprandial spikes >180 mg/dL after a specific meal → adjust carbohydrate content of that meal or adjust pre-meal rapid-acting insulin dose
- Any glucose <70 mg/dL → record time, activity, last meal, last insulin dose; apply 15–15 rule; report next visit
- Any glucose <54 mg/dL → serious hypoglycaemia; immediate treatment; urgent review of regimen
- Glucose >300 mg/dL with ketone-positive urine or vomiting → emergency care
Logbook/Diary Keeping:
Teach patients to record all results in a structured logbook (paper or digital app). The logbook should be brought to every clinic visit. A pattern of SMBG results over 2 weeks is far more informative to the physician than a single HbA1c. Modern glucometers can download and display patterns on a computer — use this capability when available.
SMBG Logbook Pattern and Basal Insulin Titration
SELF-CHECK
A T2DM patient on basal insulin glargine 18 units at bedtime and metformin 1 g twice daily consistently records fasting glucose of 155–175 mg/dL on SMBG. His 2-hour post-lunch and post-dinner glucoses are 138–158 mg/dL (within target). His HbA1c at the last visit was 7.9%. Based on this SMBG pattern, what is the MOST appropriate medication adjustment?
A. Add a DPP-4 inhibitor to control postprandial glucose — the fasting readings are fine
B. Increase glargine by 2 units every 3 days until fasting glucose is consistently 80–130 mg/dL
C. Switch to premixed insulin 30/70 twice daily to better cover meals
D. Add a sulphonylurea to improve overall glycaemic control
Reveal Answer
Answer: B. Increase glargine by 2 units every 3 days until fasting glucose is consistently 80–130 mg/dL
The SMBG pattern shows elevated fasting glucose (155–175 mg/dL — above target of 80–130 mg/dL) with near-normal postprandial readings. This pattern specifically reflects inadequate basal insulin suppression of overnight and early-morning hepatic glucose output — i.e., the basal insulin dose is insufficient. The correct adjustment is to titrate basal insulin glargine upward by 2 units every 3 days until the fasting glucose target is consistently achieved (80–130 mg/dL). DPP-4 inhibitor or sulphonylurea would address postprandial glucose — which is not the problem here. Switching to premixed insulin is unnecessarily complex when the postprandial control is already adequate.