Page 2 of 16
SU14.{1,4} | Asepsis, Sterilization and Surgical Field Practice — SDL Guide (Part 2)
Confirming Sterility and Monitoring the Process
A sterilizer that runs is not the same as a load that is sterile, so every cycle must be monitored and the results interpreted before instruments are used. Monitoring uses three complementary indicators, and you should be able to read each. Physical (mechanical) indicators are the machine's own gauges and printouts of temperature, pressure and time; if the cycle never reached 121 degrees C at 15 psi for the full 15 minutes, the load is not sterile regardless of any colour change. Chemical indicators change colour when exposed to the sterilizing conditions: external tape merely confirms a pack has been processed (not that it is sterile), while internal integrating indicators respond to the combination of time, temperature and steam. The Bowie-Dick test specifically checks a pre-vacuum steam sterilizer for complete air removal and adequate steam penetration. Biological indicators, containing spores of Geobacillus stearothermophilus, are the gold standard because they directly demonstrate that the cycle actually killed the most resistant test organism. The safe rule for interpretation is conjunctive: a load is released as sterile only when the physical readings are correct, the internal chemical indicator has changed, and (per protocol) the biological indicator shows no growth. Any single failed indicator means the load is treated as non-sterile and reprocessed.
- Physical/mechanical: gauges/printout of temperature, pressure, time — the cycle parameters.
- Chemical: tape (processed, not sterile) and internal integrators; Bowie-Dick for air removal/steam penetration.
- Biological: Geobacillus stearothermophilus spores — the gold standard proof the cycle killed spores.
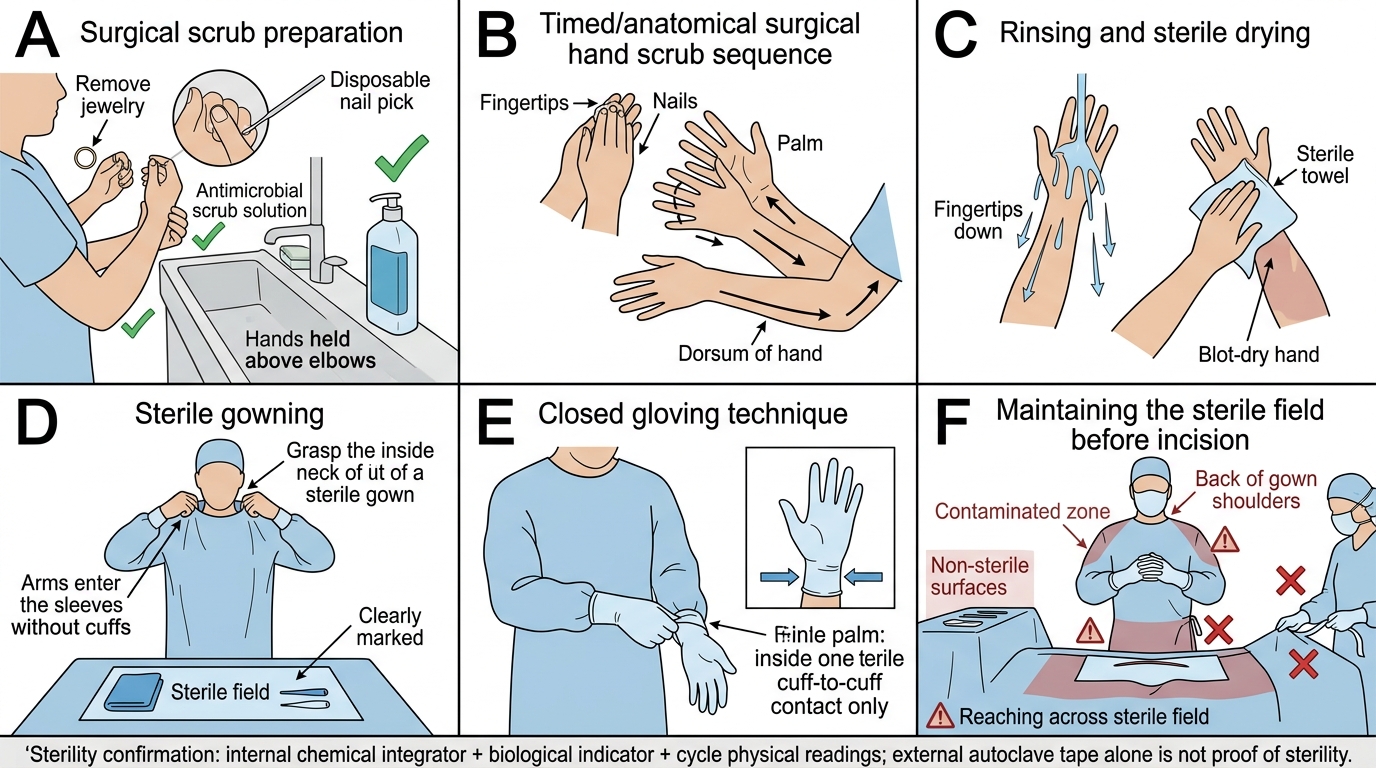
Putting Asepsis into Practice in the Simulated Theatre
Knowing the principles is necessary but not sufficient — the competency is demonstrated by performing the routine cleanly under supervision, which is exactly what the simulated theatre is for. The sequence is practised until it is automatic and contamination-free. Begin with surgical hand antisepsis: remove jewellery, clean under the nails, then perform a timed scrub with an antiseptic (chlorhexidine or povidone-iodine) or an alcohol-based hand rub, keeping the hands above the elbows so water runs from clean to less-clean, and drying with a sterile towel. Don the sterile gown touching only its inner surface, then glove using the closed technique so bare skin never contacts the glove's outer surface. Maintaining the sterile field is then a set of habits: only the front of the gown from chest to waist and the sleeves to just above the elbow are sterile; hands stay above waist level and in view; you never turn your back on or reach across the field; gowned staff face each other and pass with care; and any glove perforation or suspected contamination is corrected at once by re-gloving. Finally, basic suturing is rehearsed on a simulation pad — loading the needle correctly, an atraumatic instrument tie, and simple interrupted sutures — all while preserving asepsis. Repeated supervised simulation builds the muscle memory and the discipline that keeps real patients safe.
⚑ AI image — pending faculty review (auto-QA score 7/10; best of 3 attempts)
Surgical Scrub, Gowning, Closed Gloving and Sterile Field Discipline
CLINICAL PEARL
External autoclave tape that has changed colour tells you only that the pack has been THROUGH a sterilizer — it does NOT prove the contents are sterile. Confirm sterility from the internal chemical integrator and, per protocol, the biological indicator, together with the cycle's physical readings. Likewise, a flexible endoscope is a semi-critical item: it needs at least high-level disinfection, not merely a wipe-down — never downgrade an item below its Spaulding category.
Check Your Understanding
Consolidate the skill by walking the whole chain from item to incision. Start with the Spaulding decision: classify the item (critical, semi-critical or non-critical) to fix the required level — sterilization, high-level disinfection, or low/intermediate disinfection. Choose the method the item can tolerate: moist heat in the autoclave at 121 degrees C, 15 psi for 15 minutes for stable instruments; dry heat for glassware and powders; chemical agents such as ethylene oxide or glutaraldehyde for heat-sensitive equipment. Confirm the cycle worked using physical, chemical (including Bowie-Dick) and biological indicators, releasing a load only when all agree. Then build and protect the sterile field by scrubbing, gowning, closed-gloving, prepping skin from the centre outwards, draping, and observing field discipline. Self-test on four links: can you assign any given device to its Spaulding category and required level; can you state the autoclave parameters and when dry heat or chemical methods are preferred; can you say which indicator actually proves spores were killed; and can you list the rules that keep a sterile field intact? The questions below check exactly these.
SELF-CHECK
Which indicator is the GOLD STANDARD for confirming that an autoclave cycle has actually achieved sterilization?
A. External autoclave tape colour change
B. The machine's temperature and pressure printout
C. A biological indicator containing Geobacillus stearothermophilus spores
D. The Bowie-Dick test pack
Reveal Answer
Answer: C. A biological indicator containing Geobacillus stearothermophilus spores
A biological indicator with Geobacillus stearothermophilus spores directly proves the cycle killed the most heat-resistant test organism, making it the gold standard. External tape only shows the pack was processed; the printout confirms parameters; the Bowie-Dick test checks air removal and steam penetration, not spore kill.