Page 4 of 16
SU14.2-3 | Surgical Approaches, Instruments and Wound Closure — SDL Guide
Learning Objectives
- Describe the principles of surgical approaches and incisions, including placement along Langer's lines, and identify common surgical instruments and their correct use (SU14.2).
- Describe the materials and methods used for surgical wound closure and anastomosis — suture classification, needle types, knots and closure techniques (SU14.3).
- Select an appropriate suture, needle and closure technique for a given tissue, and demonstrate basic instrument handling and interrupted suturing in a simulated environment (SU14.2, SU14.3).
INSTRUCTIONS
Almost every operation comes down to the same handful of mechanical skills: open the right place in the right way, hold and cut tissue safely with the correct instrument, and close the wound so it heals with the least scar and the lowest risk of breakdown or infection. This module introduces the language of incisions and surgical instruments, the materials and methods of wound closure and anastomosis, and the reasoning that lets you match the suture, needle and technique to the tissue in front of you. You will then rehearse instrument handling and basic suturing in simulation before doing any of it on a patient.
References
- Bailey & Love's Short Practice of Surgery, Surgical Instruments, Sutures and Wound Closure (textbook)
- SRB's Manual of Surgery, Sutures, Needles, Knots and Surgical Instruments (textbook)
- Sabiston Textbook of Surgery, Wound Healing and Surgical Technique (textbook)
Version 2.0 | NMC CBUC 2024
CLINICAL SCENARIO
A surgeon and an assistant are closing a long laparotomy wound at the end of a difficult case. The assistant reaches for whatever suture is nearest and tightens each throw as hard as possible, reasoning that a tight closure must be a safe one. Three days later the wound edges are dusky and beginning to gape: the sutures, pulled too tight, have strangled the blood supply to the very tissue they were meant to hold. The same wound, closed with the right material at the right tension, would have healed cleanly. Surgery is full of moments like this, where the instrument you pick up, the suture you choose, and the way you handle tissue decide whether a wound heals or fails. None of it is improvised — every choice follows principles you can learn now.
WHY THIS MATTERS
Choosing where to cut, what to cut with, and how to close is the everyday mechanical core of surgery, and it is examined directly in your basic surgical skills assessment. Get the incision right and you gain safe access while leaving a fine, well-healing scar; get the instrument right and you handle tissue gently and bleed less; get the closure right and the wound holds without strangling its own blood supply or harbouring infection. As a clinician you will assist at and eventually perform these steps, select sutures and instruments from a trolley, and judge whether a wound is closing well. The reasoning also transfers far beyond the operating theatre — suturing a laceration in casualty uses exactly the same materials and knots. Mastering the principles and the hand skills now, in simulation, is what makes you safe and useful at the table.
RECALL
Recall the anatomy and biology that underpin these skills. From AN, recall that the skin is anchored by dermal collagen whose predominant orientation produces lines of natural skin tension — Langer's lines — and that an incision crossing the body wall passes through skin, subcutaneous fat, fascia, muscle and (in the abdomen) peritoneum, each a distinct layer to respect and to repair. From your wound-healing learning, recall that healing proceeds through inflammatory, proliferative and remodelling phases, that a wound regains strength only slowly (so the suture must support it long enough), and that excess tension, ischaemia, infection and a foreign-body load all impair healing. From su11-asepsis, recall that every instrument touched and every suture passed must stay within the sterile field — good technique never sacrifices asepsis for speed.
Choosing the Incision and the Right Instrument for the Step
The indication for thinking carefully about approach, instruments and closure is universal: it applies to every operation and every wound you will ever close, because these mechanical choices directly determine access, bleeding, healing and the final scar. A surgical approach is the planned route to the target structure, and the incision is its first step — it must give adequate exposure, respect the underlying anatomy, be extensible if more access is needed, and heal soundly. The right surgical instrument for each step lets you cut, hold, dissect, achieve haemostasis and retract tissue with precision and minimal trauma; the wrong instrument, or the right one used badly, bruises tissue, tears vessels and slows healing. Wound closure then re-approximates the divided layers so they heal, and the materials and method chosen decide how well that happens. The logic that ties the module together runs in this order: the anatomy and Langer's lines tell you where and how to incise; the instrument set tells you what to use for each manoeuvre; the suture, needle and closure technique tell you how to put the wound back together; reading the tissue tells you which of those choices fits the situation; and supervised simulation builds the hand skills to do it safely. Each later step depends on getting the earlier ones right.
Incisions, Langer's Lines and the Anatomy of Access
Where and how you cut is governed by anatomy, not convenience. The guiding principle is to place an elective incision parallel to Langer's lines — the lines of least skin tension, which run roughly perpendicular to the long axis of the underlying muscles. An incision made along these lines gapes less, is closed under less tension, and heals into a finer, flatter scar; an incision made across them is pulled open by skin tension and tends to widen and to form a worse scar or keloid. Beyond the skin, a good incision provides adequate exposure of the target, can be extended if the operation demands more access, follows or respects the lines of important nerves and vessels to avoid injuring them, and divides muscle along its fibres or between named muscles where possible to preserve function. The body wall is opened and later repaired in anatomical layers — skin, subcutaneous tissue, fascia, muscle and (in the abdomen) peritoneum — and each layer is handled and closed on its own terms. Common worked examples make the principle concrete: a midline laparotomy uses the relatively avascular linea alba for rapid, extensible access; a transverse or Pfannenstiel incision lies closer to Langer's lines and gives a cosmetically better scar; a gridiron/McBurney incision for appendicectomy splits the abdominal-wall muscles in the line of their fibres to spare them. Choosing the incision is therefore an anatomical decision that trades exposure, speed, muscle preservation and cosmesis against one another for the operation in hand.
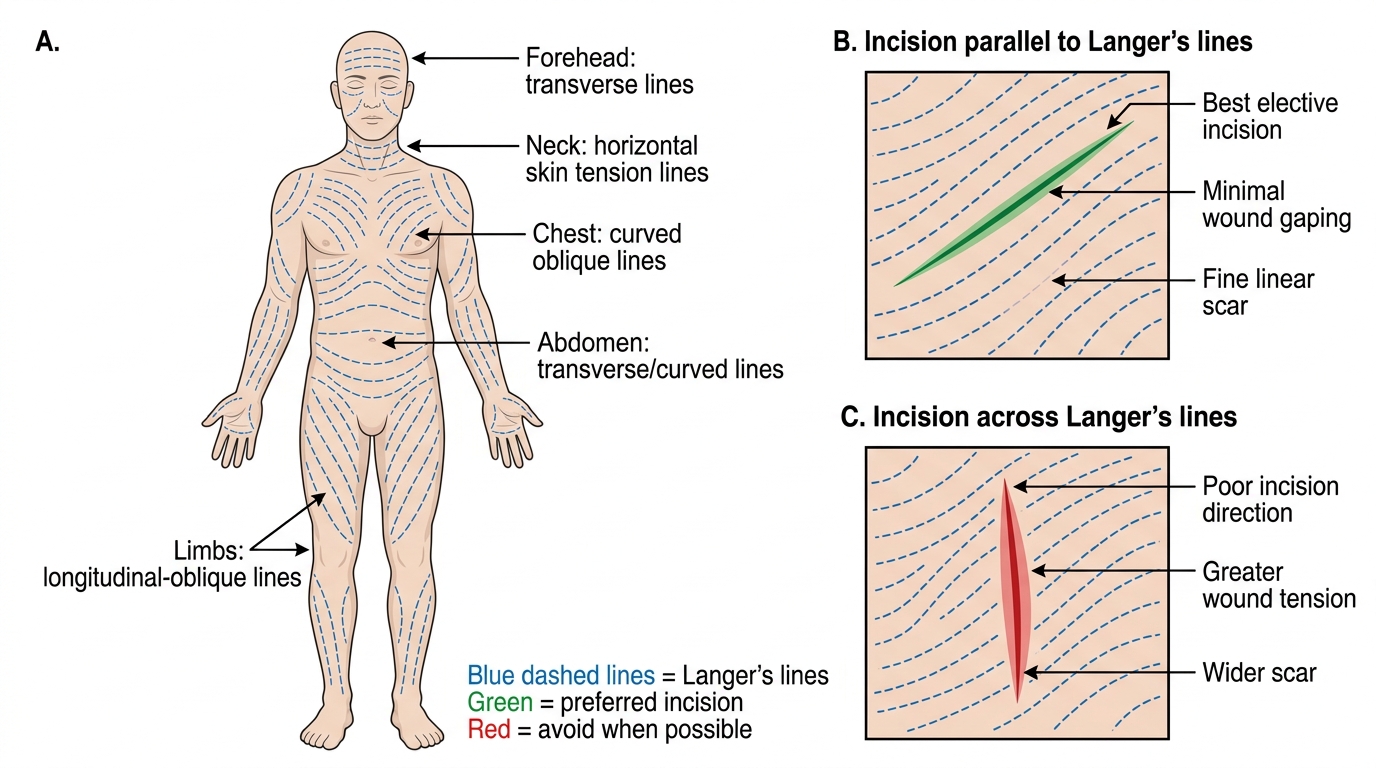
Langer's Lines and Elective Incision Placement
The Surgical Instrument Set and How Each Is Used
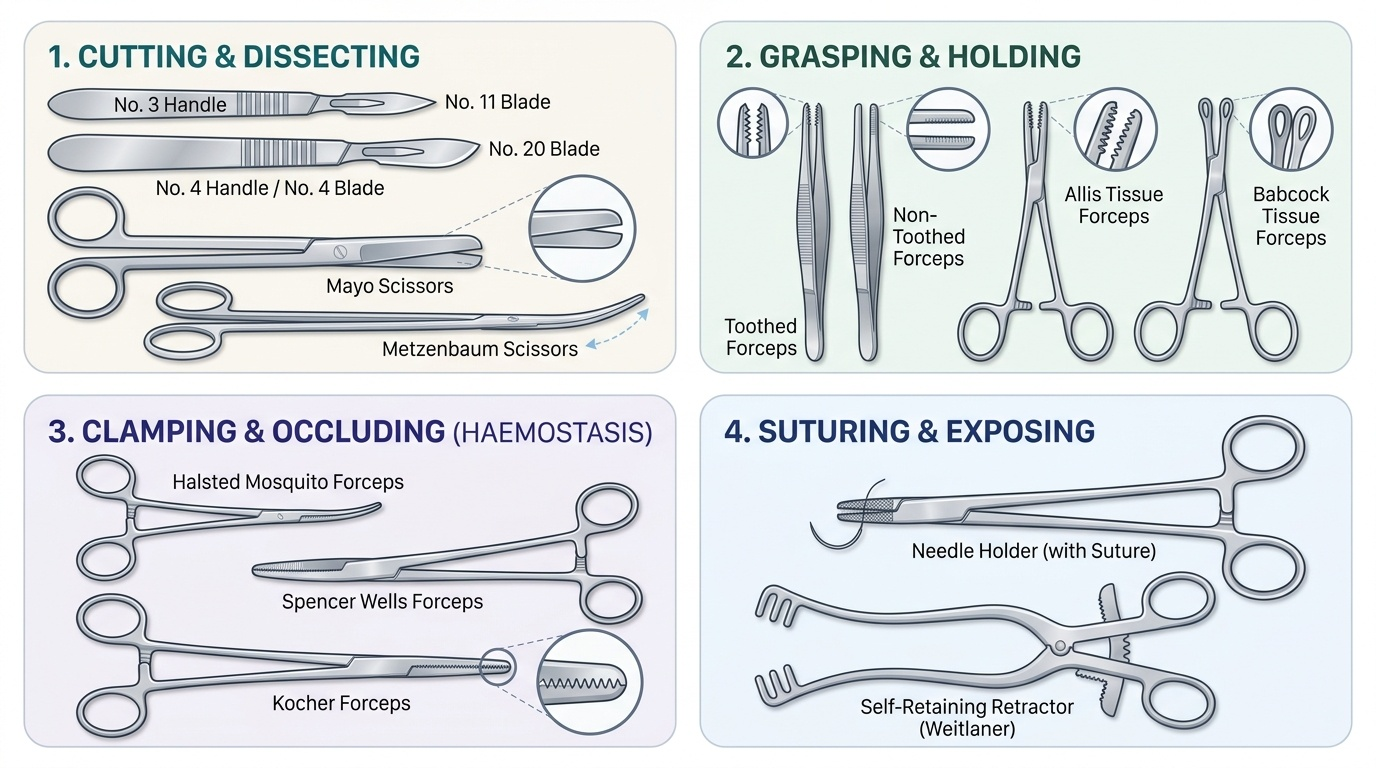
A basic surgical tray is organised by function, and knowing which family an instrument belongs to tells you what it is for and how to hold it. The first family is cutting and dissecting instruments. The scalpel is a blade mounted on a handle — a No. 3 handle takes the small Nos. 10/11/15 blades for fine work, while a No. 4 handle takes the larger Nos. 20–24 blades for bigger incisions. Scissors come in two main forms: heavy Mayo scissors for cutting tough tissue and sutures, and fine, curved Metzenbaum scissors for delicate dissection of soft tissue. The second family is grasping and holding instruments, the forceps: toothed (dissecting) forceps grip skin and fascia securely but would crush delicate tissue, whereas non-toothed forceps hold bowel, vessels and other fragile tissue atraumatically; Allis forceps grasp tissue to be removed, Babcock forceps hold delicate tubular structures such as bowel gently, and sponge-holding forceps hold swabs for skin preparation. The third family is haemostatic clamps — artery forceps used to clip bleeding vessels before they are tied or sealed; examples include the Spencer Wells and the fine mosquito (Halsted) forceps, while the toothed Kocher forceps grips tough tissue or pedicles firmly but traumatically. The fourth family is retractors, which hold the wound open: self-retaining retractors such as the Balfour and the Travers stay open by themselves, while hand-held retractors such as the Langenbeck, Deaver and Morris are held by an assistant. Finally, the needle holder grips the curved needle for suturing. Matching instrument to task — fine versus heavy, toothed versus non-toothed, self-retaining versus hand-held — is the essence of gentle, efficient surgery.
Provided image
SELF-CHECK
An assistant needs to hold a loop of small bowel gently while the surgeon completes an anastomosis. Which instrument is the most appropriate choice?
A. Kocher (toothed) forceps
B. Allis tissue forceps
C. Babcock forceps
D. Mayo scissors
Reveal Answer
Answer: C. Babcock forceps
Babcock forceps have broad, fenestrated, non-crushing blades designed to hold delicate tubular structures such as bowel atraumatically. Kocher forceps are toothed and traumatic (for tough tissue/pedicles), Allis forceps grasp tissue that is going to be removed and can crush bowel, and Mayo scissors are cutting instruments, not graspers.