Page 5 of 13
OR11.1 | Peripheral Nerve Injury Assessment and Splinting — SDL Guide (Part 2)
Procedure and Technique: Splint Application in Practice
The three splints required by OR11.1 — the cock-up splint for radial nerve wrist drop, the ankle-foot orthosis for foot drop, and the knuckle-bender splint for ulnar claw hand — are all fabricated from thermoplastic material that can be heated in warm water (60-70°C) and moulded directly to the patient's limb in a few minutes. This approach allows customisation to the individual patient's anatomy and adjustment as swelling resolves over the first weeks after injury. The key to a successful splint application is not the material but the positional precision — a splint applied in the wrong position will cause contracture in the abnormal position rather than preventing it. A careful understanding of the functional anatomy of each joint and the specific position that maximises residual function while protecting the recovering nerve is therefore the prerequisite for competent splinting. Before any splint is applied, you must confirm that the patient understands the purpose, knows how to safely remove and reapply the splint for hygiene, knows to check for pressure areas every two hours initially, and has a clear plan for follow-up. Instructing the patient is as important as applying the splint itself — a splint that is left in place for weeks without checking for skin breakdown causes pressure sores and ischaemia, converting a recoverable nerve injury into a complex wound.
Splint application for peripheral nerve injuries follows a set of shared principles regardless of the specific splint type: the splint must hold the affected part in a functional position (the position of rest that prevents contracture and allows maximal residual function), it must not cause pressure sores or circulatory compromise, it must be adjustable as swelling resolves, and the patient must be taught how to apply and remove it independently.
General pre-application steps (applicable to all three splints):
1. Explain the purpose to the patient: the splint prevents contracture while the nerve is recovering — it does not cure the nerve injury.
2. Assess the neurovascular status of the limb (pulses, capillary refill, sensation in areas not affected by the injury) before applying the splint, and document this as a baseline.
3. Pad all bony prominences that will be under the splint: styloid processes at the wrist, fibular head, lateral malleolus.
4. Ensure the skin is clean and dry. Apply a stockinette or foam underlining before the splint material.
Cock-up splint (wrist drop, radial nerve injury):
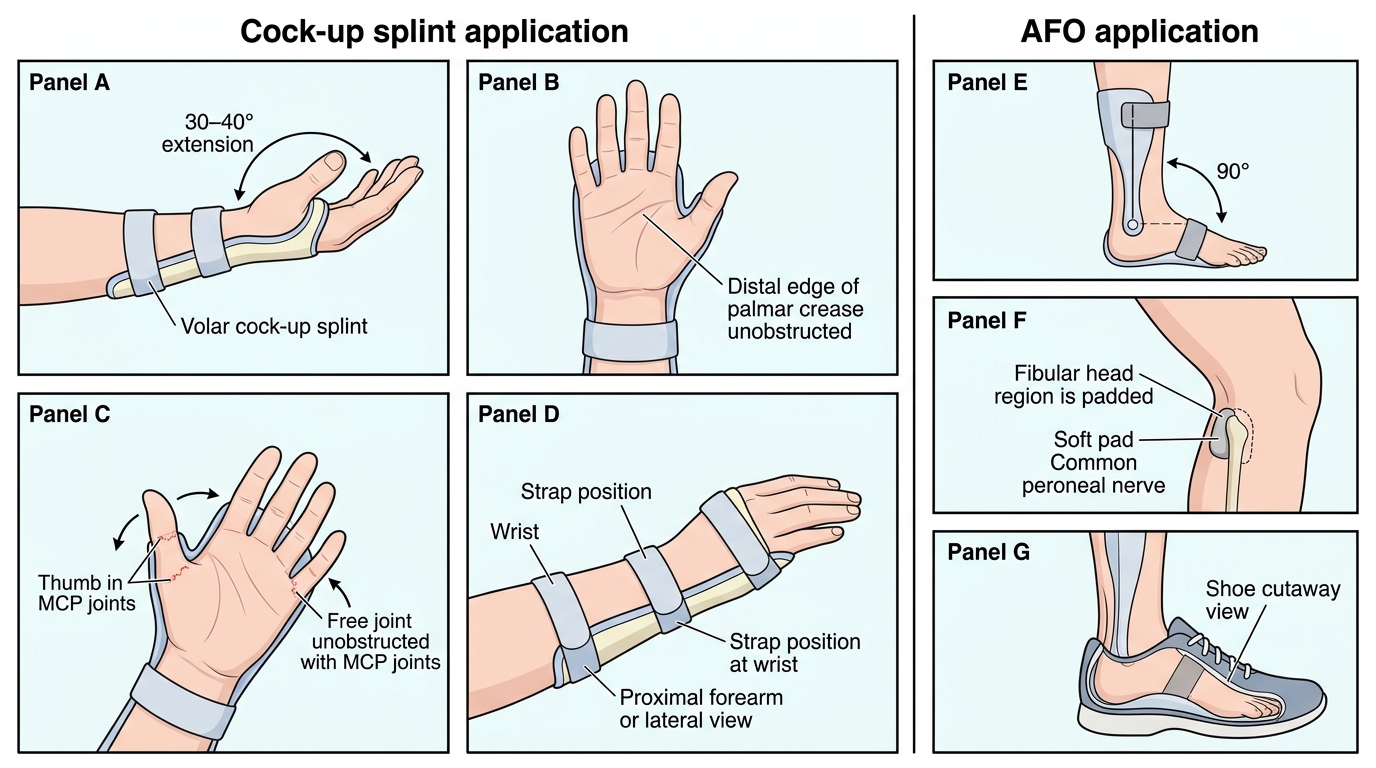
A volar or dorsal (more commonly dorsal thermoplastic) splint is moulded to hold the wrist in 30–40° of extension and the fingers and thumb free for function. The critical landmark is the metacarpophalangeal (MCP) joints, which must be left free — the splint ends at the palmar crease, not over the finger joints. The splint is secured with two circumferential Velcro straps — one just proximal to the wrist crease and one 8–10 cm further up the forearm. The patient should be able to flex the fingers (using intact FDP, FDS) around objects with the wrist held in extension, restoring grip function. Check that the splint does not block elbow flexion or create a pressure point over the radial styloid.
Foot-drop splint / Ankle-foot orthosis (AFO) (common peroneal or sciatic injury):
The AFO holds the ankle in 90° of dorsiflexion (neutral) to prevent the Achilles tendon from shortening into a fixed equinus contracture. A prefabricated posterior leaf-spring AFO or a custom thermoplastic posterior AFO is fitted inside the shoe. The key landmarks to protect are the fibular head (pad carefully — this is the very site of nerve injury and must not be recompressed by the AFO strap) and the lateral malleolus. Instruct the patient to fit the AFO before the shoe and to check for pressure areas every 2 hours initially. The patient should be able to walk with a near-normal heel-toe pattern with the AFO in place.
Knuckle-bender splint (claw hand, ulnar nerve injury):
This volar splint incorporates a lumbrical bar — a transverse bar that blocks hyperextension at the MCP joints of the ring and little fingers while leaving the IP joints free to extend and flex. The position: MCP joints held at 70–80° of flexion, IP joints free. This allows the intact extrinsic extensors (EDC, supplied by radial nerve) to extend the IP joints through the lumbrical mechanism, converting the claw into a functional finger extension. The splint should not compress the hypothenar eminence or the ulnar border of the palm.
Cock-up Splint and AFO Application
SELF-CHECK
You are applying a cock-up splint for wrist drop. The patient complains the splint is blocking their ability to bend their fingers. What is the error in your application?
A. The wrist is held in too much extension (>40°)
B. The splint extends over the MCP joints / past the palmar crease
C. The splint is applied on the volar surface instead of the dorsal surface
D. The straps are too tight proximally
Reveal Answer
Answer: B. The splint extends over the MCP joints / past the palmar crease
The cock-up splint must end at the palmar crease, leaving the MCP joints completely free. If the splint extends past the palmar crease and covers the MCP joints, it blocks the intrinsic muscles from flexing the fingers — the patient loses grip function. The MCP joints being free is the defining functional requirement of the cock-up splint.
Interpretation of Findings: Tinel's Sign and Electrophysiology
After a peripheral nerve injury, clinical and electrophysiological monitoring allows you to track whether nerve regeneration is progressing as expected and to identify cases where recovery has stalled and surgical intervention may be needed. Two principal tools are used: Tinel's sign (clinical) and electromyography/nerve conduction studies (EMG/NCS) (electrophysiological).
Tinel's sign was described by Jules Tinel during World War I. It is elicited by gently tapping (percussing) along the course of the injured nerve from distal to proximal. A tingling sensation (paraesthesia) radiating distally into the nerve's sensory territory is a positive Tinel's sign, indicating that regenerating axon tips (growth cones) are present at the level of percussion and are mechanically sensitive but not yet myelinated. In a recovering nerve, Tinel's sign advances distally over time at approximately 1 mm/day (matching the rate of axonal regeneration). A stationary Tinel's sign for more than 8 weeks indicates that regeneration has stalled — likely due to a complete disruption (neurotmesis) or dense scar blocking axon growth — and is an indication for surgical exploration. A positive Tinel's sign at the injury site in the immediate post-injury period (before 3 weeks) indicates that axons are present and the nerve has not been completely divided — a reassuring finding in blunt trauma.
EMG/NCS is the gold standard investigation for peripheral nerve injury assessment. It is performed 3–4 weeks after injury (not earlier, because Wallerian degeneration takes 3–5 days to reach the most distal electrode sites, and full EMG changes require fibrillation potentials to develop). Key findings:
- Fibrillation potentials and positive sharp waves in the affected muscle at rest = denervation (axonotmesis or neurotmesis — distinguishes from neurapraxia where EMG is normal).
- Motor unit action potential (MUAP) morphology: in partial injuries, surviving motor units become enlarged (polyphasic long-duration MUAPs) as collateral sprouting occurs.
- Nerve conduction velocity (NCV): in neurapraxia, conduction is blocked across the lesion site but normal distal to it; in axonotmesis/neurotmesis, conduction is absent distally after Wallerian degeneration.
- Reinnervation potentials (nascent MUAPs — small, polyphasic, short duration) appear in the EMG 6–10 weeks before clinical motor function returns, providing early evidence of recovery and guiding the decision to defer surgery.

Peripheral Nerve Injury Recovery Timeline
Applied and Supervised Practice: Management Principles and Surgical Indications
Provided image
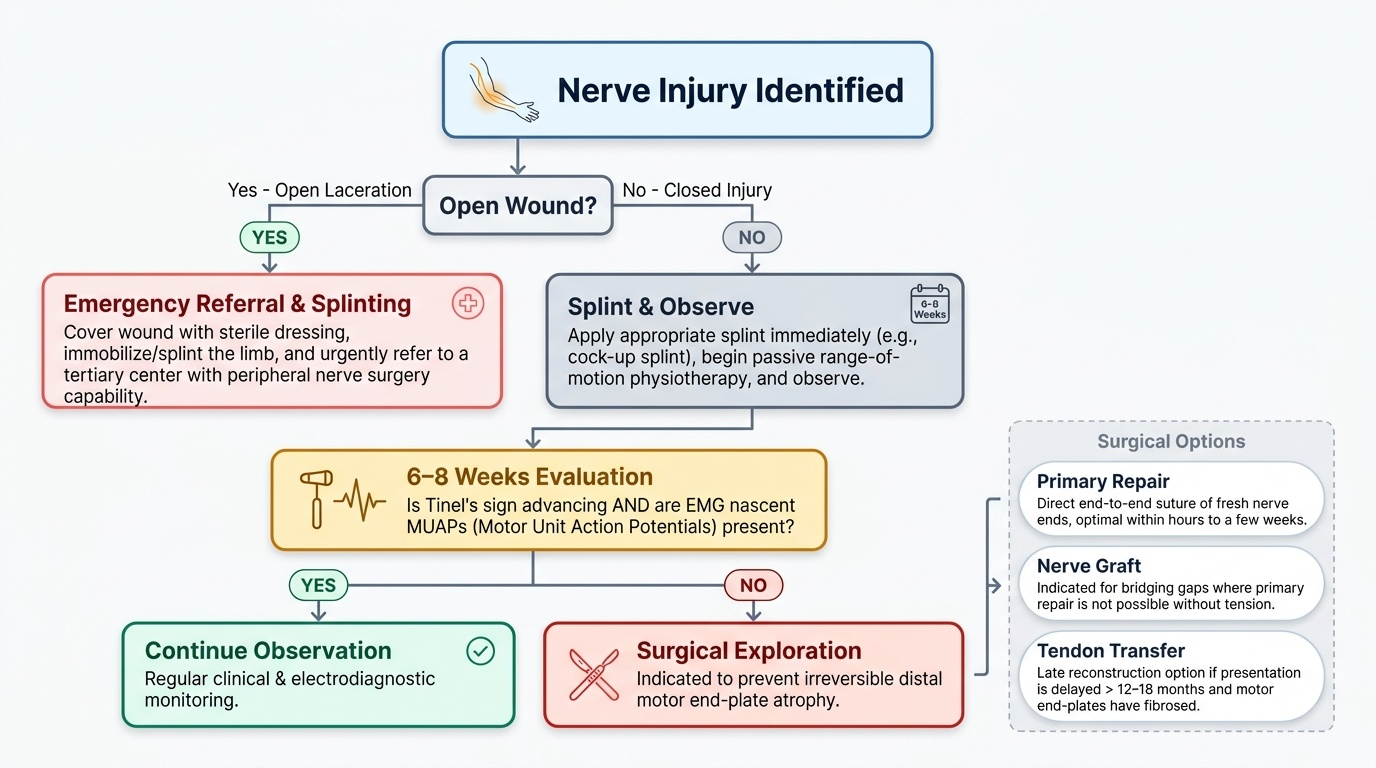
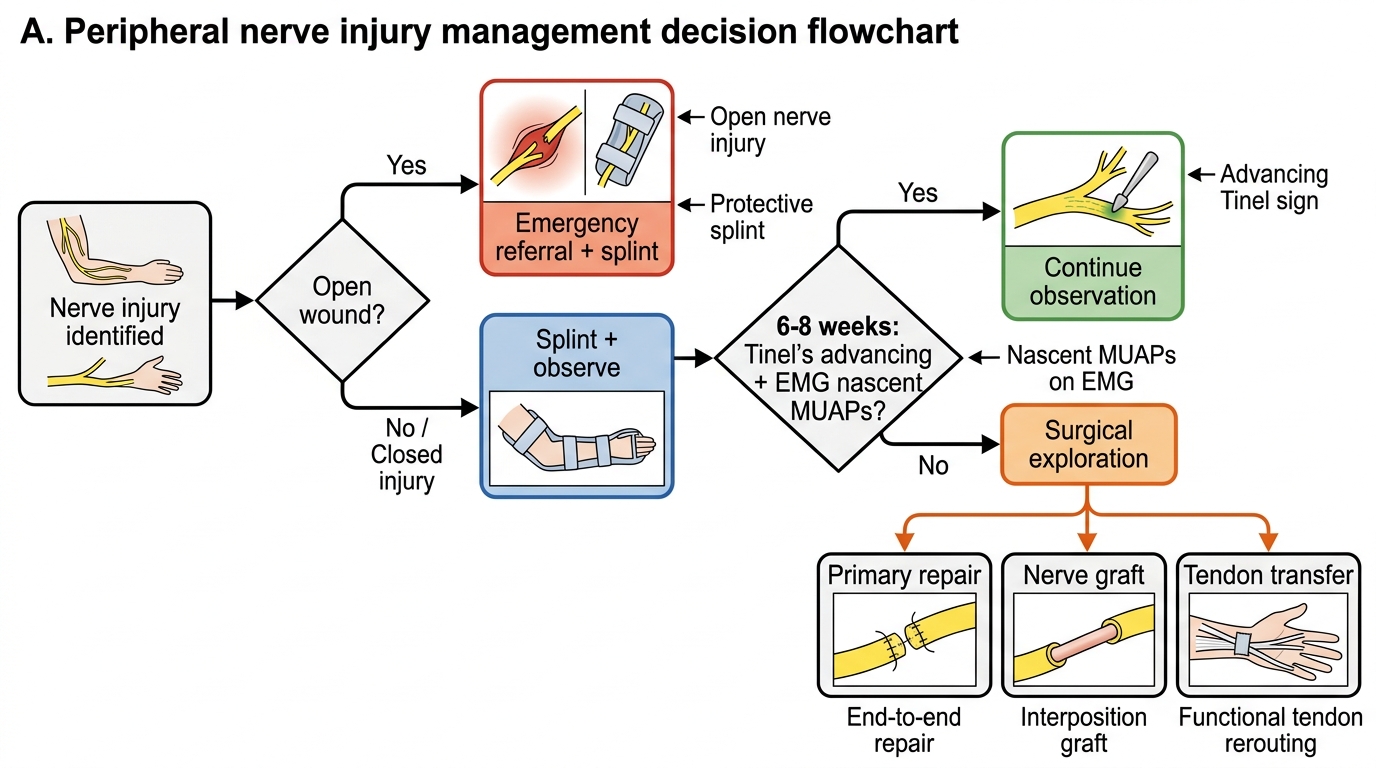
Translating the classification and anatomy into a management pathway requires an understanding of when to splint and observe, when to refer urgently, and when surgery becomes necessary. The management of peripheral nerve injuries is time-sensitive in two distinct ways: on one side, open nerve lacerations must be repaired within hours to a few weeks while the nerve ends are fresh and not yet fibrosed; on the other side, closed injuries that are observed too long without surgical exploration result in irreversible distal motor end-plate atrophy (motor end-plates remain receptive to reinnervation for approximately 12–18 months, after which the target muscle is replaced by fibrous tissue and nerve recovery cannot restore function). Understanding the tipping points in this timeline is what allows you to correctly stage the urgency of referral. The management is staged and follows the Seddon classification as a guide to intervention intensity, with the additional dimension of whether the injury is open (laceration) or closed (contusion/fracture).
The management of peripheral nerve injuries is staged and follows the Seddon classification as a guide to intervention intensity. The framework below is what you will apply both in clinical postings and as a general practitioner before referral.
Immediate care (emergency department):
- Document the nerve deficit systematically: motor grade (MRC 0–5), sensory (light touch, pin-prick) in each nerve territory, Tinel's sign at the lesion site.
- For open wounds with nerve laceration: cover the wound, apply a sterile dressing, immobilise the fracture if present (splint before referral), and refer urgently to a tertiary centre with peripheral nerve surgery capability. Do not attempt primary nerve repair in a district hospital without the appropriate microsurgery infrastructure.
- For closed fractures with nerve injury (e.g., humeral shaft fracture + radial nerve): the nerve is most commonly in continuity (neurapraxia or axonotmesis from the fracture mechanism). Apply the cock-up splint, begin physiotherapy to maintain passive joint range of motion, and observe for recovery over 6–8 weeks before surgical exploration.
- Apply the appropriate splint immediately in all cases — do not wait for recovery to begin before splinting.
Monitoring (weeks 0–12):
- Review at 4–6 weeks: is Tinel's sign advancing distally? Is there any return of motor function in proximal muscles?
- EMG/NCS at 3–4 weeks after injury to establish a baseline and differentiate neurapraxia (normal EMG) from axonotmesis/neurotmesis (fibrillations).
- Decision point at 8–12 weeks: if there is no Tinel's advancement, no clinical motor recovery, and EMG shows complete denervation without nascent MUAPs, surgical exploration is indicated for closed injuries. For open lacerations, do not wait — explore primarily or within 3 weeks.
Surgical options:
- Primary repair: end-to-end epineural repair or fascicular (group) repair under magnification, performed within hours of a clean laceration.
- Secondary repair / nerve grafting: for gaps too large for tension-free primary repair; the sural nerve is the commonest donor (30 cm of expendable sensory nerve from the posterolateral calf, with predictable anatomy).
- Neurolysis: release of scar tissue compressing an intact nerve in continuity; used in delayed cases where Tinel's sign is stationary at the level of dense adherent scar.
- Tendon transfer: when nerve recovery is not expected (late presentation, elderly patients with poor regeneration capacity), tendon transfer redistributes function from intact muscles to replace paralysed ones. For example, for irreversible radial nerve palsy: the pronator teres is transferred to ECRB/ECRL to restore wrist extension.
Prognosis and patient counselling for the five nerve injuries:
- Radial nerve (humeral shaft fracture): neurapraxia/axonotmesis in 90% — spontaneous recovery expected in 3–6 months; favourable prognosis for counselling. Proceed to explore at 3–4 months if no recovery.
- Common peroneal (fibular neck): recovery less reliable than radial; foot drop may be permanent in 25–30% of complete injuries. Early AFO and physiotherapy critical.
- Ulnar nerve: poorest intrinsic recovery of all upper limb nerves because the distance from the medial epicondyle to the intrinsic muscles of the hand is great and the motor end-plates in intrinsic muscles atrophy rapidly with denervation.
- Median nerve: carpal tunnel (low median) responds very well to surgical decompression; high median injuries at the elbow have incomplete recovery in a substantial proportion.
- Sciatic: prognosis depends on whether the injury is a stretch/contusion (posterior hip dislocation — partial recovery common) or a transection. The peroneal component (foot drop) recovers less well than the tibial component because the peroneal fibres are more superficial and often sustain greater injury in hip dislocations.
Peripheral Nerve Injury Management Flowchart
CLINICAL PEARL
The ulnar paradox: injury of the ulnar nerve at the wrist produces a more severe claw hand than injury at the elbow. The reason is that at the elbow, the FDP to the ring and little fingers is also paralysed (its motor supply is from the ulnar nerve above the elbow), so these fingers cannot flex at the DIP joint — reducing the severity of the claw. At the wrist, FDP is intact, flexing the DIP aggressively and producing a more obvious claw. This is paradoxical because the more proximal (elbow) lesion produces a less obvious deformity despite greater overall functional loss.
Tinel's advancing = recovery in progress; Tinel's static = recovery stalled. Serial monthly Tinel's marking on the skin is the single most practical bedside tool for monitoring nerve regeneration. If the sign has not moved 1–2 cm in 8 weeks, re-examine the case for surgical indication.
Self-Assessment: Nerve Injury Scenarios
Test your clinical reasoning with these scenarios, focusing on identifying the nerve, the mechanism, the splint, and the management step:
Scenario A: A 12-year-old girl falls on an outstretched hand and sustains a Gartland type III supracondylar fracture of the humerus. Post-reduction, she cannot flex her index finger or thumb (no flexion at DIP of index, no flexion at IP of thumb). She can flex the ring and little fingers. The thenar muscles are intact for opposition. Which nerve is injured, and which specific branch?
Scenario B: A 60-year-old plumber has a 6-month history of wrist pain and progressive numbness in the thumb, index, and middle fingers, worse at night. Tinel's sign is positive at the wrist crease. Thenar wasting is present. What nerve and what level is injured, and what is the management?
Scenario C: A 25-year-old motorcyclist sustains a closed mid-shaft femur fracture. After 6 weeks, he walks with a high-stepping gait and cannot dorsiflex the foot. Plantar flexion is intact, and the knee jerk is normal. Which nerve, where, and what is the most likely cause and management?
Expected answers: A = anterior interosseous nerve (AIN) — a motor-only branch of the median nerve at the elbow, causing the 'AIN syndrome' — cannot make the 'OK' sign with thumb and index finger tip-to-tip; B = median nerve at the wrist (carpal tunnel syndrome) — surgical carpal tunnel decompression; C = common peroneal nerve at the fibular neck — most likely from the traction hip-knee flexion during fracture reduction or post-operative positioning — AFO + EMG/NCS at 4 weeks + observe for recovery.