Page 6 of 20
OR3.2 | Joint Aspiration Practice — SDL Guide
Learning Objectives
- Describe the clinical indications for and contraindications to joint aspiration (arthrocentesis) in suspected septic arthritis
- Identify the surface anatomy landmarks and safe entry routes for aspiration of the knee, hip, shoulder, and ankle joints
- Demonstrate the aseptic technique for joint aspiration, including patient positioning, skin preparation, and needle insertion
- Interpret synovial fluid analysis — cell count, differential, Gram stain, glucose, protein, and culture — to distinguish septic arthritis from inflammatory and non-inflammatory effusions
- Apply the Kocher criteria to risk-stratify a child with hip pain and determine the threshold for surgical aspiration versus observation
INSTRUCTIONS
Joint aspiration is a core procedural skill for any clinician managing musculoskeletal disease. As a team member in orthopaedics, you will assist with or perform supervised arthrocentesis in emergency and outpatient settings. Mastery of the anatomical landmarks, aseptic technique, and synovial fluid interpretation is essential — a correctly aspirated and analysed joint can provide the definitive diagnosis of septic arthritis within minutes and guide urgent surgical decision-making. This module prepares you to participate competently and safely in this procedure.
References
- Maheshwari's Essential Orthopaedics, Ch 20 — Infections of Bone and Joints (textbook)
- Apley and Solomon's System of Orthopaedics and Trauma, 10th ed., Ch 2 — Infection (textbook)
Version 2.0 | NMC CBME 2024
CLINICAL SCENARIO
A 6-year-old girl is brought to your emergency department at 11 pm with a two-day history of severe right hip pain and fever of 39.1°C. She refuses to walk. Her hip is held in flexion, abduction, and external rotation. Her WBC is 16,000, ESR 55 mm/h, CRP 95 mg/L. Ultrasound shows a significant hip joint effusion. The senior registrar asks you to prepare for joint aspiration. You have never done this before — but you have read the brief and you know the landmarks, the aseptic technique, and what you are looking for in the fluid. What do you do first?
WHY THIS MATTERS
Joint aspiration is simultaneously the most time-critical diagnostic procedure and the most immediately therapeutic intervention in septic arthritis. The result of a synovial fluid white cell count takes less than 30 minutes; a count of >50,000 cells/μL with >90% neutrophils is essentially diagnostic of septic arthritis without waiting for culture results. Starting antibiotics before the aspirate is sent, or sending an inadequate sample, cripples the microbiological yield and may delay definitive diagnosis by days. Equally, attempting aspiration with poor aseptic technique can introduce infection into a previously sterile effusion (e.g., transient synovitis). This module gives you the clinical judgment to know when to aspirate, the anatomical knowledge to do it safely, and the interpretive skills to act on the result.
RECALL
Recall from your anatomy module: (1) The knee joint is the largest synovial joint, with a suprapatellar pouch extending 3-4 cm above the patella under the quadriceps. (2) The hip joint is a deep ball-and-socket joint enclosed in a tight capsule; needle access requires either a lateral (trochanteric) or anterior approach with image guidance. (3) The shoulder joint communicates with the subacromial bursa in full-thickness rotator cuff tears; a posterior or anterior approach may be used. (4) Synovial fluid is produced by type B synoviocytes and is a filtrate of plasma — normal fluid is straw-coloured, viscous, and contains <200 cells/μL.
Clinical Indications, Contraindications, and Pre-procedure Assessment
Provided image
Arthrocentesis (joint aspiration) is indicated whenever the clinical picture raises the possibility of septic arthritis, and in several other settings where synovial fluid analysis will inform management. The primary indication is the diagnosis and decompression of a suspected infected joint — the procedure is both diagnostic (identifying the organism) and therapeutic (reducing intra-articular pressure and pus load). Secondary indications include: diagnosis of crystal arthropathy (gout, pseudogout — polarised microscopy of crystals in fluid), draining a tense haemarthrosis (particularly after acute injury), injecting corticosteroids or local anaesthetic (therapeutic aspirate), and diagnosing inflammatory arthropathy (RA, reactive arthritis) when the joint is acutely swollen.
In the context of a febrile patient with a swollen, painful joint, the indications for aspiration are urgent — this is NOT an elective procedure. The single most important question before aspiration is: is the overlying skin infected (cellulitis)? Passing a needle through infected skin introduces bacteria into the joint space and is a contraindication to aspiration at that site. A bleeding diathesis or anticoagulation (therapeutic INR >2.5) is a relative contraindication — the risk of haemarthrosis must be weighed against the diagnostic urgency. There is no absolute contraindication when septic arthritis is suspected; even in a patient on anticoagulation, the consequences of untreated septic arthritis far outweigh the risk of a post-aspiration haematoma in most cases.
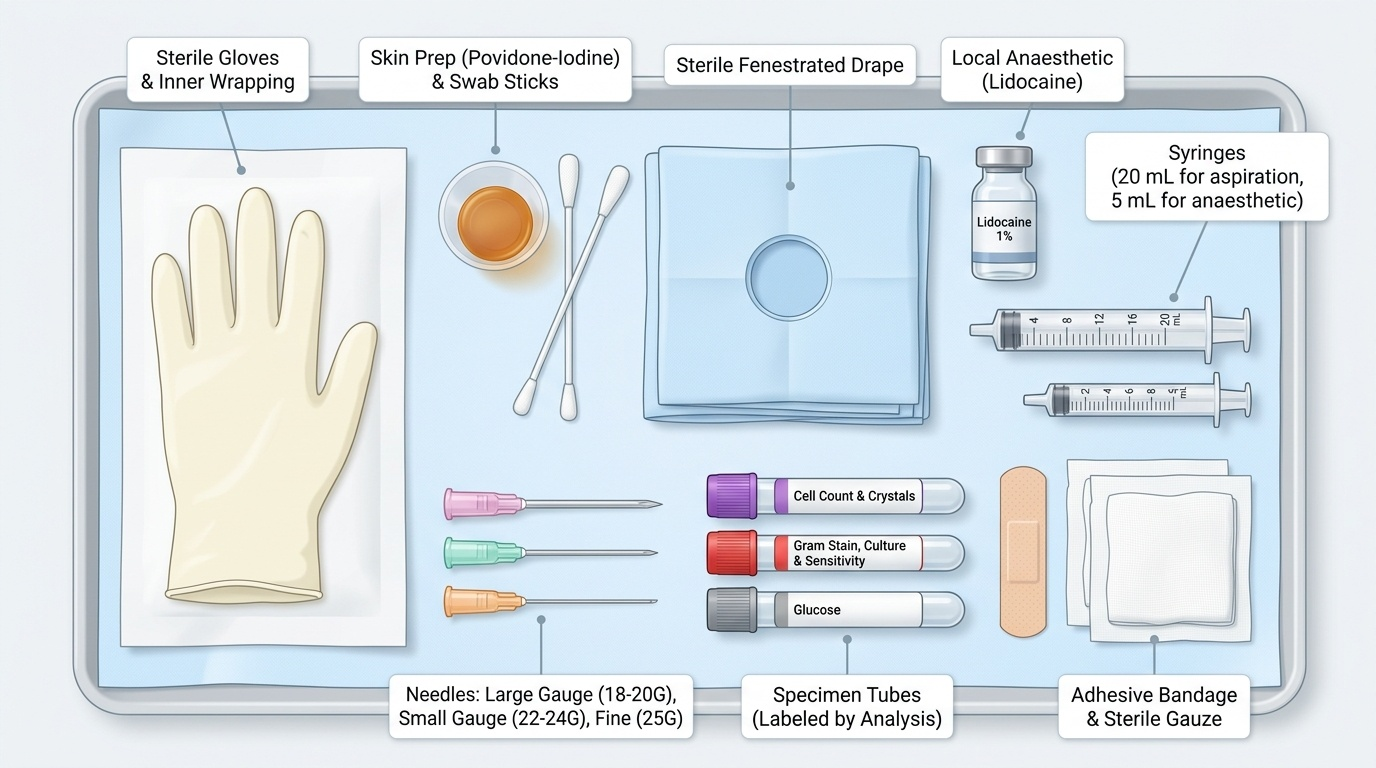
Pre-procedure assessment involves confirming the indication, reviewing the clotting screen and platelet count, obtaining informed consent (explaining the procedure, its purpose, the expected pain, and the risk of introducing infection if not done aseptically), and positioning the patient appropriately. Equipment is assembled before the patient is positioned: sterile gloves, skin preparation solution (povidone-iodine or chlorhexidine), sterile drape, appropriate gauge needle (18-20G for large joints, 22-24G for small joints), syringe (10-20 mL), specimen containers (EDTA tube for cell count; plain sterile bottle for culture; fluoride tube for glucose), and local anaesthetic if required.
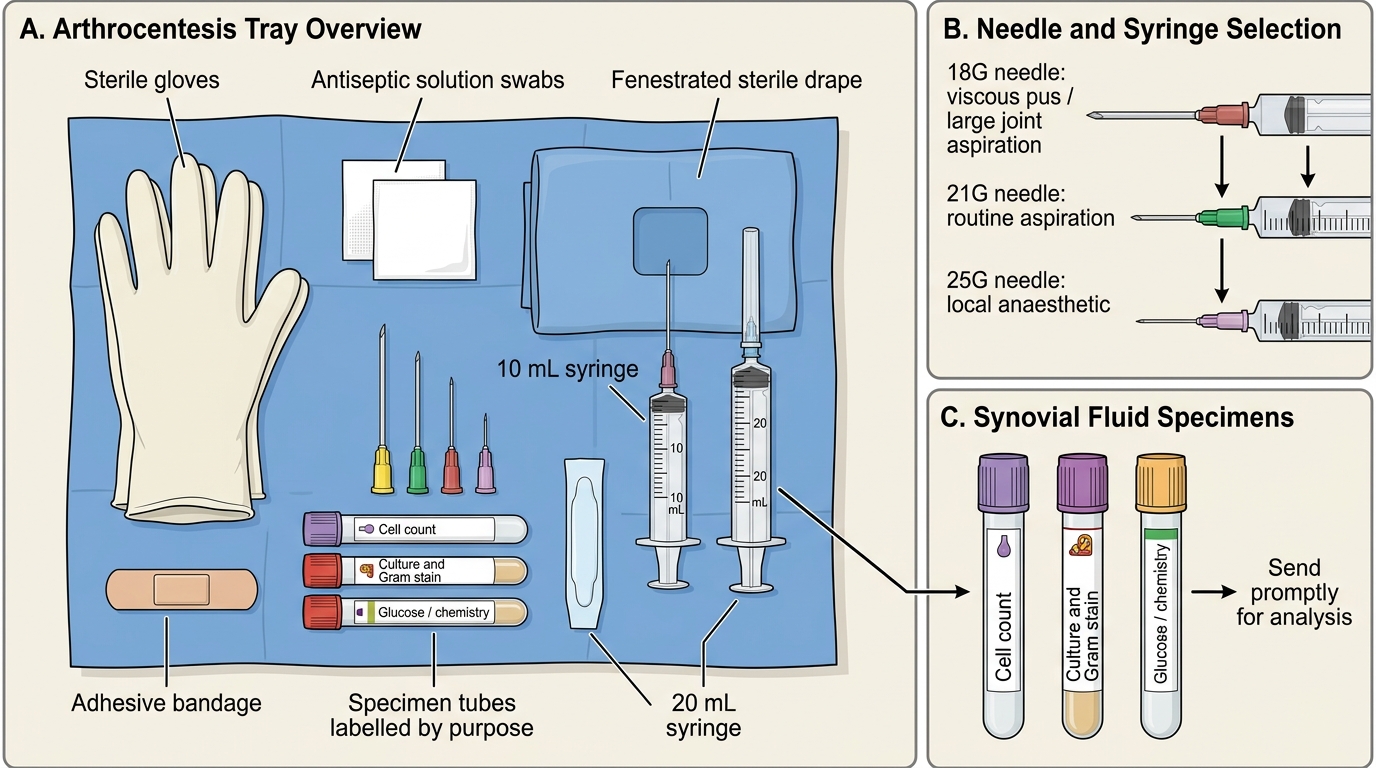
Sterile Arthrocentesis Tray: Required Equipment
Anatomical Landmarks and Safe Entry Routes
A thorough knowledge of joint anatomy is the foundation of safe arthrocentesis. The key principle is to approach the joint from a surface that is well away from major neurovascular structures, where the joint capsule is most accessible, and where the bony landmarks can be reliably palpated. Each major joint has established safe approaches.
Knee joint — the most frequently aspirated joint. Two main approaches: (1) Superolateral approach: the needle is inserted 1 cm superior and 1 cm posterior to the superolateral border of the patella, directed at 45° into the patellofemoral joint and the suprapatellar pouch. This is the preferred approach for large effusions. The patient is supine with the knee extended or slightly flexed to relax the extensor mechanism. (2) Medial approach: 1 cm medial to the midpoint of the patella, directed laterally into the joint space. Landmarks: the patella (palpable) and the joint line (felt as a groove with the knee slightly flexed at 20-30°). Avoid the popliteal fossa posteriorly (popliteal vessels and tibial nerve lie there).
Shoulder joint — two main approaches: (1) Posterior approach (most common): patient sitting with arm at side, needle inserted 2-3 cm inferior to the posterolateral corner of the acromion, directed anteriorly and medially toward the coracoid. (2) Anterior approach: needle inserted just medial to the humeral head, 1 cm lateral to the coracoid. The posterior approach is preferred because major vessels (axillary artery, cephalic vein) are anterior.
Ankle (tibiotalar) joint — anteromedial approach: patient supine with foot in slight plantarflexion. Needle inserted just medial to the extensor hallucis longus tendon, at the level of the joint line (felt as a soft spot between the distal tibia and talus). Avoid the dorsalis pedis artery laterally.
Hip joint — requires image guidance (ultrasound or fluoroscopy) due to its depth. The lateral approach enters just anterior to the greater trochanter; the anterior approach (Smith-Petersen) enters from the groin, medial to the femoral artery, directed laterally. In children, ultrasound-guided anterior aspiration is the standard because the hip is deep and the femoral vessels must be avoided. Never attempt blind hip aspiration.

Safe Joint Aspiration Approaches
Aseptic Technique: Step-by-Step Procedure
Aseptic (sterile) technique is non-negotiable in joint aspiration. Introducing bacteria into a joint is a catastrophic iatrogenic complication that causes septic arthritis in a previously sterile effusion. Every step of the procedure must minimise the risk of contamination.
Step 1 — Position the patient. For knee aspiration: supine, knee extended (or slightly flexed at 20-30°). For shoulder: sitting with arm relaxed at the side. For ankle: supine, foot in slight plantarflexion. Correct positioning brings the joint space to maximal accessibility and minimises patient movement during the procedure.
Step 2 — Identify and mark the landmarks. Palpate the bony landmarks (patella, joint line, acromion, greater trochanter) and mark the entry point with a skin marker or the blunt end of a needle cap. Do this BEFORE gloving — palpating through sterile gloves after skin prep is less reliable.
Step 3 — Skin preparation. Apply 2% chlorhexidine in 70% isopropyl alcohol (or povidone-iodine if chlorhexidine is unavailable) in concentric circles from the marked entry point outward, covering at least a 10 cm radius. Allow to dry completely (at least 30 seconds for chlorhexidine, 2 minutes for povidone-iodine) — wet antiseptic is less effective and may cause local irritation. Apply sterile drapes.
Step 4 — Don sterile gloves and prepare the equipment on a sterile field. Draw up local anaesthetic (1-2 mL of 1% lignocaine) if required. Attach the appropriate needle to the syringe.
Step 5 — Local anaesthesia. Raise a skin bleb of local anaesthetic at the entry point, then infiltrate down to the joint capsule. Allow 2-3 minutes for the anaesthetic to take effect. Local anaesthesia is particularly important for conscious patients and for small joints.
Step 6 — Insert the needle. Advance the needle steadily along the planned trajectory, applying gentle negative pressure on the syringe plunger. The entry into the joint space is felt as a subtle give (loss of resistance) as the needle passes through the capsule. Synovial fluid will immediately enter the syringe on aspiration. Note the colour (normal: clear straw-coloured; septic: turbid/yellow/frankly purulent; haemarthrosis: bloody/xanthochromic).
Step 7 — Aspirate maximally. Remove as much fluid as possible — this is both diagnostic and relieves intra-articular pressure. If flow stops, the needle tip may be against the synovial wall; rotating the needle 90° or repositioning slightly may restore flow.
Step 8 — Withdraw, dress, and send samples. Withdraw the needle in one smooth motion. Apply pressure with a swab. Transfer fluid immediately into the appropriate tubes. Send to the laboratory without delay — cell counts and culture are time-sensitive. Document the colour, clarity, and volume of fluid aspirated.
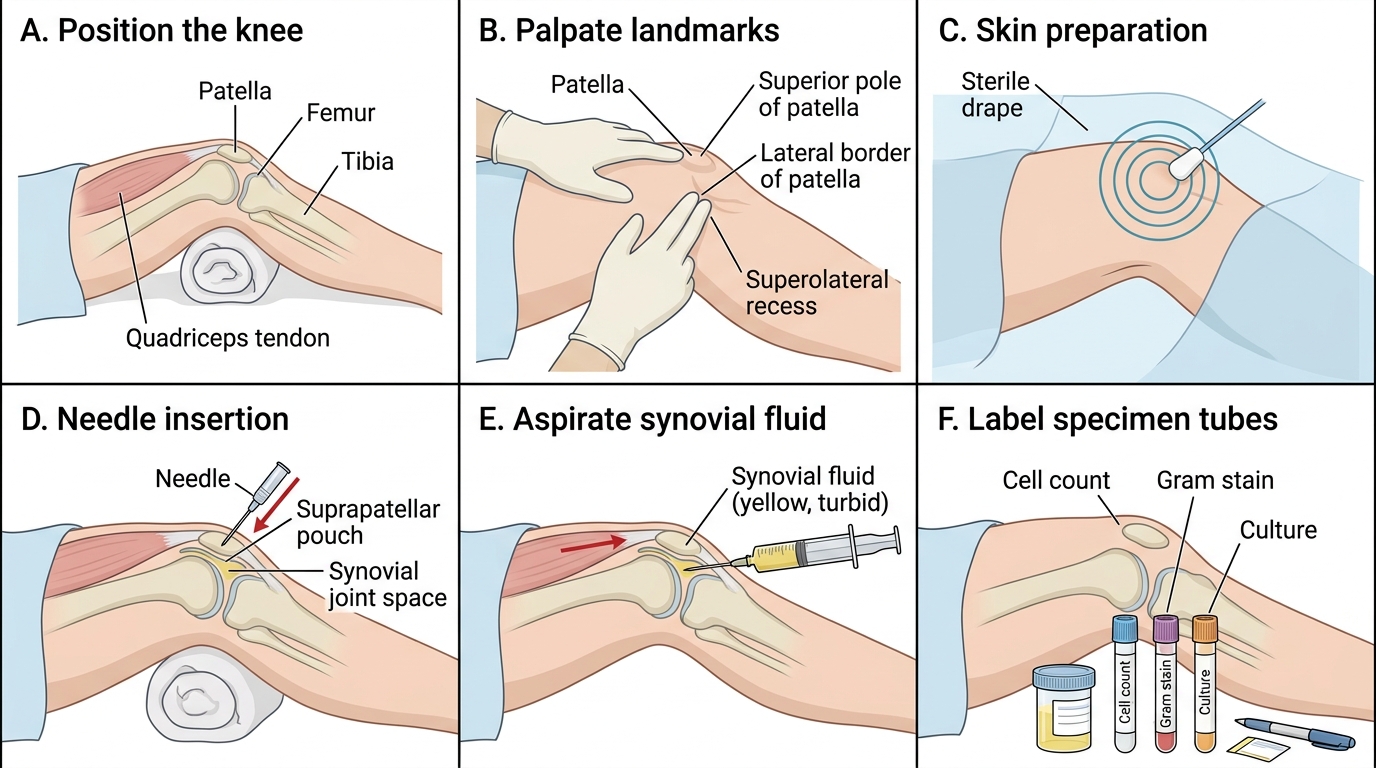
Knee Joint Aspiration: Six Key Steps
SELF-CHECK
During hip joint aspiration in a 4-year-old with suspected septic arthritis, the aspirated fluid is frankly turbid and yellow. The cell count returns as WBC 95,000/μL with 92% neutrophils. Gram stain is negative. What is the correct interpretation and next step?
A. Gram stain is negative so septic arthritis is excluded — treat as transient synovitis with NSAIDs
B. This is consistent with reactive arthritis — start DMARDs and refer to rheumatology
C. This is diagnostic of septic arthritis — proceed to urgent surgical washout and start empirical anti-staphylococcal antibiotics while awaiting culture
D. The WBC of 95,000 is within the range for inflammatory arthritis — repeat aspiration in 24 hours
Reveal Answer
Answer: C. This is diagnostic of septic arthritis — proceed to urgent surgical washout and start empirical anti-staphylococcal antibiotics while awaiting culture
WBC >50,000/μL with >90% neutrophils is diagnostic of septic arthritis regardless of Gram stain result (Gram stain is positive in only 50-70% of septic arthritis cases — a negative result does not exclude infection). Culture is the definitive test. Urgent surgical washout is required. Do not wait for culture results before operating — delay risks avascular necrosis and permanent cartilage destruction.