Page 7 of 23
IM11.11-13 | Diabetes Diagnostic Testing — SDL Guide
Learning Objectives
- Order and interpret laboratory tests to diagnose diabetes and its complications including glucose, OGTT, HbA1c, urinary microalbumin, ECG, electrolytes, ABG, ketones, renal function, and lipid profile
- Perform and correctly interpret a capillary blood glucose test using a glucometer
- Perform and interpret a urinary ketone estimation using a urine dipstick
INSTRUCTIONS
Accurate diagnostic testing is the foundation of diabetes management — the wrong test, the wrong technique, or misinterpretation of results leads to missed diagnoses, over-treatment, and patient harm. This skills module covers the theory and technique of every diagnostic test you will use in clinical diabetology, from the bedside glucometer to the laboratory OGTT.
References
- Harrison's Principles of Internal Medicine, 21st ed., Ch. 403 — Diabetes Mellitus: Diagnosis and Classification (textbook)
- API Textbook of Medicine, 10th ed., Ch. 51 — Diabetes Mellitus (textbook)
- American Diabetes Association — Standards of Medical Care in Diabetes, 2024 — Section 2: Diagnosis (guideline)
- WHO Diagnostic Criteria for Diabetes Mellitus, 2006 (updated 2011) (guideline)
Version 1.0 | NMC CBUC 2024
CLINICAL SCENARIO
Nurse Preethi hands you a blood report for a 48-year-old man: HbA1c 6.8%, fasting plasma glucose 118 mg/dL. 'Does he have diabetes?' she asks. Now consider a second scenario: you are in the casualty at midnight, a 22-year-old T1DM patient is brought in drowsy and tachycardic. The lab will take 90 minutes for results. You have a glucometer and a urine dipstick at the bedside. Your clinical decision — start IV insulin now or wait — depends entirely on what those two tests tell you in the next 60 seconds. Diagnostic testing in diabetes is not passive number-reading. It is an active clinical skill that determines diagnosis, guides emergency management, and monitors long-term control. Knowing which test to order, how to perform it correctly, and — critically — how to interpret each result in its clinical context is the competency this module builds.
WHY THIS MATTERS
The NMC competencies IM11.11, IM11.12, and IM11.13 address three tiers of diagnostic testing: the laboratory panel for diagnosis and complication monitoring (IM11.11), the bedside capillary glucose test (IM11.12), and the bedside urine ketone dipstick (IM11.13). In the MBBS final and early clinical practice, you will perform capillary glucose and urine ketone testing yourself — these are not delegated tasks. The ability to interpret the full diagnostic panel (HbA1c, OGTT, microalbuminuria, ABG, electrolytes, ketones) is tested in both vivas and long cases, where you will be expected to state not just the value but its clinical significance, the limitations of the test, and the action it triggers.
RECALL
Recall the four diagnostic criteria for diabetes mellitus before proceeding. Fasting plasma glucose ≥126 mg/dL (fasting defined as no caloric intake for ≥8 hours); 2-hour plasma glucose ≥200 mg/dL on a standard 75 g oral glucose tolerance test (OGTT); HbA1c ≥6.5% (using a NGSP/IFCC-certified assay); and random plasma glucose ≥200 mg/dL in a symptomatic patient (polyuria, polydipsia, unexplained weight loss). Any single positive result must be confirmed by a repeat test on a different day in the absence of unequivocal symptomatic hyperglycaemia. Also recall the pre-diabetic thresholds: IFG = fasting glucose 100–125 mg/dL; IGT = 2-hour OGTT 140–199 mg/dL; prediabetes HbA1c = 5.7–6.4%. These numbers are the anchor from which all diagnostic test interpretation is built.
Laboratory Tests for Diagnosis and Complication Monitoring
The laboratory investigation of diabetes serves two purposes: establishing the diagnosis and monitoring for complications and comorbidities. Each test has a specific clinical indication, a defined reference range, an interpretation framework, and critically, a set of limitations that every clinician must know to avoid erroneous conclusions.

Provided image
Fasting Plasma Glucose (FPG):
The FPG is the standard first-line test for diagnosing diabetes in asymptomatic individuals. The patient must fast for ≥8 hours (water only). Venous plasma glucose is measured in the laboratory. Diagnostic threshold: ≥126 mg/dL (7.0 mmol/L) on two separate occasions. Advantages: simple, inexpensive, widely reproducible, sensitive for monitoring. Limitations: affected by acute illness, fasting compliance, and the timing of the last meal; single measurement has a coefficient of variation of approximately 5–8%, requiring confirmation.
Oral Glucose Tolerance Test (OGTT):
The OGTT is the gold standard for diagnosing IGT, gestational diabetes, and borderline cases where FPG is equivocal. Protocol: patient fasts for 8–14 hours; a fasting blood sample is drawn; the patient drinks 75 g of anhydrous glucose dissolved in 250–300 mL water over 5 minutes; a second blood sample is drawn at exactly 2 hours. Interpretation: Normal = 2-hour glucose <140 mg/dL; IGT = 140–199 mg/dL; Diabetes = ≥200 mg/dL. Prerequisites: the patient must have consumed ≥150 g carbohydrate per day for 3 days before the test (carbohydrate restriction falsely elevates the 2-hour value); the patient must remain seated and not smoke during the 2-hour interval. In pregnancy, a 75 g OGTT with glucose measured at 0, 1, and 2 hours is used for GDM diagnosis (IADPSG criteria: fasting ≥92, 1-hour ≥180, 2-hour ≥153 mg/dL — any one value diagnostic).
Glycosylated Haemoglobin (HbA1c):
HbA1c measures the percentage of haemoglobin A that has been glycated (glucose non-enzymatically attached to the N-terminus of the beta-chain of haemoglobin). It reflects average blood glucose over the preceding 8–12 weeks (the lifespan of a red blood cell). Diagnostic threshold for diabetes: ≥6.5% (≥48 mmol/mol); prediabetes: 5.7–6.4% (39–47 mmol/mol). Advantages: no fasting required, reflects long-term control (not a single-day snapshot), internationally standardised (NGSP/DCCT certification). Critical limitations (HbA1c IS UNRELIABLE in): haemolytic anaemia (shortened RBC lifespan → falsely low HbA1c); haemoglobinopathies (sickle cell disease, thalassaemia — abnormal Hb species interfere with some assay methods); iron deficiency anaemia (falsely elevated HbA1c due to increased proportion of older, more glycated cells); recent blood transfusion (donor RBCs dilute patient's glycated Hb); pregnancy (physiological anaemia, altered RBC turnover). In all these conditions, use FPG or OGTT for diagnosis and fructosamine for short-term monitoring.
Urinary Microalbumin / Albumin:Creatinine Ratio (ACR):
The first test ordered to screen for diabetic nephropathy. Microalbuminuria = ACR 3–30 mg/mmol (or urinary albumin excretion 30–300 mg/day). Macroalbuminuria = ACR >30 mg/mmol (>300 mg/day). A single morning spot urine ACR is the practical standard, as it avoids the inconvenience of a 24-hour urine collection with equivalent diagnostic accuracy. Caution: a single elevated ACR must be confirmed on at least two of three samples over 3–6 months, because exercise, fever, urinary tract infection, heart failure, and marked hyperglycaemia all cause transient non-diabetic albuminuria.
Serum Creatinine and eGFR:
Assesses the degree of nephropathy/CKD. The CKD-EPI equation is the preferred method for estimating GFR in adults. KDIGO staging: G1 (eGFR ≥90), G2 (60–89), G3a (45–59), G3b (30–44), G4 (15–29), G5 (<15 = kidney failure). Creatinine alone underestimates GFR in early CKD in muscular individuals and overestimates in elderly patients with low muscle mass — always use eGFR.
Fasting Lipid Profile:
Diabetes confers a pro-atherogenic dyslipidaemia: elevated triglycerides, reduced HDL-C, and small dense LDL particles (even if total LDL is normal). Annual fasting lipid profile is mandatory in all diabetic patients. Targets: LDL-C <2.6 mmol/L (100 mg/dL) for most; <1.8 mmol/L (70 mg/dL) if established CVD; triglycerides <1.7 mmol/L (150 mg/dL); HDL-C >1.0 mmol/L (40 mg/dL) in men, >1.3 mmol/L (50 mg/dL) in women.
Serum Electrolytes:
Essential in hyperglycaemic emergencies (DKA and HHS). In DKA: total body potassium (K+) is depleted even when serum K+ is normal or elevated (insulin deficiency shifts K+ extracellularly; acidosis worsens this). Treating DKA with insulin without first checking K+ is dangerous — if K+ <3.5 mEq/L, insulin is withheld until K+ is replaced. Sodium (Na+) may be artefactually low (pseudohyponatraemia) due to extreme hyperglycaemia: corrected Na+ = measured Na+ + 1.6 mEq/L for every 100 mg/dL glucose above 100 mg/dL.
Arterial Blood Gas (ABG):
Mandatory in suspected DKA to confirm metabolic acidosis and assess severity. DKA severity classification:
- Mild: pH 7.25–7.30, bicarbonate 15–18 mEq/L, mild obtundation
- Moderate: pH 7.00–7.24, bicarbonate 10–14 mEq/L
- Severe: pH <7.00, bicarbonate <10 mEq/L, stupor/coma
The anion gap = Na+ − (Cl− + HCO₃−); normal = 8–12 mEq/L; DKA produces a high anion gap metabolic acidosis (HAGMA) typically >20 mEq/L. The anion gap excess is accounted for by ketone bodies (acetoacetate and beta-hydroxybutyrate). In HHS, the ABG is typically normal (no metabolic acidosis).
ECG:
Annual ECG is indicated in diabetic patients >40 years or with hypertension, as diabetic autonomic neuropathy can mask ischaemic symptoms. ECG changes of silent MI (Q waves, persistent ST elevation, LBBB), left ventricular hypertrophy (from hypertension), and arrhythmias (AF — increased risk in DM) are specifically sought.
SELF-CHECK
A 32-year-old woman with sickle cell trait (HbAS) presents for diabetes screening. Her fasting plasma glucose is 119 mg/dL. You order an HbA1c: the result is 5.4%. Which statement BEST explains the interpretation of these results?
A. The HbA1c confirms no diabetes; the elevated fasting glucose is a laboratory error
B. The HbA1c result is unreliable due to haemoglobin variant interference; use FPG and OGTT for diagnosis
C. HbA1c 5.4% excludes prediabetes and the fasting glucose of 119 mg/dL should be repeated for confirmation
D. HbA1c is only unreliable in homozygous sickle cell disease, not sickle cell trait
Reveal Answer
Answer: B. The HbA1c result is unreliable due to haemoglobin variant interference; use FPG and OGTT for diagnosis
HbA1c assays can be unreliable in patients with haemoglobinopathies including sickle cell trait (HbAS), because abnormal haemoglobin variants interfere with some assay methods (particularly immunoassay methods that rely on the beta-chain N-terminus). The result may be falsely low or falsely elevated depending on the assay. In this patient, the fasting glucose of 119 mg/dL is in the IFG range (100–125 mg/dL), suggesting prediabetes. The HbA1c should not be used for diagnosis here; an OGTT should be performed instead. Using HbA1c alone would result in a missed prediabetes diagnosis.
Performing and Interpreting a Capillary Blood Glucose Test
The capillary blood glucose (CBG) test using a glucometer is the most widely performed bedside diagnostic test in diabetes management. It provides a rapid, near-patient measurement of blood glucose within 5–10 seconds and is essential for monitoring glycaemic control, detecting hypoglycaemia, and guiding immediate management decisions in hyperglycaemic emergencies. Unlike laboratory plasma glucose measurements, the CBG test requires proper technique to yield accurate results — errors in technique are a significant source of incorrect clinical decisions.
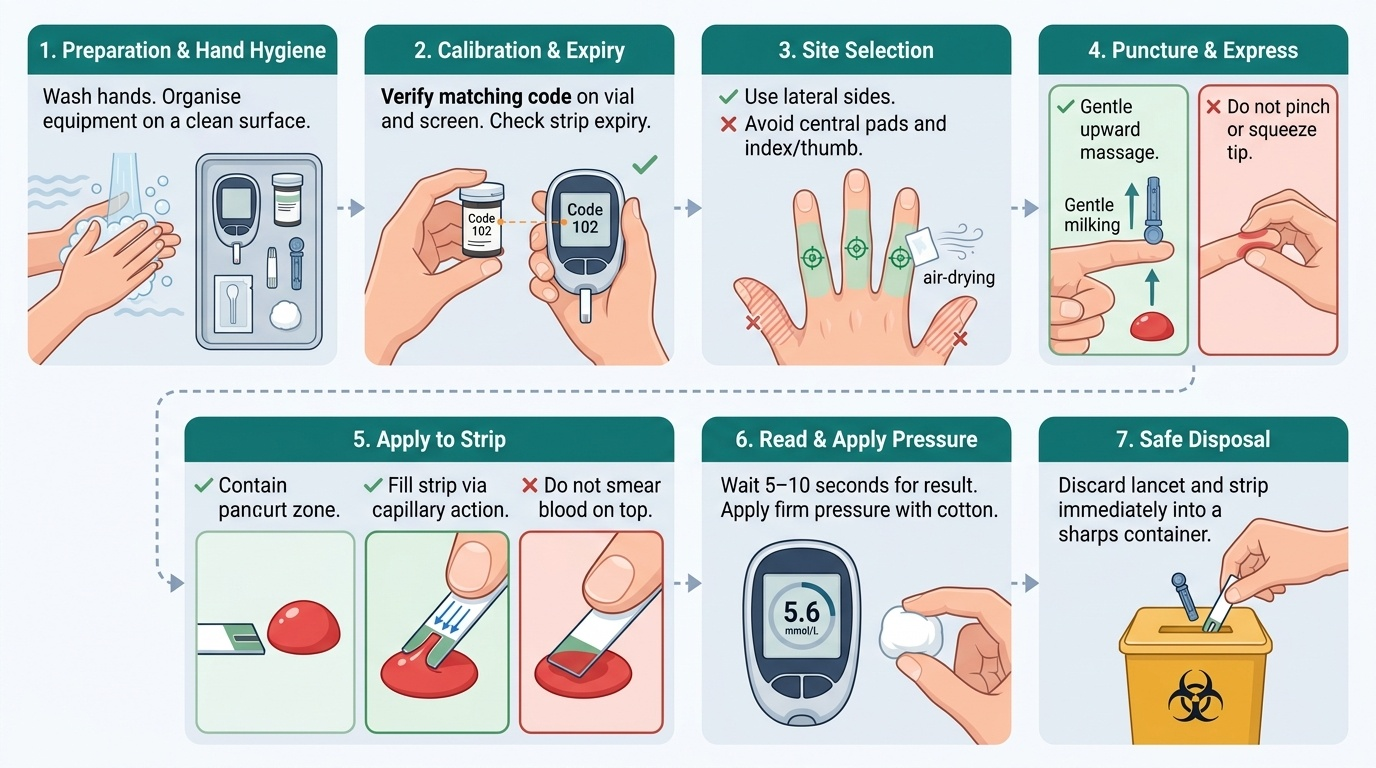
Provided image
Equipment required: A calibrated glucometer (with a current code strip or auto-coded), compatible glucose test strips (checked against the expiry date and the code number on the glucometer), a sterile lancet (single use, appropriate gauge — typically 28–30 gauge for finger capillary testing), an alcohol swab, cotton wool or a small gauze square, and a sharps container for disposal.
Step-by-step technique:
1. Confirm identity and explain the procedure to the patient. Obtain verbal consent. Wash your own hands (or use alcohol gel).
2. Check the glucometer and strips: Verify the test strip code matches the glucometer code (where applicable), check the strip expiry date, and confirm the glucometer has been calibrated with the current strip batch.
3. Select and prepare the finger: Use the lateral aspect of the fingertip (the side of the distal phalanx, not the pad — the pad has more nerve endings and is more painful) on a finger that has been warmed if needed to improve blood flow. Avoid the thumb and index finger (used most in daily activities and therefore most sensitive). Clean the site with an alcohol swab and allow it to dry completely — residual alcohol dilutes the blood sample and causes falsely low readings.
4. Perform the puncture: Apply the lancet device firmly to the lateral fingertip and activate. Express a drop of blood by applying gentle pressure from the base of the finger upward — do not squeeze the fingertip vigorously, as this dilutes the sample with tissue fluid and gives falsely low results.
5. Apply to the test strip: Bring the test strip edge (the target zone) to the blood drop and allow capillary action to fill the measurement zone completely. Do not smear or apply blood to the top surface. Insert the strip into the glucometer before applying blood (or as per the specific device protocol).
6. Read the result: The glucometer displays the result in mg/dL or mmol/L within 5–10 seconds. Document the result with the time.
7. Post-procedure: Apply gentle pressure with cotton wool to the puncture site. Dispose of the lancet immediately into the sharps container — never resheath a used lancet.
Interpreting the CBG result — clinical correlation:
The CBG result must always be interpreted in the clinical context. Accepted reference ranges:
- Normal fasting: 70–99 mg/dL
- Normal postprandial (2-hour): <140 mg/dL
- Hypoglycaemia: <70 mg/dL (clinical threshold); <54 mg/dL = serious hypoglycaemia requiring prompt treatment
- Target fasting in treated T2DM: 80–130 mg/dL (ADA)
- Target 2-hour postprandial in treated T2DM: <180 mg/dL
Important limitations of CBG:
- Not diagnostic: CBG from a glucometer is a screening/monitoring tool; it should NOT be used to make the formal diagnosis of diabetes (laboratory venous plasma glucose or HbA1c must be used for diagnosis, as glucometers have a permissible error of ±15–20%)
- Haematocrit effect: In severe anaemia (low haematocrit), glucometers based on glucose oxidase electrochemistry may overestimate glucose; in polycythaemia, they may underestimate
- Interfering substances: Paracetamol (acetaminophen), ibuprofen, vitamin C, and some other drugs can interfere with electrochemical glucometer systems
- Sample site variation: Capillary blood glucose lags behind venous/arterial blood glucose during rapidly changing glucose states (e.g., after a glucose load or during a hypoglycaemic episode); the lag can be 10–15 minutes
- Cold extremities: Peripheral vasoconstriction reduces blood flow and may affect sample quality
Performing and Interpreting a Urinary Ketone Dipstick Test
The urinary ketone dipstick test is a bedside investigation of critical importance in the assessment of hyperglycaemia, particularly in distinguishing diabetic ketoacidosis from hyperosmolar hyperglycaemic state and in detecting early or subclinical ketosis in T1DM. It is a point-of-care test that can be performed in 60 seconds and should be immediately available in every emergency and diabetes management setting. Understanding both the technique and the biochemical basis of the test is essential for correct interpretation and for recognising its limitations.
Biochemical basis: In states of absolute or relative insulin deficiency, lipolysis is unrestrained and free fatty acids flood the liver. Hepatic beta-oxidation of free fatty acids produces acetyl-CoA, which cannot enter the TCA cycle efficiently (because oxaloacetate is being diverted to gluconeogenesis). Instead, acetyl-CoA is converted to ketone bodies: acetoacetate, beta-hydroxybutyrate (BHB), and acetone. Acetoacetate and acetone are excreted in the urine, where they are detected by the dipstick. The standard dipstick reagent (nitroprusside reaction) detects acetoacetate and acetone but does NOT detect beta-hydroxybutyrate. This is a critical limitation: in severe DKA, the ketone bodies are predominantly beta-hydroxybutyrate (the BHB:acetoacetate ratio rises from the normal 3:1 to as high as 10:1 in severe DKA), which means the dipstick may actually underestimate the severity of ketonaemia. Conversely, during DKA treatment with insulin, BHB is converted to acetoacetate — so the dipstick result may appear to increase during treatment even as the patient is improving. This is why blood ketone measurement (bedside BHB meter) is superior to urinary ketone dipstick for monitoring DKA treatment response.
Equipment: A urine dipstick (e.g., Combur, Multistix, or Keto-Diastix) with an intact ketone reagent pad, a fresh urine sample (midstream clean catch or catheter specimen), and a colour comparison chart (usually printed on the dipstick container).
Step-by-step technique:
1. Confirm identity, explain the procedure, obtain a fresh midstream urine sample. Urine should be tested within 2 hours of collection — prolonged standing at room temperature causes acetoacetate to break down and falsely reduces the ketone reading.
2. Check the expiry date of the dipstick and ensure the container has been stored correctly (tightly capped, away from moisture and heat — exposure to air inactivates the reagent pads).
3. Dip the reagent strip into the urine sample for 1 second (not longer — over-wetting dilutes the reagent), remove it, and shake off the excess urine along the edge of the container.
4. Hold the strip horizontally (to prevent reagents from running onto adjacent pads and cross-contaminating the result).
5. Read the ketone result at exactly 40–60 seconds after dipping (reading too early or too late gives inaccurate results — follow the manufacturer's timing).
6. Compare the colour of the ketone pad to the reference chart on the container under adequate lighting.
Interpreting the result:
| Dipstick reading | Approximate urinary ketone level | Clinical significance |
|---|---|---|
| Negative | <0.5 mmol/L | Normal; not consistent with significant ketosis |
| Trace (+) | 0.5–1.5 mmol/L | Mild ketonaemia; starvation, low-carb diet, or early DKA |
| Small (++) | 1.5–4 mmol/L | Moderate ketonaemia; investigate urgently in diabetic patients |
| Moderate (+++) | 4–8 mmol/L | Significant DKA; immediate management required |
| Large (++++) | >8 mmol/L | Severe ketonaemia; DKA emergency |
Clinical decision rule: In any patient with known T1DM (or newly diagnosed diabetes) with: blood glucose >250 mg/dL AND urinary ketones ≥++ (moderate), or any patient with signs of metabolic acidosis (Kussmaul breathing, vomiting, reduced consciousness), treat as DKA until ABG and laboratory results are available. Do not wait for the laboratory to initiate fluid resuscitation.
Key limitations to remember:
- The dipstick does NOT detect beta-hydroxybutyrate — severe DKA may have only trace/small dipstick ketones if BHB predominates
- False positives: captopril, mesna, and high urinary specific gravity can give false positive results on some dipstick systems
- False negatives: old or improperly stored dipsticks, very dilute urine, and prolonged urine storage
- Urinary ketones can be positive (trace/small) in prolonged fasting, low-carbohydrate diets, alcoholic ketoacidosis, and after prolonged exercise — these must be distinguished from DKA by clinical context and blood glucose
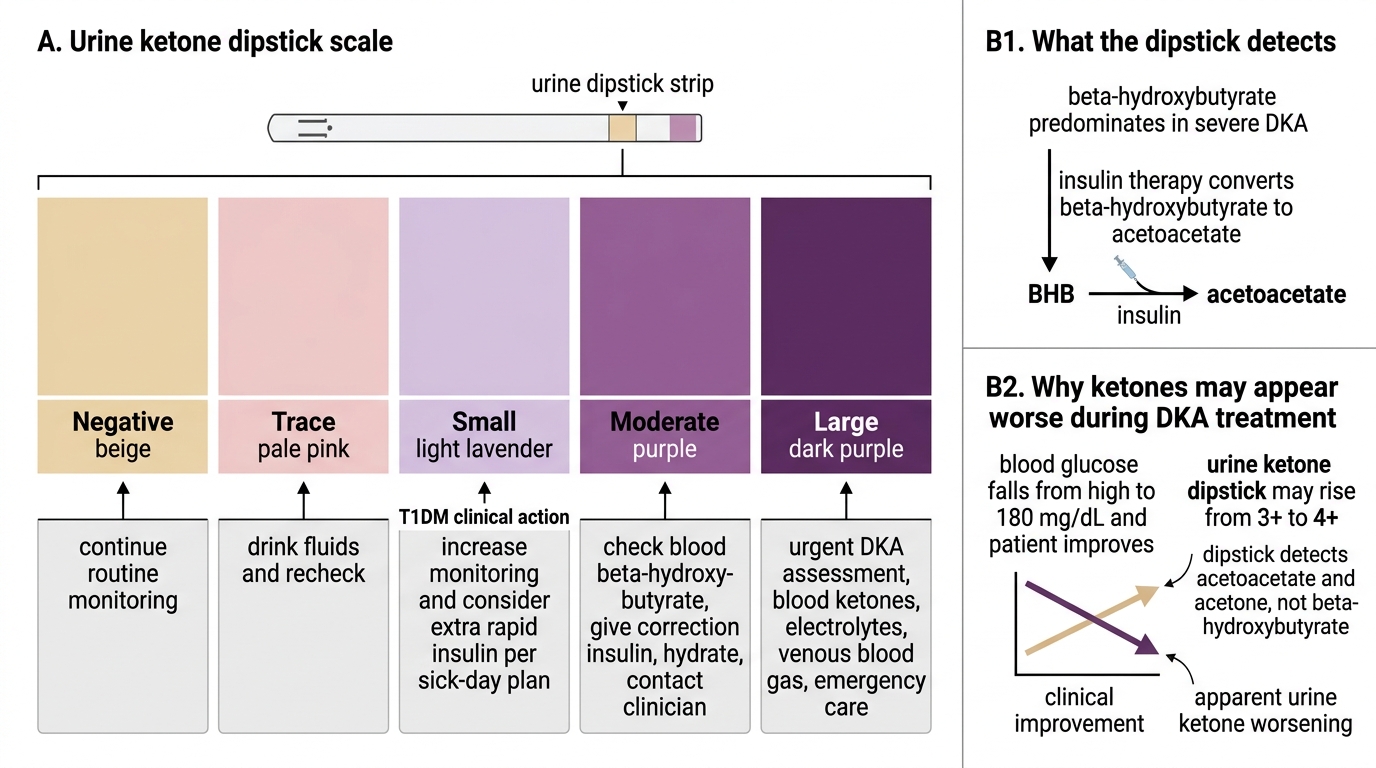
Urinary Ketone Dipstick Interpretation in T1DM
SELF-CHECK
A T1DM patient is being treated for DKA. Six hours after insulin infusion was started, his blood glucose has fallen to 180 mg/dL and his clinical status is improving. A repeat urine dipstick for ketones now shows 4+ (large) — HIGHER than on admission when it was 3+. What is the MOST LIKELY explanation?
A. Insulin resistance has developed, worsening ketogenesis during treatment
B. The dipstick is detecting beta-hydroxybutyrate, which has increased during treatment
C. Insulin is converting beta-hydroxybutyrate to acetoacetate, which the dipstick now detects more
D. The patient has developed lactic acidosis as a complication of DKA treatment
Reveal Answer
Answer: C. Insulin is converting beta-hydroxybutyrate to acetoacetate, which the dipstick now detects more
This is a well-recognised and important phenomenon: the standard urine dipstick detects acetoacetate and acetone but NOT beta-hydroxybutyrate (BHB). In severe DKA, BHB predominates over acetoacetate (ratio can be 10:1). As insulin therapy proceeds, BHB is oxidised to acetoacetate — which the dipstick can now detect. The dipstick result therefore appears to worsen or remain high even as the patient clinically improves and blood glucose falls. This is why blood BHB measurement (bedside ketone meter) is superior to urine dipstick for monitoring DKA treatment response — blood BHB accurately reflects total ketonaemia and will fall with effective treatment.