Page 15 of 28
OG21.2 | IUCD Insertion and Removal — SDL Guide (Part 2)
IUCD Removal Technique
IUCD removal is generally straightforward when the threads are visible, and is significantly simpler than insertion. Every woman who has an IUCD inserted will eventually need it removed — whether at the end of its licensed duration, for a desired pregnancy, because of a complication, or simply at the patient's request. Understanding the removal technique and anticipating difficult scenarios is therefore as essential as the insertion procedure itself. The most important principle is gentleness: threads can be fragile, particularly after many years in situ, and sharp traction can break them and complicate further management. When threads are visible and in good condition, removal takes less than a minute. When threads are missing, a systematic diagnostic algorithm — excluding pregnancy first, then imaging — guides further management. You must be able to counsel patients on each scenario so that they do not delay returning if they notice a problem.
Standard removal (threads visible):
1. Position patient in lithotomy, insert speculum, visualise cervix and threads.
2. Grasp the threads close to the external os with Spencer Wells forceps or ring forceps.
3. Apply gentle, steady, continuous traction in the axis of the uterus. The T-arms fold downward on withdrawal and the device comes out intact. Do not jerk or pull sharply, which can fragment the device or avulse the threads.
4. Inspect the removed device to confirm it is intact (both arms + stem + threads). Incomplete removal requires further assessment.
5. Advise the patient that fertility returns rapidly after removal; if she does not wish to conceive, a new method should be started immediately or a replacement device inserted at the same visit if indicated.
Difficult/failed removal — missing or broken threads:
Missing threads are one of the most common problems encountered after IUCD insertion. The differential diagnosis includes: threads coiled in the cervical canal (most common), thread detachment (the device is still in situ), expulsion (device has come out unnoticed), or uterine perforation (device has migrated out of the uterine cavity). The clinical approach is:
1. Confirm pregnancy is excluded (pregnancy with an IUCD in situ is a serious complication — see complications section).
2. Ultrasound pelvis — identifies whether the device is in the uterine cavity, confirms its position.
3. If device is in situ on ultrasound: probe the cervical canal gently with a thread-retriever (Emmett's thread retriever or IUD retriever hook) under good light; if threads are found in the canal, retrieve as above.
4. If threads cannot be retrieved and device is confirmed in situ, hysteroscopic removal or alligator forceps under ultrasound guidance may be needed — refer appropriately.
5. If ultrasound shows no device in the uterus: X-ray pelvis (supine AP + lateral) to look for a displaced (extra-uterine) device — copper is radiopaque. A device not in the uterus and not found on X-ray has been expelled; if seen outside the uterus, it has perforated (see complications).
When removal is requested for conception, reassure that fertility typically returns to baseline within one menstrual cycle of removal.
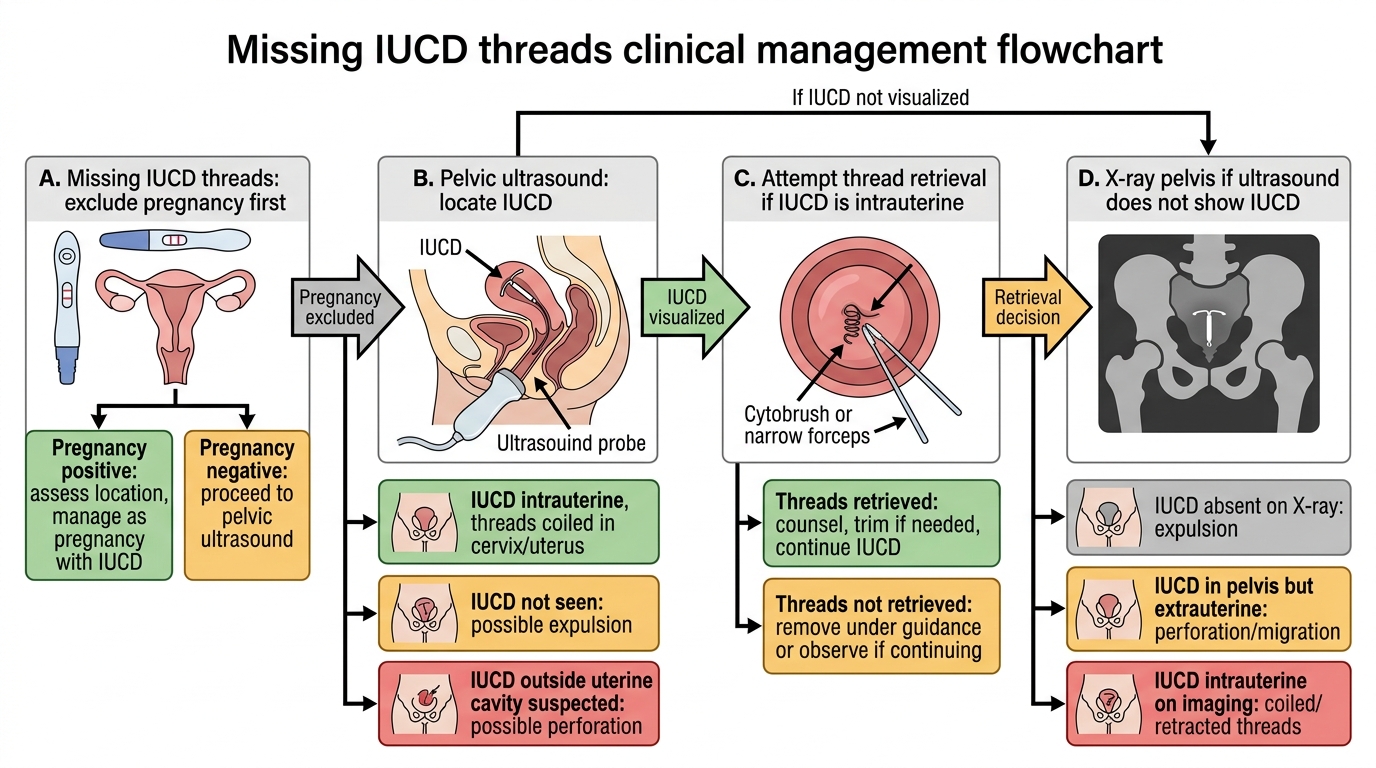
Management Algorithm for Missing IUCD Threads
SELF-CHECK
During IUCD insertion using the plunger-withdrawal technique, the outer tube is withdrawn approximately 1–2 cm while the plunger rod is held stationary. What is the purpose of this manoeuvre?
A. To advance the device further into the uterine cavity beyond the fundus
B. To release the T-arms of the device within the uterine cavity at the fundal level
C. To measure the uterine sounding depth before final placement
D. To trim the threads to an appropriate length before withdrawal
Reveal Answer
Answer: B. To release the T-arms of the device within the uterine cavity at the fundal level
The plunger-withdrawal (no-push) technique releases the T-arms by drawing back the outer tube while keeping the plunger — and thus the device itself — stationary at the fundal level. This avoids pushing the device against the fundus (which could traumatise the endometrium or perforate). The T-arms spring open within the cavity, anchoring the device. Sounding is a prior step; thread trimming is a subsequent step.
Interpretation of Findings and Complications
Recognition and initial management of IUCD complications is as important as the insertion technique itself. While serious complications are uncommon, they can be life-threatening if missed — particularly perforation and ectopic pregnancy.
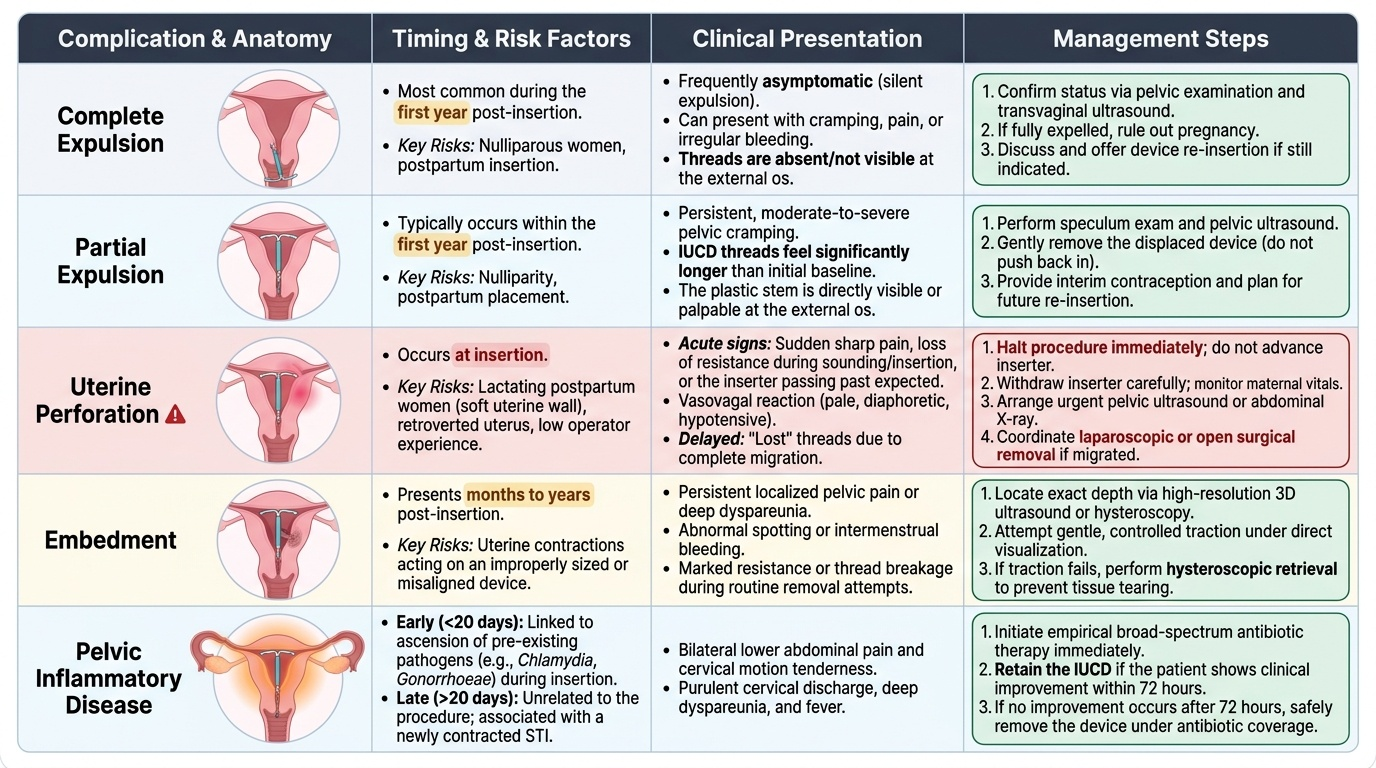
Expulsion occurs most commonly in the first year after insertion, especially in nulliparous women and following postpartum insertion. Partial expulsion (device partly in the cervical canal) presents with prolonged cramping and/or visible threads at the external os longer than expected, or the device visible at the cervix. Complete expulsion may be silent or associated with pain and heavier bleeding. Management: confirm by examination ± ultrasound; if expelled, offer re-insertion if indicated.
Uterine perforation is a rare but serious complication occurring at the time of insertion, usually from the sound or the inserter penetrating the myometrium or serosa. Risk factors: postpartum lactating women (uterus is soft and more easily perforated), retroverted uterus, inexperienced operator. Clinical features at time of insertion: sudden onset of sharp pain, loss of resistance, inserter passing further than expected sounding depth, or the patient becoming pale and diaphoretic. Management: stop the procedure immediately, remove the inserter if possible without further advancement, observe for pain and haemodynamic instability, arrange ultrasound ± surgical assessment. A device that has perforated and migrated into the peritoneal cavity requires laparoscopic or open surgical removal — it cannot be left in situ (copper causes peritoneal adhesions).
Pelvic inflammatory disease (PID) occurring within the first 20 days of insertion is almost always related to ascent of pre-existing lower genital tract organisms (most commonly Chlamydia trachomatis or Neisseria gonorrhoeae) at the time of insertion — emphasising the importance of pre-insertion STI screening in high-risk women. PID presenting after 20 days post-insertion is typically unrelated to the device and reflects new acquisition of STI. Management: treat with appropriate antibiotics; removal of the device is generally NOT required if the patient responds to treatment within 72 hours. If no improvement occurs or the patient is severely ill, consider device removal.
Ectopic pregnancy risk: while IUCDs are highly effective at preventing intrauterine pregnancy (>99%), they are less effective at preventing ectopic implantation. If a woman conceives with an IUCD in situ, the probability that the pregnancy is ectopic is substantially higher than in the general population. Any woman with an IUCD who presents with amenorrhoea, unilateral pelvic pain, or light vaginal bleeding must have a pregnancy test and pelvic ultrasound to exclude ectopic pregnancy — this is a clinical emergency.
Intrauterine pregnancy with IUCD in situ (rare, usually from expulsion): if the threads are visible, the device should be removed in the first trimester to reduce the risks of miscarriage, septic abortion, and preterm labour. If threads are not visible, a decision on removal is made after ultrasound localisation, with counselling about ongoing pregnancy risks.
Menstrual changes: copper IUCDs commonly cause heavier, more prolonged, and occasionally more painful periods (menorrhagia, dysmenorrhoea) for the first 3–6 months; this usually improves but may persist. If severe, consider removing and offering an alternative. LNG-IUS typically causes irregular spotting for the first 3–6 months followed by very light periods or amenorrhoea — a desirable outcome for many women, but requires advance counselling to avoid alarm.
Provided image
Supervised Practice and Competency Benchmarks
The NMC competency OG21.2 specifies that learners must demonstrate IUCD insertion and removal in a simulated environment at the SH (Skills in a simulated or supervised clinical setting) level. This means that by the end of Phase III, you must be able to perform the procedure correctly on a pelvic task-trainer under supervision, and you should observe the procedure in actual patients under the guidance of a senior clinician. Simulation-based training is not merely a box-ticking exercise: research consistently shows that trainees who achieve proficiency on task-trainers before clinical exposure make fewer technique errors, cause less patient discomfort, and have lower rates of immediate complications. The SH competency level reflects the reality that IUCD insertion is performed in patients only once the learner has demonstrated safe technique in a controlled environment. Your preparation should therefore include multiple task-trainer sessions until the ten-step sequence is automatic, review of the complication recognition framework, and deliberate practice of the post-procedure counselling conversation. Only then should you seek supervised clinical observation opportunities.
In the simulation laboratory, the OSCE-style assessment checklist covers:
- Correct patient positioning and verbal consent review (1 point)
- Correct bimanual examination and identification of uterine position (1 point)
- Speculum insertion and cervical visualisation with antiseptic application (1 point)
- Vulsellum placement and appropriate traction (1 point)
- Uterine sounding with correct depth measurement and recording (1 point)
- Flange adjustment to match sounding depth (1 point)
- Device loading with no-touch technique within 5 minutes (1 point)
- Correct insertion to fundal level and withdrawal of outer tube to release arms (2 points)
- Thread trimming to 2–3 cm (1 point)
- Post-procedure counselling points (2 points)
A passing performance typically requires at least 9/12 points with no critical errors (e.g., failure to confirm uterine position, failure to perform sounding, no-touch violation that introduces contamination into the cavity).
During supervised clinical observation: focus on observing the operator's technique at each step, particularly the sounding and insertion sequence; note how the operator manages minor difficulties (uterine flexion, cervical stenosis, patient discomfort); and ask about the operator's decision-making at key choice points (timing, device type, handling of side effects). You are NOT expected to independently perform this procedure on a patient until certified competent by a supervisor — the SH competency level reflects this. Document each supervised observation in your logbook with date, clinical context, and a reflective note.
Between simulation sessions: practise the sequence of steps by verbalising the procedure aloud (cognitive walkthrough), rehearsing instrument handling on the task-trainer, and reviewing complication scenarios using the comparison framework above.
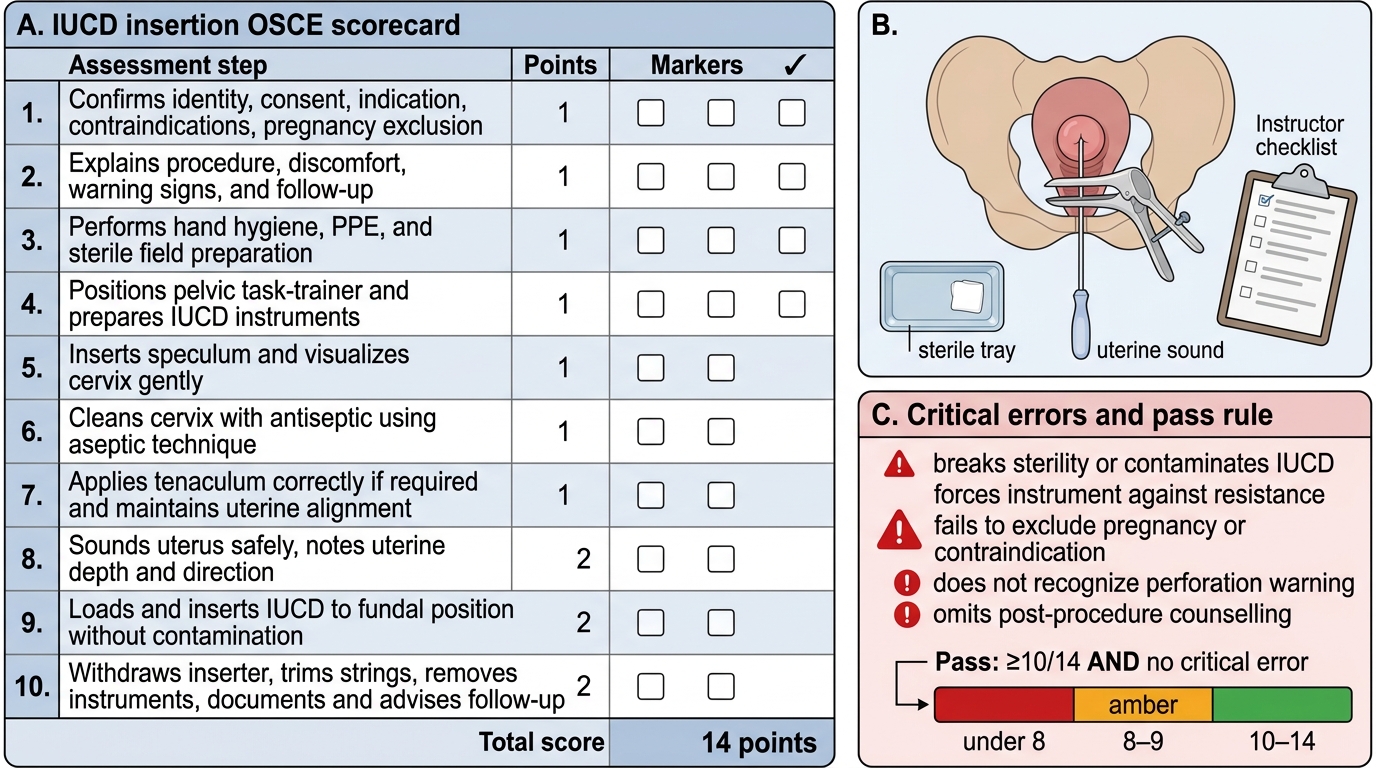
IUCD Insertion OSCE Scorecard