Page 6 of 27
OG37.2-3 | Laparotomy and Hysterectomy Observation — SDL Guide (Part 2)
Total Abdominal Hysterectomy (TAH) — Step-by-Step Observation
The TAH proceeds through a defined anatomical sequence. The observer who has memorised this sequence can follow each step and anticipate the next — this is the hallmark of a well-prepared surgical observer.
Step 1 — Round ligament division. The round ligament on each side is clamped, cut, and ligated close to the uterine cornu. This opens the anterior and posterior leaves of the broad ligament and provides the entry plane for subsequent dissection.
Step 2 — Broad ligament opening and adnexal decision. If the ovaries are to be conserved, the tube and ovarian ligament (utero-ovarian ligament) are clamped and divided close to the uterus, leaving the adnexa attached to the pelvic sidewall. If the ovaries are to be removed (bilateral salpingo-oophorectomy, BSO), the IP ligament (containing the ovarian vessels) is clamped — but only after the ureter is identified running posterior to it.
Step 3 — Bladder flap creation. The vesicouterine peritoneum is incised and the bladder reflected downward, exactly as in CS, to expose the lower uterus and cervix.
Step 4 — Uterine artery ligation. This is the pivotal step. The uterine artery is clamped at the level of the internal os, lateral to the cervix — but medial to the ureter. Watch the surgeon identify the ureter before placing the clamp. The vessels are doubly clamped (a straight Heaney clamp on the specimen side, a curved Heaney clamp on the stump side), cut, and ligated with absorbable suture.
Step 5 — Cardinal and uterosacral ligaments. The parametrial tissue (cardinal ligaments) is divided in successive bites from lateral to medial, progressively skeletonising the cervix. The uterosacral ligaments are divided posteriorly at the level of the posterior vaginal fornix.
Step 6 — Colpotomy and specimen removal. The surgeon places clamps on both sides of the vaginal vault, incises the vagina circumferentially at the level of the fornices, and removes the uterus and cervix en bloc. A swab count is performed. The vaginal cuff is then closed with interrupted or continuous absorbable sutures (Vicryl), and the pelvic peritoneum may or may not be formally closed.
Step 7 — Specimen inspection. The removed specimen is opened on a separate trolley and inspected — the fibroids, the endometrium, the cervix. This is a teaching moment: the pathology that caused the symptoms is now directly visible.
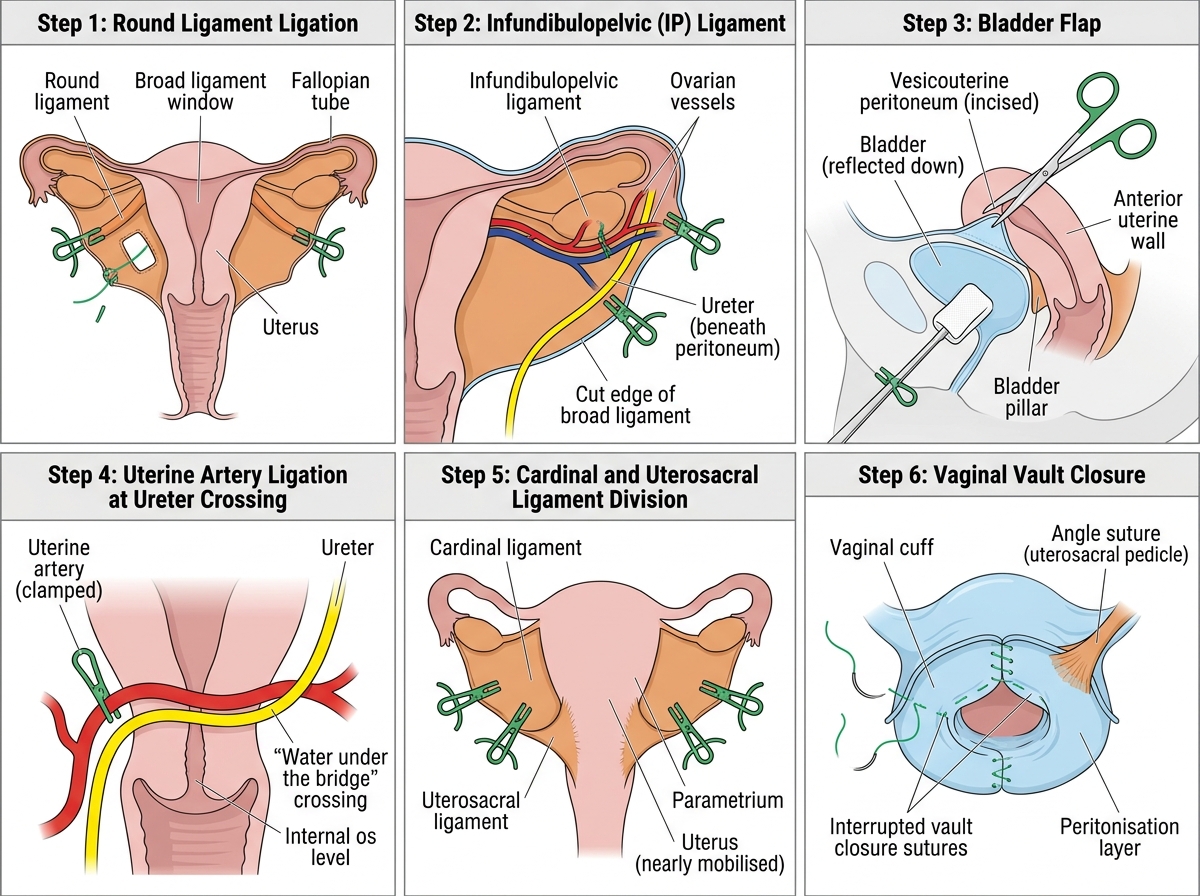
Sequential Steps of Total Abdominal Hysterectomy (TAH): Operative Observer's View
Vaginal Hysterectomy (VH) — Observing the Vaginal Approach
The vaginal hysterectomy is performed entirely through the vaginal route, and for an observer it provides a uniquely different perspective from the abdominal approach. The anatomy is familiar but viewed from below and in reverse order — the surgeon works from the vaginal margin upward toward the fundus, which is the opposite of TAH. Understanding this reversal is key to following the procedure.
VH is preferred in cases of uterovaginal prolapse (the uterus descends with traction facilitating delivery), in women with smaller uteri where abdominal access is not required, and in patients in whom abdominal incisions carry a higher risk (obesity, previous abdominal surgery in selected cases). The key prerequisites that the surgeon will have assessed preoperatively are adequate vaginal access, a mobile, non-adherent uterus, uterine size ≤12–14 weeks, no suspected adnexal pathology, and no indication for pelvic exploration.
Steps of VH observed:
Step 1 — Circumferential vaginal incision. The cervix is grasped with a tenaculum and put on traction. A circumferential incision is made in the vaginal mucosa at the cervicovaginal junction, separating the vaginal wall from the cervix.
Step 2 — Anterior dissection (bladder reflection). The vesicovaginal space is entered anteriorly, and the bladder is reflected upward with a blunt-ended retractor, exposing the anterior peritoneum of the vesicouterine pouch (pouch of vesicouterine). This is entered sharply to access the peritoneal cavity.
Step 3 — Posterior dissection (pouch of Douglas entry). The rectovaginal space is developed posteriorly, and the pouch of Douglas peritoneum is entered — allowing the surgeon to feel and see the posterior peritoneal cavity.
Step 4 — Uterosacral and cardinal ligament division. The uterosacral ligaments are clamped, cut, and ligated on each side (these are the first pedicles taken in VH, opposite to TAH where they are the last). The cardinal ligaments are progressively divided in bites, skeletonising the cervix from below.
Step 5 — Uterine artery ligation. The uterine arteries are clamped, cut, and ligated bilaterally. Again, the ureter is at risk here even in VH, as it lies close to the uterine artery — the surgeon uses traction and counter-traction to ensure safe clamping.
Step 6 — Fundus delivery and upper pedicles. With the cervix freed and the uterus mobilised, the fundus is delivered through the vaginal opening, often by rotating the uterus. The utero-ovarian ligaments are clamped and divided if the ovaries are not being removed. The round ligaments are divided last.
Step 7 — Vault closure and pelvic floor repair. The peritoneum is closed with a purse-string suture, and the vaginal vault is closed. If prolapse repair was the primary indication, an anterior and/or posterior colporrhaphy is performed at the same sitting.
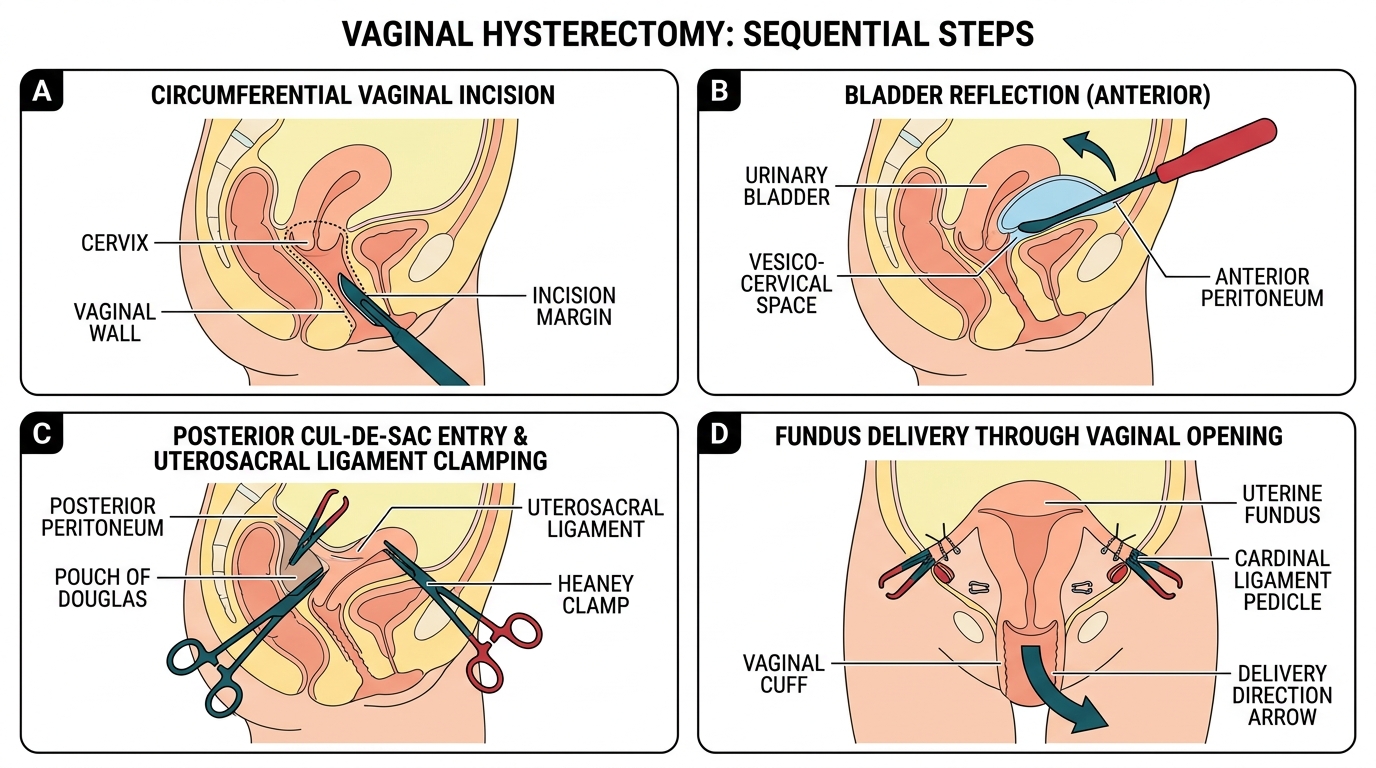
Sequential Steps of Vaginal Hysterectomy (VH)
SELF-CHECK
A 55-year-old woman with stage II uterovaginal prolapse (cervix at the hymenal level, anterior and posterior vaginal wall descent) and a uterus of 10 weeks size is scheduled for hysterectomy. Which approach is MOST appropriate, and what additional procedure is likely to be performed simultaneously?
A. TAH with BSO — abdominal approach is standard for all hysterectomies after menopause
B. VH with anterior and posterior colporrhaphy — vaginal approach preferred for prolapse with simultaneous pelvic floor repair
C. TLH — laparoscopic approach always preferred for uterovaginal prolapse
D. Subtotal hysterectomy — the cervix should be retained for pelvic floor support
Reveal Answer
Answer: B. VH with anterior and posterior colporrhaphy — vaginal approach preferred for prolapse with simultaneous pelvic floor repair
Uterovaginal prolapse with a mobile uterus of adequate size is the classic indication for VH, because the uterine descent facilitates vaginal delivery and the vaginal approach allows simultaneous anterior and/or posterior colporrhaphy for pelvic floor repair. TAH would require a separate or additional vaginal approach for the prolapse repair. Subtotal hysterectomy (retaining the cervix) is not performed for prolapse as it leaves the cervix in situ, which would prolapse independently.
Intraoperative Findings — What the Observer Should Identify and Interpret
The observer at a hysterectomy or laparotomy who understands the anatomy can identify several intraoperative findings that directly influence the surgeon's decision-making. Watching for these findings and understanding their implications transforms passive observation into active learning.
Adhesions. Adhesions — fibrous bands from previous surgery, endometriosis, or pelvic inflammatory disease — distort the normal anatomical planes. At laparotomy, the surgeon performs adhesiolysis before attempting the hysterectomy, carefully separating adhesions between the uterus, tubes, ovaries, bowel, and bladder. Watch how the surgeon distinguishes filmy, easily separated adhesions (using blunt dissection) from dense, vascular adhesions (requiring sharp dissection with scissors, risking enterotomy or vessel injury). Dense pelvic adhesions from endometriosis or previous surgery are the most frequent reason a planned VH is converted to TAH intraoperatively.
Fibroid mapping. In a fibroid uterus, the surgeon palpates and mentally maps the number, size, and positions of fibroids before starting the hysterectomy. Pedunculated fibroids on the serosa are straightforward; intracavitary (submucosal) or deep intramural fibroids may distort the anatomy considerably. Watch the surgeon adjust the incision planes to account for fibroid positions — particularly when creating the bladder flap in a uterus where an anterior intramural fibroid is bulging forward.
Ureter identification. Watch for the moment when the surgeon pauses at the level of the uterine artery and either palpates the ureter (a distinctive hard rolling sensation like a thick cord) or uses a ureteric catheter (placed cystoscopically before surgery in difficult cases) to delineate its course. In straightforward cases the surgeon may not formally dissect the ureter; in cases with adhesions, large fibroids, or a history of pelvic infection, formal ureterolysis is performed before any clamping.
Specimen inspection. After the uterus is removed, the specimen is inspected on the back table. The surgeon or scrub nurse will identify any unexpected findings — a cervical polyp, a pale nodular area on the endometrium suggesting malignancy, or fibroids that were larger or more numerous than anticipated on imaging. Any unexpected finding is reported and a fresh histology specimen is sent in addition to the routine specimen jar.
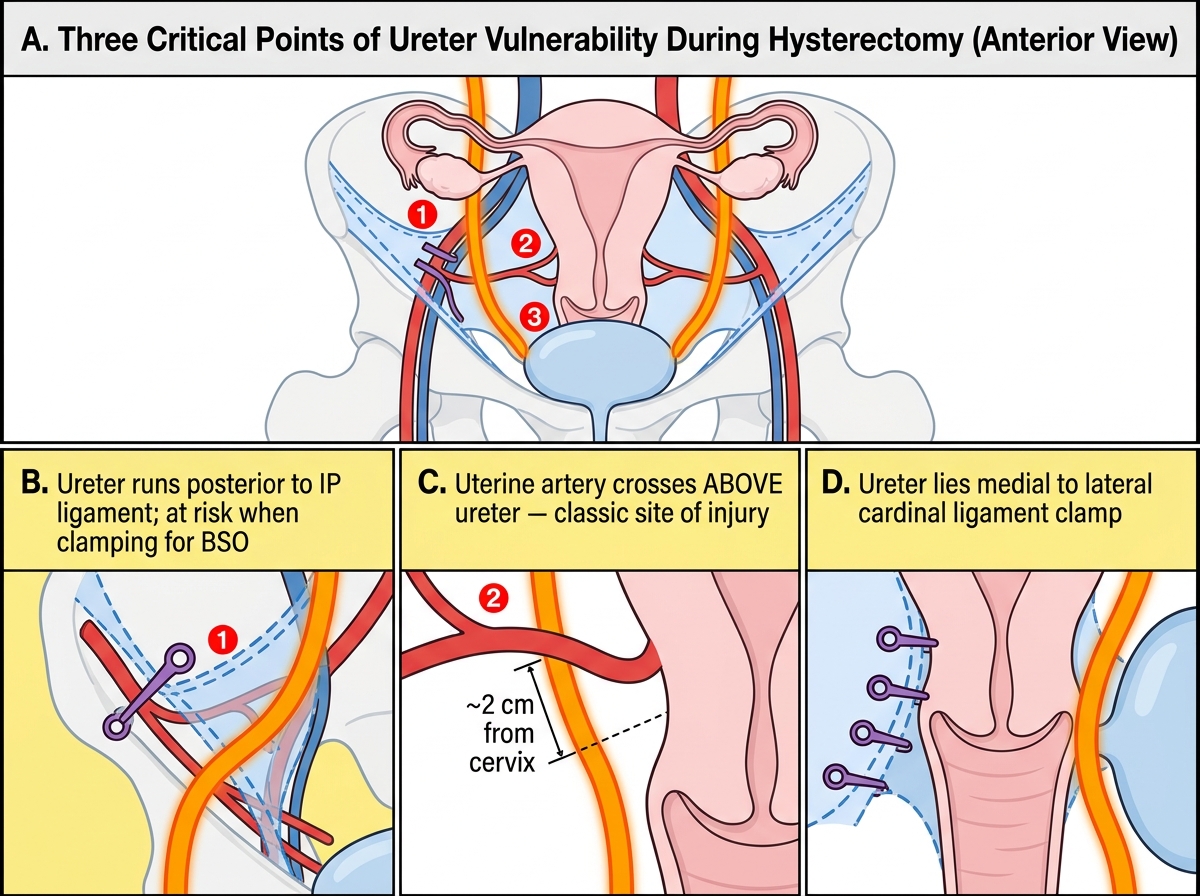
Three Critical Points of Ureter Vulnerability During Hysterectomy
SELF-CHECK
During a TAH for a 16-week fibroid uterus, the surgeon finds dense adhesions between the posterior uterine wall and the sigmoid colon. The planned vaginal approach has already been abandoned in favour of TAH. What is the observer witnessing in terms of the surgical decision-making process, and what does this mean for the operative plan?
A. An incidental finding that does not affect the hysterectomy; adhesions posterior to the uterus are not relevant to the operation
B. A risk factor for bowel injury during posterior dissection; the surgeon will perform careful adhesiolysis and may need a colorectal surgeon if the bowel is entered
C. A finding that indicates the surgery should be abandoned and rescheduled
D. An indication that the uterus should be morcellated rather than removed intact
Reveal Answer
Answer: B. A risk factor for bowel injury during posterior dissection; the surgeon will perform careful adhesiolysis and may need a colorectal surgeon if the bowel is entered
Dense adhesions between the posterior uterus and sigmoid colon are a significant risk for bowel injury during posterior dissection and uterosacral ligament division. The surgeon will perform careful, often slow, sharp adhesiolysis with scissors before attempting division of the uterosacral ligaments. If the bowel is inadvertently entered, primary repair is performed immediately, and a colorectal surgeon is called if the injury is extensive. This is a key reason for requesting senior assistance or converting a planned shorter procedure into a more careful dissection.