Page 11 of 21
OG13.5-7 | Normal Labour Skills — SDL Guide (Part 2)
Artificial Rupture of Membranes (ARM): Technique and Safety
Artificial rupture of membranes (ARM), also called amniotomy, is the deliberate rupture of the chorioamniotic membranes using a sharp instrument inserted through the cervix. It is one of the most commonly performed obstetric procedures, appearing simple but carrying real risks when performed without the prerequisite check of fetal head engagement. The procedure relies on a single anatomical principle: the fetal presenting part must be well-applied to the cervix before the membranes are ruptured, so that the sudden egress of amniotic fluid does not carry a loop of umbilical cord through the cervix ahead of the presenting part. When this principle is violated — most often when the head is unengaged or when polyhydramnios allows cord mobility — cord prolapse, a life-threatening emergency, can result. ARM is used to assess liquor colour, to allow fetal scalp electrode attachment for continuous CTG monitoring, to accelerate slow labour in active-phase arrest with a well-engaged head, and as part of induction of labour protocols.
Indications for ARM:
- Slow active-phase progress when the head is engaged and oxytocin augmentation is planned
- Assessment of liquor for meconium staining
- Induction of labour (as part of the induction protocol after cervical ripening)
- Fetal blood sampling or scalp electrode application requiring direct access to the presenting part
Contraindications:
- Unengaged presenting part (head above the ischial spines, station –2 or higher) — highest risk of cord prolapse
- Placenta praevia — membranes may be covering the placenta; blind rupture risks catastrophic haemorrhage
- Active genital herpes or other transmissible infection where membrane integrity is protective
- HIV infection with high viral load — membranes protect the fetus from intrapartum vertical transmission
- Cord presentation — if the cord is felt ahead of the presenting part on vaginal examination, ARM is absolutely contraindicated
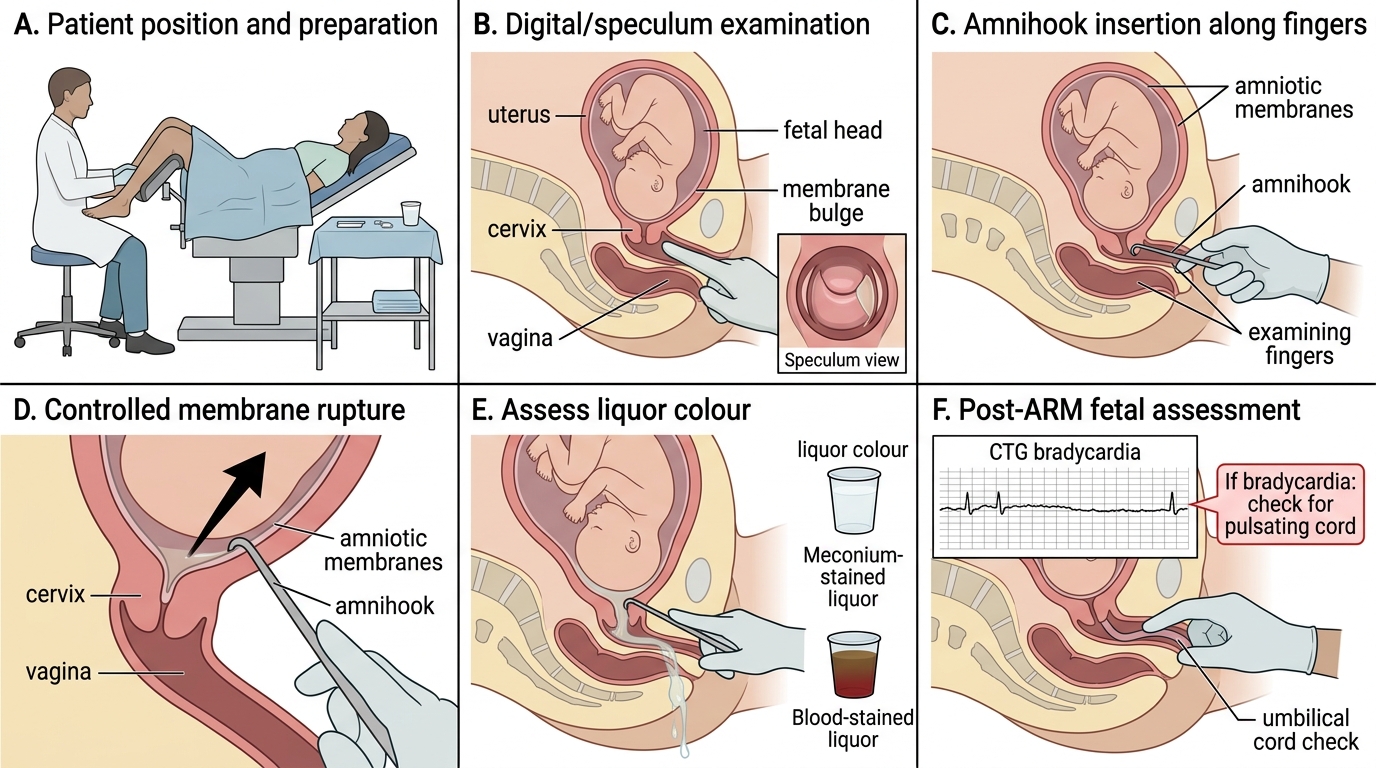
Technique (observe/assist level):
1. Explain the procedure to the patient and obtain verbal consent.
2. Position: dorsal lithotomy or left lateral.
3. Perform an aseptic vaginal examination to confirm cervical dilatation (≥3–4 cm recommended), assess station (head must be engaged), and check for cord presentation (pulsating structure felt ahead of the head).
4. Auscultate the fetal heart rate before the procedure.
5. Under aseptic conditions, introduce the amnihook (or Kocher clamp with toothed tip) alongside the examining fingers into the cervical os, ideally during a uterine contraction (when the membranes are taut and the presenting part is pressed down).
6. Apply the toothed tip to the membrane and snag — do not sweep or pull; a single deliberate puncture is sufficient.
7. Allow the amniotic fluid to drain slowly, keeping the presenting part pressed against the cervix with the examining hand to reduce cord prolapse risk.
8. Assess the liquor: note colour (clear, blood-stained, meconium grade I/II/III), volume (normal vs oligohydramnios).
9. Auscultate the fetal heart rate immediately after the procedure. A persistent bradycardia or prolonged deceleration after ARM suggests cord prolapse — perform immediate vaginal examination to check for a pulsating cord.
10. Document: time of procedure, liquor colour, and post-ARM FHR.
Artificial Rupture of Membranes: Step-by-Step Technique and Immediate Safety Check
SELF-CHECK
Immediately after performing ARM on a patient at 6 cm with an engaged head, the CTG shows a prolonged bradycardia to 70 bpm lasting 3 minutes. What is the most urgent immediate action?
A. Give oxygen by face mask and administer 500 mL IV fluid bolus
B. Perform immediate vaginal examination to check for a pulsating umbilical cord in the vagina
C. Call for caesarean section and transfer the patient immediately to the theatre
D. Increase oxytocin infusion rate to accelerate delivery
Reveal Answer
Answer: B. Perform immediate vaginal examination to check for a pulsating umbilical cord in the vagina
A prolonged bradycardia immediately following ARM must raise the immediate suspicion of cord prolapse — a loop of umbilical cord that has been washed through the cervix by the gush of amniotic fluid and is now being compressed by the fetal presenting part. The first action is to perform an immediate vaginal examination to feel for a pulsating cord. If cord prolapse is confirmed, the hand should remain in the vagina to manually elevate the presenting part off the cord while urgent caesarean section is arranged. This is a true obstetric emergency where seconds matter — oxygen and fluids are supportive but secondary to definitively diagnosing and relieving cord compression.
Conduct of Normal Vaginal Delivery
The conduct of a normal vaginal delivery is the clinical embodiment of the seven cardinal movements described theoretically in OG13.2. Every action of the birth attendant is designed to guide the fetus through its natural mechanism while protecting the mother from perineal trauma and managing the third stage to prevent haemorrhage. As a final-year student observing and assisting a delivery, you need to know the sequence in enough detail to anticipate the next step, prepare the necessary equipment, and recognise when something is deviating from the expected.
Preparation and pushing (second stage):
The patient is positioned for delivery — dorsal lithotomy for most institutional deliveries, though upright and lateral positions are encouraged in midwifery-led settings. Vulval and perineal cleaning is performed. The CTG monitor remains on until delivery. When the head is visible at the introitus with pushes (crowning), the attendant is positioned at the perineum.
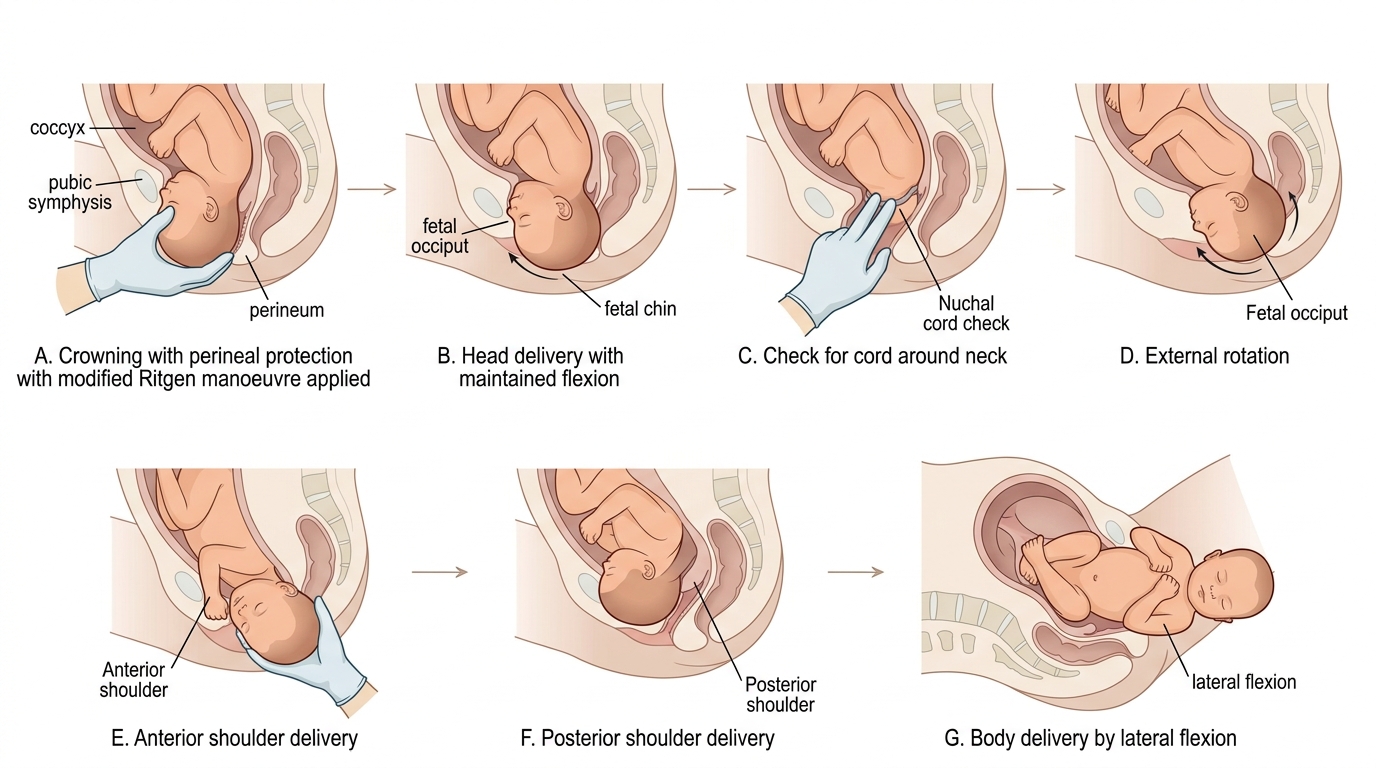
Delivery of the head:
As the head crowns, the modified Ritgen manoeuvre is applied: one hand maintains gentle pressure over the occiput to prevent rapid extension (which risks perineal tearing), while the other hand applies upward pressure through the perineum beneath the fetal chin to assist controlled extension. The head should be delivered slowly, between contractions if possible, to allow perineal stretching. The mother is asked to pant (short shallow breaths) to reduce pushing force at this critical moment.
Check for nuchal cord: After head delivery, check for a loop of umbilical cord around the neck. If loose — slip over the head. If tight — double clamp and cut (this is rarely necessary and interrupts the third stage mechanism).
External rotation: The delivered head rotates spontaneously to face either the left or right thigh as the shoulders complete their internal rotation. No traction is applied at this point — wait for the next contraction.
Delivery of the anterior shoulder: With the next contraction, gentle downward traction is applied to the head to bring the anterior shoulder under the symphysis pubis. The attendant's hands grasp the head on the sides (not by neck) and apply traction in the direction of the pelvic axis.
Delivery of the posterior shoulder: The head is lifted upward over the perineum (toward the mother's abdomen), and the posterior shoulder is delivered over the perineum. The body follows rapidly by lateral flexion.
Third stage — AMTSL: Immediately as the anterior shoulder delivers, the midwife/assistant gives oxytocin 10 IU IM. After the cord is clamped and cut (delayed clamping at 1–3 min recommended for term neonates), the placenta is delivered by controlled cord traction (Brandt-Andrews manoeuvre): firm traction on the cord while counter-pressure is applied suprapubically until the placenta is delivered. Signs of placental separation: cord lengthening, gush of blood, fundus rises and becomes globular. After delivery, the uterus is massaged to maintain tone.
Steps of Normal Vaginal Delivery
Interpretation of Findings and Applied Practice
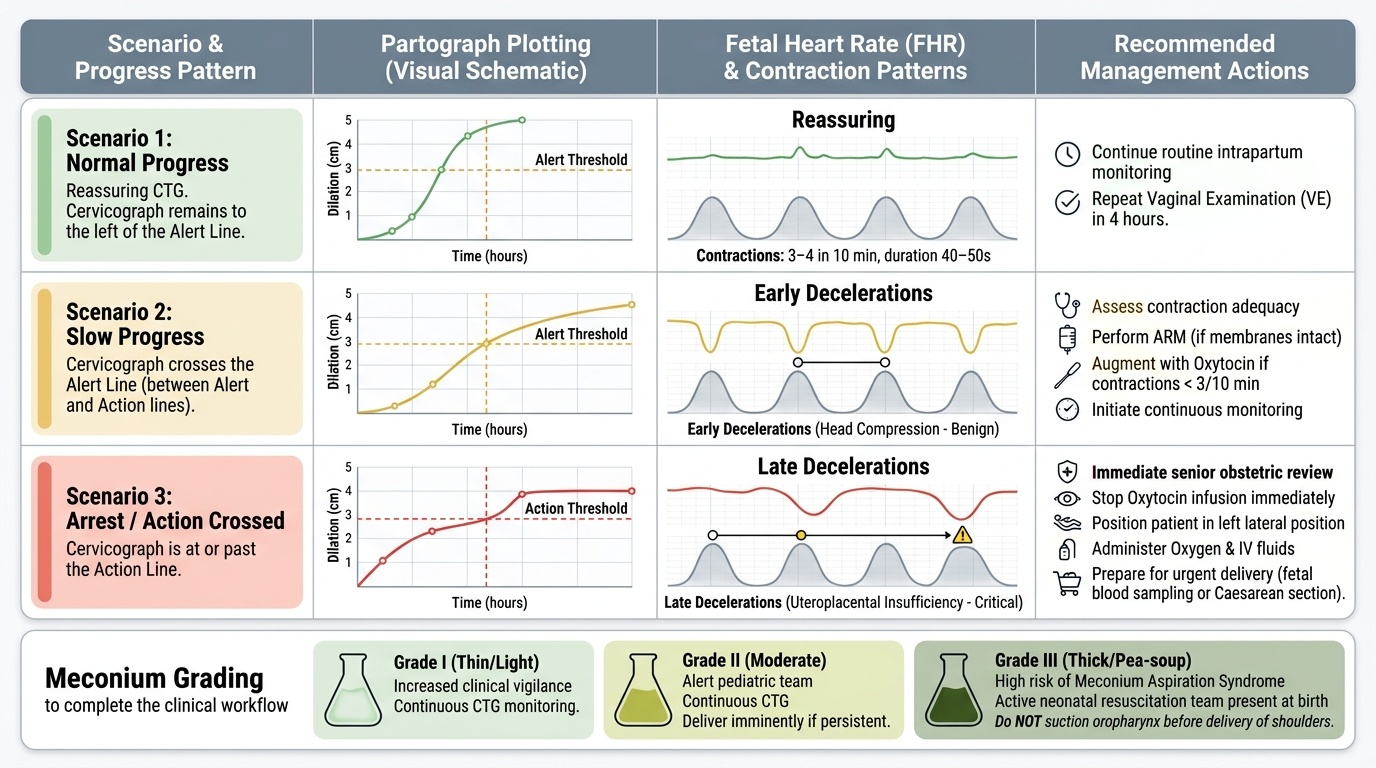
Integrating partograph findings with fetal heart rate patterns and clinical examination is the highest-level skill in intrapartum monitoring. Three clinical scenarios illustrate the integrated interpretation that a final-year student must be able to perform.
Scenario 1 — Normal progress with reassuring CTG: Cervicograph plotting is to the left of the alert line; FHR 120–150 bpm with accelerations; contractions 3–4/10 min, each 40–50 s; no decelerations. Decision: continue routine monitoring, repeat VE in 4 hours.
Scenario 2 — Slow progress with early decelerations: Cervicograph crosses the alert line; FHR shows early decelerations (mirror the contraction, nadir at contraction peak, return to baseline before contraction ends — due to head compression, benign). Decision: assess contraction adequacy; if <3/10 min, augment with oxytocin after ARM (if membranes intact); close monitoring.
Scenario 3 — Action-line crossing with late decelerations: Cervicograph at or past the action line; FHR shows late decelerations (onset after contraction peak, nadir after peak, slow return after contraction — uteroplacental insufficiency pattern). Decision: immediate senior review; stop oxytocin; position left lateral; oxygen; IV fluid; prepare for delivery (fetal blood sampling or caesarean depending on gestation and cervical findings).
Meconium grading: Grade I (thin, light) — increased vigilance; continuous CTG. Grade II (moderate) — paediatric team alert; continuous CTG; delivery imminent if grade II persists. Grade III (thick, pea-soup) — significant risk of meconium aspiration syndrome; active resuscitation team present at delivery; do NOT suction the oropharynx before shoulder delivery (evidence reversed; suction at delivery if thick meconium at vocal cords).
Provided image
SELF-CHECK
Thick green meconium-stained liquor is noted after ARM. The fetal heart rate pattern shows late decelerations. What is the single most appropriate immediate action?
A. Increase the rate of the oxytocin infusion to accelerate delivery
B. Stop oxytocin, position left lateral, give oxygen, call senior obstetrician for urgent delivery decision
C. Perform immediate suctioning of the oropharynx to prevent meconium aspiration
D. Reassure the patient that meconium is normal in a post-dates pregnancy and continue monitoring
Reveal Answer
Answer: B. Stop oxytocin, position left lateral, give oxygen, call senior obstetrician for urgent delivery decision
The combination of thick meconium and late decelerations represents a clinical emergency — evidence of both fetal bowel compromise (thick meconium = maturity + hypoxic stimulus) and uteroplacental insufficiency (late decelerations). The immediate actions are: stop any oxytocin (reducing uterine hyperstimulation), position left lateral (improving uteroplacental blood flow by relieving aortocaval compression), give oxygen, and summon senior help urgently. Increasing oxytocin would worsen the situation. Oropharyngeal suctioning at delivery is no longer routinely recommended for meconium (only if cord is at the vocal cords). Late decelerations with thick meconium require a delivery decision — typically emergency caesarean unless vaginal delivery is imminent.