Page 1 of 23
OP9.1 | Ophthalmoscopy Technique and Normal Retina — SDL Guide
Learning Objectives
- Describe the optical principles and design differences between direct and indirect ophthalmoscopes
- Demonstrate the step-by-step technique of direct ophthalmoscopy including patient preparation, room conditions, and systematic retinal examination
- Describe the principles and technique of indirect ophthalmoscopy
- Identify and label the normal fundoscopic features: optic disc, physiological cup, cup-to-disc ratio, retinal vessels, macula, and fovea
- Recognise key abnormal fundoscopic findings including papilloedema, disc pallor, optic cupping, retinal haemorrhages, hard and soft exudates, and neovascularisation
INSTRUCTIONS
Ophthalmoscopy is the clinician's window into the microvascular system of the living eye — and the only place in the body where arteries, veins, and nerve tissue can be observed directly and non-invasively. Mastery of this technique is essential for any medical practitioner: it reveals conditions ranging from diabetic retinopathy and hypertensive changes to raised intracranial pressure, before symptoms become disabling. This module walks you through the optical principles, step-by-step technique, and systematic interpretation of the normal fundus so you can examine with confidence.
References
- Khurana AK. Comprehensive Ophthalmology, 7th ed. Chapter on Examination of the Eye (textbook)
- Parsons' Diseases of the Eye, 22nd ed. Section on Clinical Examination (textbook)
Version 2.0 | NMC CBUC 2024
CLINICAL SCENARIO
A 58-year-old man with poorly controlled diabetes presents for a routine check-up. He reports no visual complaints whatsoever. On direct ophthalmoscopy, you find multiple dot haemorrhages and hard exudates near the macula, with one cotton-wool spot at the superior arcade. His retinopathy has been silently progressing for years. Had you not looked inside his eye — had you relied on his self-reported symptoms — you would have missed the window for intervention before macular oedema develops. This is why every physician must be able to use an ophthalmoscope.
WHY THIS MATTERS
Ophthalmoscopy is not a specialist-only skill. As a clinician in any setting — a primary health centre, a medical ward, or an emergency bay — you will encounter patients whose eye findings are a direct reflection of their systemic disease. Diabetic retinopathy affects millions of Indians who may not see an ophthalmologist for years. Hypertensive retinopathy grades the severity of end-organ damage. A swollen optic disc (papilloedema) may be your first clue to raised intracranial pressure. A pale disc tells you the optic nerve has been injured. Direct ophthalmoscopy is a bedside tool you carry in your bag and should be able to use in three minutes. Indirect ophthalmoscopy, while more specialised, gives you the wide-field view essential for screening and peripheral pathology. Understanding both techniques — and being able to read a normal fundus reliably — is the foundation on which all retinal disease recognition is built.
RECALL
Before we use the ophthalmoscope, recall what you already know from anatomy and physiology. The retina is the innermost sensory layer of the eye, containing photoreceptors (rods for peripheral/dim-light vision; cones for central/colour vision) organised in ten histological layers. The optic nerve exits at the optic disc — a point where there are no photoreceptors, creating the physiological blind spot. The macula is the central 5 mm of retina, with the fovea at its centre — the area of highest cone density and sharpest acuity. The retina is supplied by the central retinal artery (a branch of the ophthalmic artery, itself from the internal carotid) and drained by the central retinal vein. Both travel through the optic nerve. The vitreous humour fills the posterior chamber; on ophthalmoscopy you look through it to reach the retina. The pupil must be adequately dilated for a complete view — normally achieved with tropicamide 1% (cycloplegic mydriatic) or phenylephrine 2.5-10% (sympathomimetic, no cycloplegia).
When and Why We Look Inside the Eye
The clinical indications for ophthalmoscopy span nearly every system of medicine, which is precisely why it remains a core physician skill rather than an exclusive specialty procedure. When you understand the range of conditions fundoscopy can reveal, you will naturally reach for the instrument in the right clinical contexts.
In systemic disease, ophthalmoscopy offers direct visualisation of end-organ vascular changes. In a hypertensive patient, the fundus grades the severity of retinopathy (Keith-Wagener-Barker grades I–IV) and reveals whether accelerated hypertension is causing papilloedema (grade IV — a medical emergency). In a diabetic patient, it detects the spectrum from early non-proliferative retinopathy (microaneurysms, dot haemorrhages) through to the sight-threatening proliferative stage with neovascularisation — all before the patient reports visual symptoms. In a patient with anaemia or leukaemia, fundoscopy may show Roth spots (haemorrhages with pale centres) or pre-retinal haemorrhages.
In neurological emergencies, a swollen optic disc (papilloedema) is a critical sign of raised intracranial pressure — seen in meningitis, cerebral venous sinus thrombosis, space-occupying lesions, and idiopathic intracranial hypertension. Conversely, disc pallor indicates optic atrophy, which may follow optic neuritis, glaucoma, or compressive lesions at any point in the visual pathway.
In ophthalmological assessment, fundoscopy is the cornerstone: retinal detachment, central retinal artery occlusion (cherry-red spot), central retinal vein occlusion (blood-and-thunder fundus), age-related macular degeneration, retinitis pigmentosa, and retinoblastoma (pale reflex in a child) all have distinctive fundoscopic signatures.
Key indications to always examine the fundus:
- Sudden or progressive visual loss of any cause
- Headache with vomiting (exclude papilloedema)
- Known diabetes or hypertension (annual screening)
- Suspected meningitis or raised ICP
- Unexplained optic neuropathy or visual field defect
- Leukocoria (white pupil) in a child — urgent
How the Ophthalmoscope Works: Optical Principles
Understanding the optics of the two instruments prevents technical errors — particularly the common mistake of holding a direct ophthalmoscope too far from the patient's eye, which reduces the field of view to almost nothing. The fundamental goal of both instruments is the same: to illuminate the fundus and neutralise the refractive power of the patient's cornea and lens so that the examiner's eye can focus on the retina.
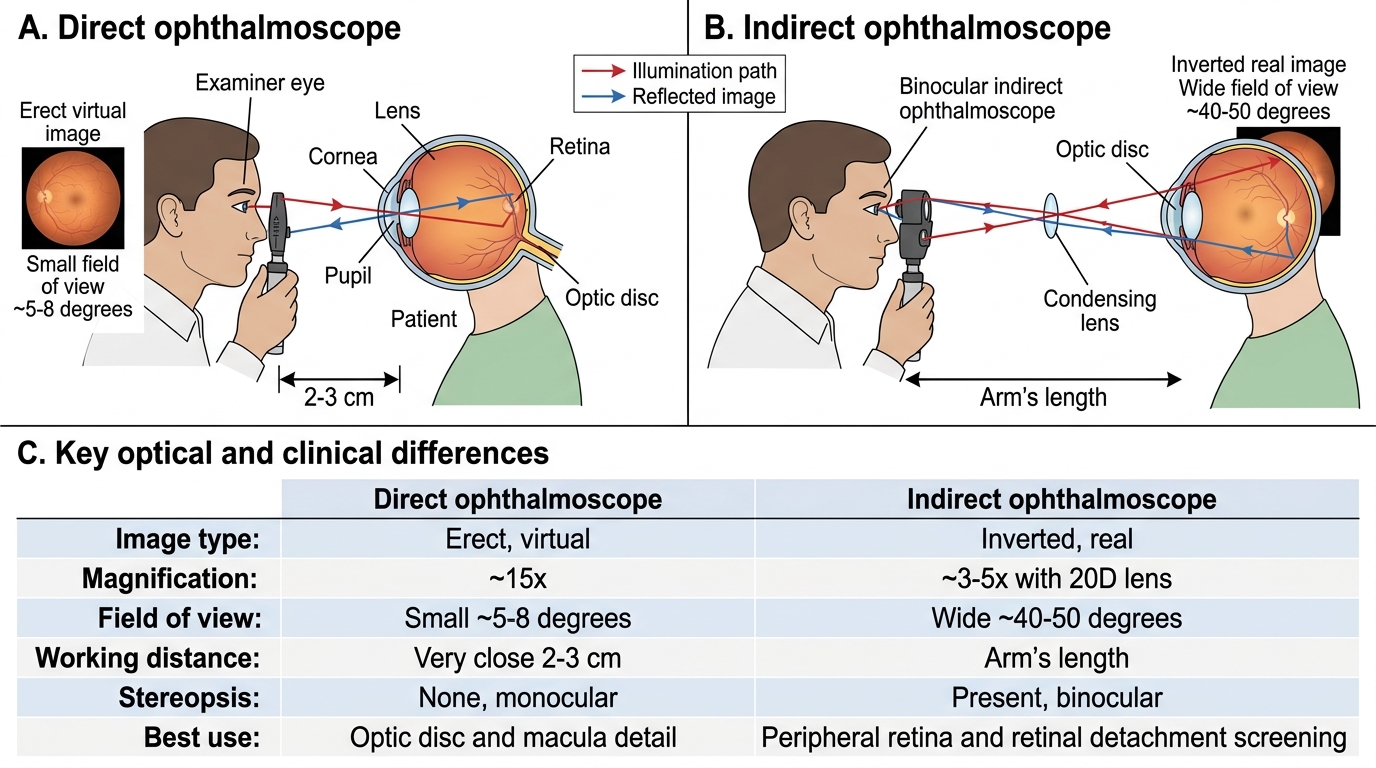
The direct ophthalmoscope uses a set of lenses (the diopter wheel, usually ranging from approximately +20 to −20) to correct for both the patient's and the examiner's refractive errors, rendering the system optically equivalent to two emmetropic eyes in direct contact. Because there is no condensing lens in the beam path, the image is erect (upright, same orientation as the fundus) and virtual (projected behind the patient's eye). The magnification is approximately 15×, making it excellent for detailed examination of the disc and macula. However, the field of view is very small — approximately 5–8° — and the working distance is critically short: you must approach to within 2–3 cm of the patient's eye to see the full available field.
The indirect ophthalmoscope interposes a condensing lens (typically 20D or 28D) between the examiner's headset and the patient's eye, at arm's length. The condensing lens creates a real, inverted image of the fundus in the air between the lens and the examiner. The binocular headset then allows the examiner to view this floating image stereoscopically. The image is inverted and laterally transposed — superiorly in the patient's retina appears inferiorly in the image — which must be mentally corrected. Magnification is lower (~3–5× with 20D lens), but the field of view is vastly larger (approximately 40–50° with 20D), allowing examination of the entire peripheral retina, vitreous, and far periphery with scleral indentation.
Direct vs Indirect Ophthalmoscopy
| Feature | Direct Ophthalmoscope | Indirect Ophthalmoscope |
|---|---|---|
| Image type | Erect, virtual | Inverted, real |
| Magnification | ~15× | ~3–5× (20D lens) |
| Field of view | Small (~5–8°) | Wide (~40–50°) |
| Working distance | Very close (2–3 cm) | Arm's length |
| Stereopsis | None (monocular) | Yes (binocular) |
| Peripheral retina | Limited | Excellent |
| Primary use | Disc and macula detail | Wide-field screening, peripheral pathology |
Performing Direct Ophthalmoscopy: Step-by-Step
Technique determines success. The most common reason a student 'cannot see the fundus' is not pathology — it is technique failure: standing too far away, using the wrong diopter setting, or having an un-dilated pupil in a brightly lit room. Follow this sequence methodically and you will achieve a satisfactory view in the vast majority of patients.
Step 1 — Preparation. Dim the room lights to encourage physiological pupil dilatation. Ideally, instil tropicamide 1% drops 20 minutes before examination to pharmacologically dilate the pupil to ≥6 mm. Warn the patient that near vision will blur for 2–4 hours and they should not drive. The ophthalmoscope battery should be fully charged and the beam aperture set to the large round white light for routine examination.
Step 2 — Initial alignment (the red reflex). Stand at arm's length (approximately 50 cm) from the patient, hold the ophthalmoscope in the right hand and use your right eye when examining the patient's right eye (and left hand/left eye for the left eye — this avoids uncomfortable nose-to-nose contact). Set the diopter wheel to +8 to +10 dioptres (the green/plus numbers). Ask the patient to look straight ahead at a distant point. Shine the light at the patient's pupil from arm's length — you will see the red reflex: the warm orange-red glow of reflected light from the vascular choroid. Absence or asymmetry of the red reflex is itself significant (dense cataract, vitreous haemorrhage, retinoblastoma in children).
Step 3 — Moving in. Keeping the red reflex in view, move steadily toward the patient, approaching from slightly lateral (about 15° temporal to the visual axis). As you approach, turn the diopter wheel gradually toward zero — the vessels of the retina will come into focus. The exact zero-point depends on both the patient's and your refractive error; most emmetropic examiners examining an emmetropic patient will focus at around 0 dioptres. For a myopic patient (minus lenses in their glasses), you will need minus dioptres on the wheel; for a hypermetropic patient, plus dioptres.
Step 4 — Systematic retinal scan. Follow a consistent order to avoid missing pathology:
1. Optic disc — find the disc first by following a retinal vessel toward its convergence. Assess: disc margin clarity (sharp vs blurred), disc colour (pink-orange = normal; pale = atrophy; hyperaemic = papillitis), cup-to-disc ratio (normal <0.5), and spontaneous venous pulsations at the disc (presence suggests normal ICP).
2. Vessels — trace each arcade (superior and inferior) from disc to periphery. Assess: artery-to-vein ratio (~2:3 in diameter normally), arterial light reflex, AV nipping at crossings, haemorrhages, exudates.
3. Macula — last, because it is the most light-sensitive. Ask the patient to look directly at the light to centre the macula in view. Assess for: foveal reflex (small bright pinpoint of reflected light), haemorrhages, exudates, drusen, or oedema.
4. Periphery — ask the patient to look in the four cardinal directions; each gaze shift brings a new peripheral quadrant into view.
Common pitfalls to avoid: not dimming the room, staying too far away (the commonest error), forgetting to switch hands between eyes, and examining without dilation.
SELF-CHECK
A student examining the right eye of a patient holds the direct ophthalmoscope in the LEFT hand, using the LEFT eye, approaching from the temporal side. What is the key error in technique?
A. The room should be fully lit for a direct ophthalmoscope
B. For the right eye, use the right hand and right eye to avoid uncomfortable contact and maintain optimal working distance
C. The approach should be from the nasal side, not temporal
D. The diopter wheel should be at −10 initially
Reveal Answer
Answer: B. For the right eye, use the right hand and right eye to avoid uncomfortable contact and maintain optimal working distance
The standard rule is: examine the patient's right eye with your right hand and right eye; examine the left eye with your left hand and left eye. Using the same-side eye and hand prevents your head from colliding with the patient's and allows you to approach from the correct temporal angle at the optimal working distance. Approaching from temporal is correct (not nasal). Initial diopter setting should be +8 to +10 (plus, green numbers) to start at arm's length and progressively focus as you approach.