Page 2 of 23
OP9.1 | Ophthalmoscopy Technique and Normal Retina — SDL Guide (Part 2)
Performing Indirect Ophthalmoscopy: Principles and Steps
Indirect ophthalmoscopy requires more practice and specialised equipment — a binocular indirect ophthalmoscope (BIO) headset worn on the examiner's head and a condensing lens (typically 20D or 28D) — but it provides a view of the entire fundus that is simply impossible with the direct instrument. Every ophthalmologist relies on it for retinal detachment assessment, peripheral laser treatment planning, and paediatric fundus examination.
The binocular indirect ophthalmoscope (BIO) is a headset with a bright light source (often halogen or LED) and two eyepieces allowing stereoscopic binocular vision. The coaxial light from the headset and the condensing lens together create an aerial, real, inverted image of the retina that floats between the condensing lens and the examiner's eyes at arm's length.
Technique:
1. Dilate the pupil fully (tropicamide 1% + phenylephrine 2.5%).
2. Dim the room completely — the BIO light is bright but peripheral retinal examination requires maximal dilation.
3. Ask the patient to fixate on a point on the ceiling.
4. Hold the condensing lens (e.g., 20D) between thumb and index finger approximately 5 cm from the patient's eye — perpendicular to the beam of light from your headset.
5. Move your position and the lens until you capture the fundus image in the aerial focal plane — you will see an inverted, wide-field image of the retina.
6. To examine the peripheral retina, ask the patient to look in the direction of the quadrant you want to examine (e.g., look up and right for the superior temporal quadrant).
7. Scleral indentation — a cotton-tip applicator or metal indentor pressed on the sclera through the lower eyelid — pushes peripheral retina into view; used to examine the far periphery and identify retinal tears and detachments.
Mental inversion correction: because the image is inverted and laterally transposed, remember: superior retina = inferior image, and left of image = right retina. This takes conscious practice to internalise.
The choice between instruments depends on the clinical question: use direct for disc/macula detail in systemic disease screening; use indirect when you need to see peripheral lesions, assess extent of retinal detachment, or examine a paediatric patient under anaesthesia.
Reading the Fundus: Normal Retinal Landmarks
You cannot recognise the abnormal without first having a firm mental map of the normal fundus. The normal fundus has a characteristic appearance that varies somewhat with the patient's age and fundal pigmentation (more pigmented in darker-complexioned individuals), but the key landmarks are constant and should be identified systematically at every examination.
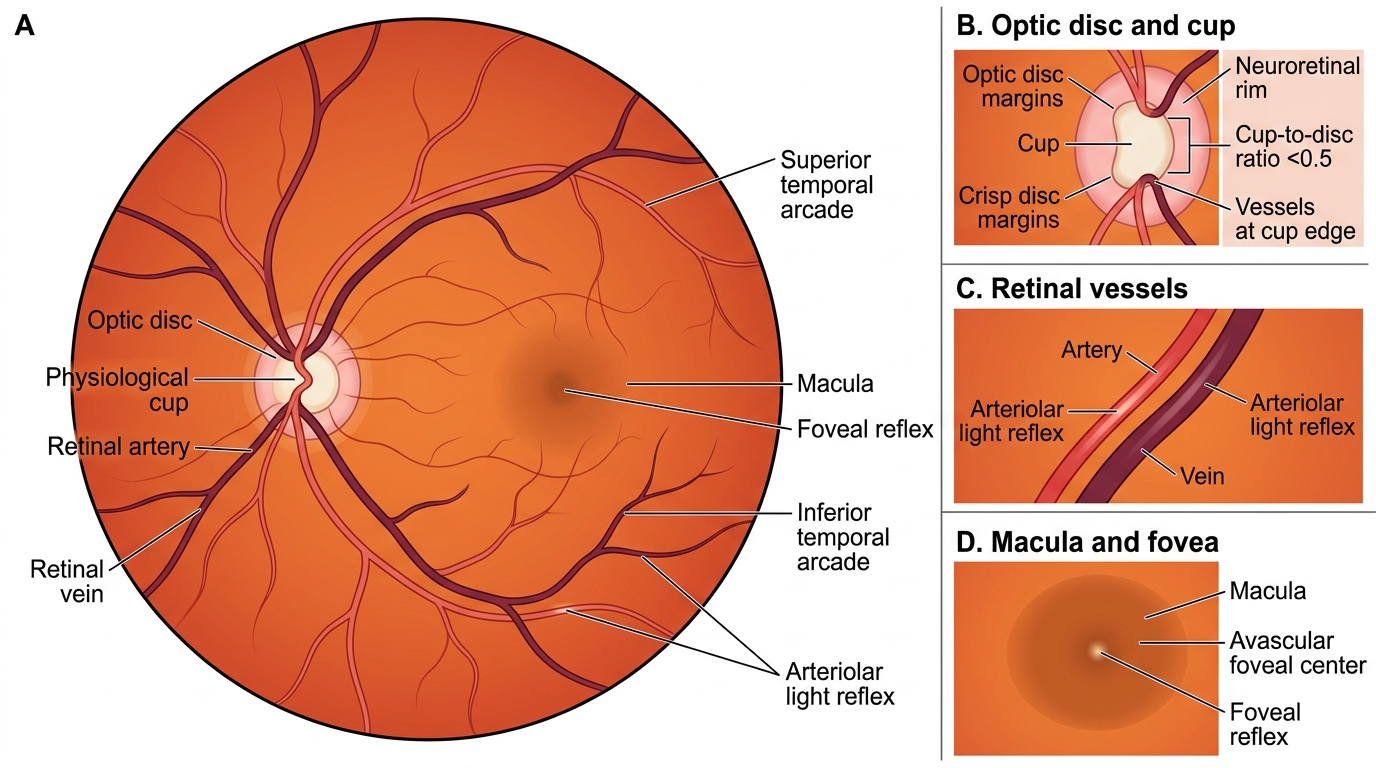
The optic disc is the entry point of the optic nerve into the eye, located slightly nasal to the posterior pole. On ophthalmoscopy it appears as a pale pinkish-orange oval or round area, approximately 1.5 mm in diameter (used as a standard 'disc diameter' unit for describing retinal lesion positions). The disc margin should be sharp and well-defined in all quadrants — blurring of the margin, particularly superiorly and inferiorly, is an early sign of papilloedema. The physiological cup is a central pale depression within the disc where the optic nerve fibres exit. The cup-to-disc ratio (CDR) is the diameter of the cup divided by the diameter of the disc — normally 0.3 to 0.4; a CDR of >0.5, or an asymmetry >0.2 between the two eyes, raises suspicion for glaucomatous optic neuropathy. Spontaneous venous pulsations visible at the disc margin (pulsation of central retinal vein) suggest intracranial pressure is not significantly raised.
Retinal vessels emerge from the optic disc in four arcuate patterns: the superior and inferior arcades (temporal, curving over and below the macula) and two nasal branches. Arteries are brighter red, narrower, and carry a bright arterial light reflex (a central yellowish-white stripe of reflected light from the vessel wall). Veins are darker, wider, and without a bright reflex. Normally, the artery-to-vein diameter ratio is approximately 2:3 (arteries are about two-thirds the calibre of adjacent veins). At arteriovenous crossings, both vessels share an adventitial sheath — in hypertensive retinopathy, thickening of the arterial wall at these crossings produces arteriovenous (AV) nipping (nicking).
The macula is the central 5 mm of retina temporal to the disc, responsible for central and colour vision. It appears slightly darker than the surrounding retina due to the higher density of xanthophyll pigment and the absence of large vessels. At its centre lies the fovea (1.5 mm in diameter), and within it the foveola — the point of maximum cone density and visual acuity. A healthy foveola reflects the ophthalmoscope light as a bright pinpoint called the foveal reflex (more prominent in young patients, less so with age or oedema).
Normal Fundus Anatomy
Recognising Abnormal Findings on Fundoscopy
Having established the normal anatomy of the fundus — the pink disc with crisp margins, a cup-to-disc ratio under 0.5, the four main vascular arcades, and the avascular, reflex-bright fovea — you must now learn to identify the key abnormal findings that fundoscopy reveals, because each deviation from normal points to a specific underlying pathological process. Recognising these correctly is the direct clinical application of your ophthalmoscopy technique: systematic, unhurried inspection of the disc first (margins, colour, cup, vessels at the rim), then the periphery along each arcade, and finally the macula. Many of the findings you will encounter on fundoscopy are the earliest objective signs of systemic disease — papilloedema is the retinal signature of raised intracranial pressure, microaneurysms are the first visible manifestation of diabetic microvascular injury, and flame haemorrhages betray hypertensive arteriolosclerosis. Developing a disciplined recognition framework for these patterns is therefore as much an exercise in internal medicine as it is in ophthalmology.
Disc abnormalities:
- Papilloedema — bilateral disc swelling due to raised intracranial pressure. Early: hyperaemia, blurred disc margins, loss of venous pulsations. Advanced: elevation of the disc, haemorrhages on the disc, dilated tortuous veins, and eventually vision loss. A unilateral swollen disc is more likely to be papillitis (optic neuritis — painful, reduced visual acuity) rather than papilloedema (which is usually bilateral and initially asymptomatic for vision).
- Disc pallor / optic atrophy — the disc appears white or chalk-white (primary atrophy: sharply defined margins) or grey with blurred margins (secondary atrophy: post-papilloedema). Causes: glaucoma, optic neuritis, compressive lesions, toxic optic neuropathy, ischaemic optic neuropathy.
- Glaucomatous cupping — an enlarged cup (CDR >0.5), superior or inferior notching of the neuroretinal rim, and peripapillary atrophy in the context of raised IOP or glaucomatous field loss.
Retinal lesions:
- Microaneurysms — tiny dark-red dots, earliest sign of diabetic retinopathy (NPDR).
- Dot-blot haemorrhages — dark red, round, in the inner nuclear/outer plexiform layers; seen in NPDR.
- Flame haemorrhages — superficial, flame-shaped, in the nerve fibre layer; seen in hypertensive retinopathy and vein occlusions.
- Hard exudates — bright yellow, well-defined deposits of lipoprotein from leaky vessels; seen in NPDR (surrounding the macula in clinically significant macular oedema) and hypertensive retinopathy.
- Soft exudates (cotton-wool spots) — white fluffy patches of ischaemic nerve fibre layer infarction; seen in severe NPDR, hypertensive retinopathy, and HIV retinopathy.
- Neovascularisation — new vessel formation either on the disc (NVD) or elsewhere on the retina (NVE); hallmark of proliferative diabetic retinopathy (PDR) — these vessels are fragile and bleed into the vitreous.
- Cherry-red spot — central retinal artery occlusion (CRAO): pale, oedematous retina with a visible cherry-red spot at the fovea (where the choroidal circulation is still perfusing through the thin foveal tissue).
- Blood-and-thunder fundus — central retinal vein occlusion (CRVO): extensive flame haemorrhages in all four quadrants, disc swelling, dilated tortuous veins.
Macular abnormalities: macular oedema (loss of foveal reflex, greyish swelling), macular hole, cherry-red spot (CRAO), drusen (tiny pale-yellow deposits in age-related macular degeneration — AMD).
CLINICAL PEARL
The single most important pearl of fundoscopy: always compare the two eyes. A cup-to-disc ratio of 0.5 in both eyes may be normal for that patient; but CDR 0.3 in one eye and 0.6 in the other is significant asymmetry that demands further glaucoma workup. Similarly, if the fundus looks 'normal' in one eye but the vessels are slightly tortuous and narrowed in the other, you've caught early hypertensive retinopathy on the abnormal side. Most pathology is bilateral but often asymmetric — comparison is the most reliable way to detect subtle early disease. And a practical tip: always reduce the ophthalmoscope beam to the small aperture when examining through an undilated pupil — the smaller, dimmer beam produces less glare and makes it easier for the patient to cooperate.