Page 2 of 14
OR13.1 | Plastering and Splinting Skills — SDL Guide (Part 2)
Thomas Splint Application
Provided image
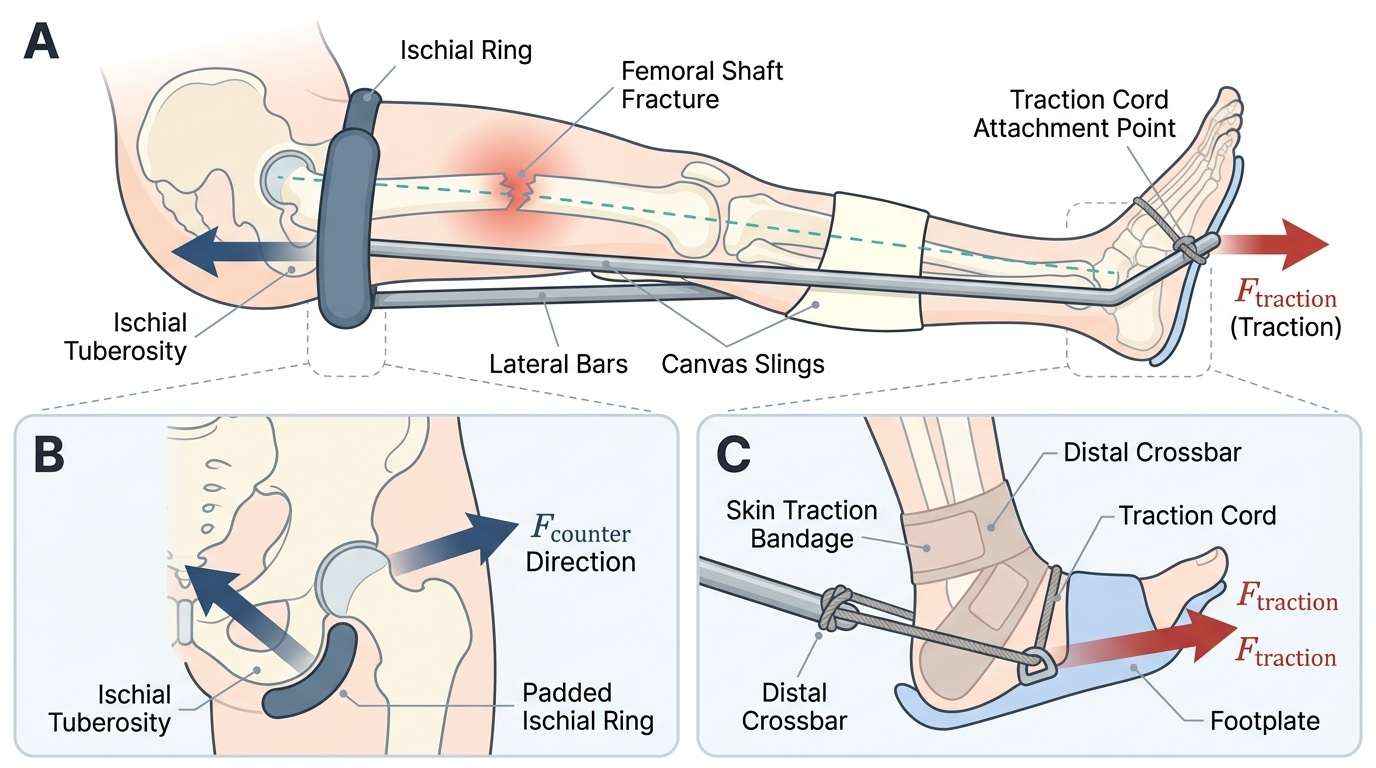
The Thomas splint was designed by Hugh Owen Thomas for the treatment of femoral shaft fractures, the one indication for which it remains standard pre-operative emergency treatment. It consists of a padded ring (oval or round) that rests against the ischial tuberosity as a fixed point of counter-traction, with two lateral iron bars extending distally and joined at an angle at the far end — the characteristic shape that gives the splint its name.
Before applying the Thomas splint, it is essential to choose the correct ring size. The ring circumference should equal the circumference of the mid-thigh plus 5 cm to accommodate swelling; a ring that is too tight compresses the perineum and produces pressure necrosis over the ischium.
Technique:
(1) Select the correct ring size; slide the ring up the thigh to the groin.
(2) Apply canvas slings or broad bandages between the lateral bars to support the thigh and leg along the splint length.
(3) Apply skin traction or skeletal traction at the ankle/calcaneum to provide the traction force.
(4) Secure the traction cord to the distal end of the splint frame (fixed traction — Tobruk plaster technique) or to an external attachment.
(5) The net effect is that the leg is suspended, the femoral fragments are aligned longitudinally, and haematoma tamponade is promoted by the fascial envelope being kept under tension.
(6) Document the state of the dorsalis pedis and posterior tibial pulses and sensation in the foot before and after application.
A key teaching point: the Thomas splint does not produce true skeletal traction and is a temporising device, not a definitive treatment. It is applied in the emergency department or at the scene and maintained until surgical fixation (intramedullary nail) is performed, typically within 24–48 hours.
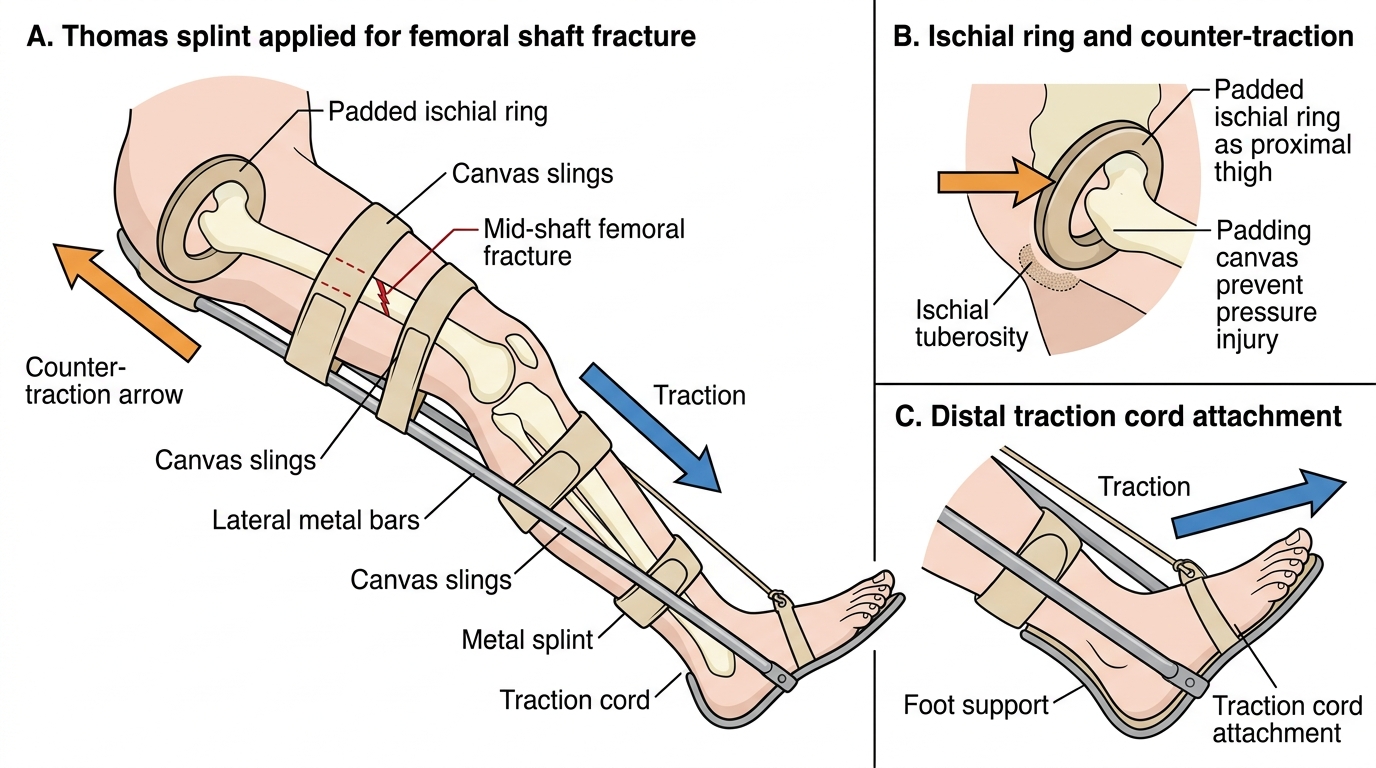
Thomas Splint for Femoral Shaft Fracture
Shoulder and Clavicle Strapping Techniques
Strapping for shoulder and clavicle trauma encompasses several simple but effective techniques that are the initial management for a large proportion of shoulder-girdle injuries presenting to primary care and casualty settings. These techniques do not require plaster and can be applied rapidly by a single operator.
Broad-arm sling: the standard support for undisplaced or minimally displaced clavicle fractures, acromioclavicular joint injuries grade I–II, and humeral surgical neck fractures in elderly patients where surgical risk outweighs benefit. The forearm is supported at 90° of elbow flexion across the chest, distributing the weight of the arm onto the neck via a triangular bandage. The knot must lie at the side of the neck, not at the nape, to avoid pressure on the cervical spine. Expected duration of use: 4–6 weeks for clavicle fractures, 4–6 weeks for shoulder immobilisation.
Collar-and-cuff sling: used specifically for surgical neck of humerus fractures, it suspends only the wrist from the neck, allowing the weight of the arm to produce gentle traction at the fracture site — a passive reduction force. It is NOT equivalent to the broad-arm sling.
Figure-of-eight bandage (clavicle strapping): encircles both shoulders with a padded figure-of-eight configuration, bracing the shoulders posteriorly and maintaining the clavicular fragments in reduced position. It is applied with the patient sitting and the shoulders retracted. The key anatomical point is to pad the axillary skin folds well to prevent pressure sores and maceration. The figure-of-eight bandage is controversial — evidence suggests it confers no superiority over a sling for union rate or cosmesis, but it remains in common use in India. The patient must be taught to tighten the bandage daily and inspect the axillary skin.
Velpeau bandage: immobilises the arm against the chest wall, with the elbow at 90° and the forearm across the anterior chest. Useful in very young children (clavicle, proximal humerus) and in elderly non-ambulant patients.
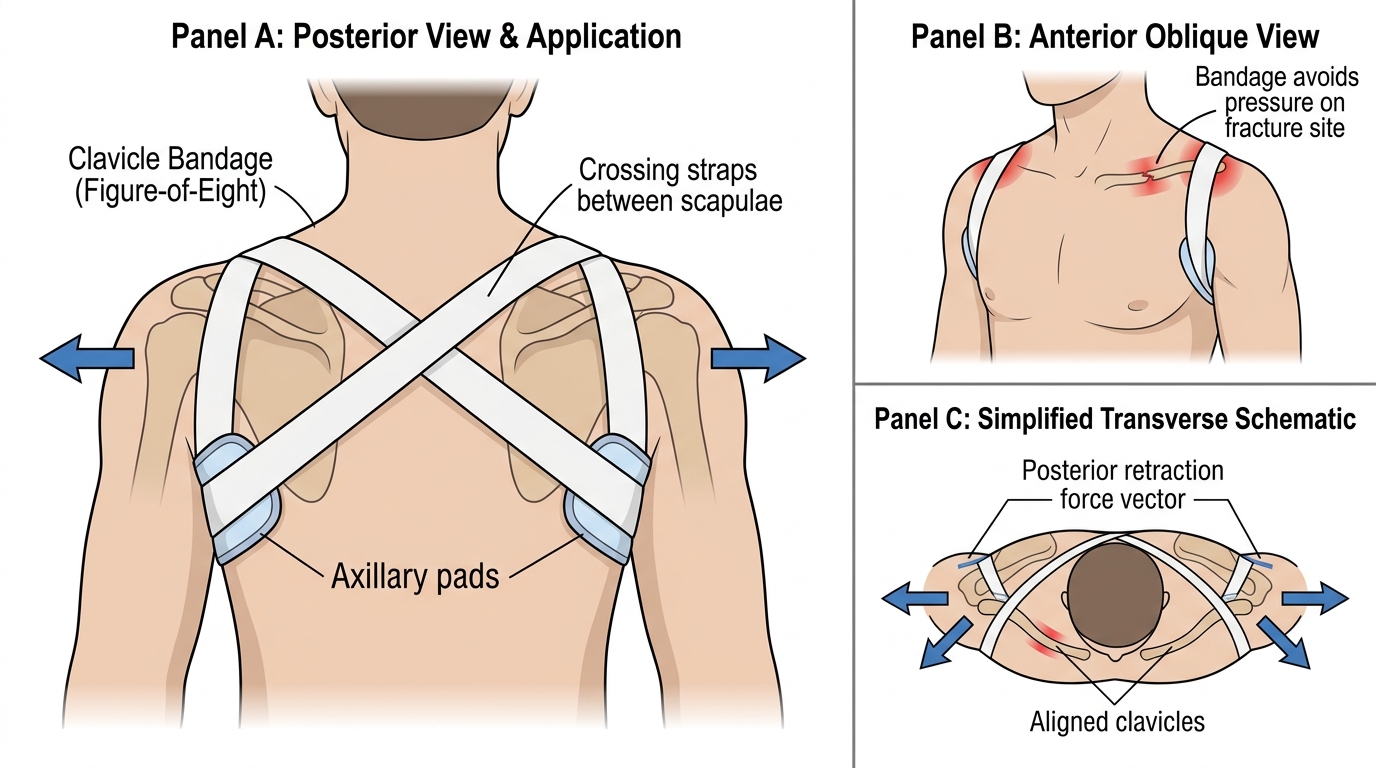
Figure-of-Eight Clavicle Bandage Application
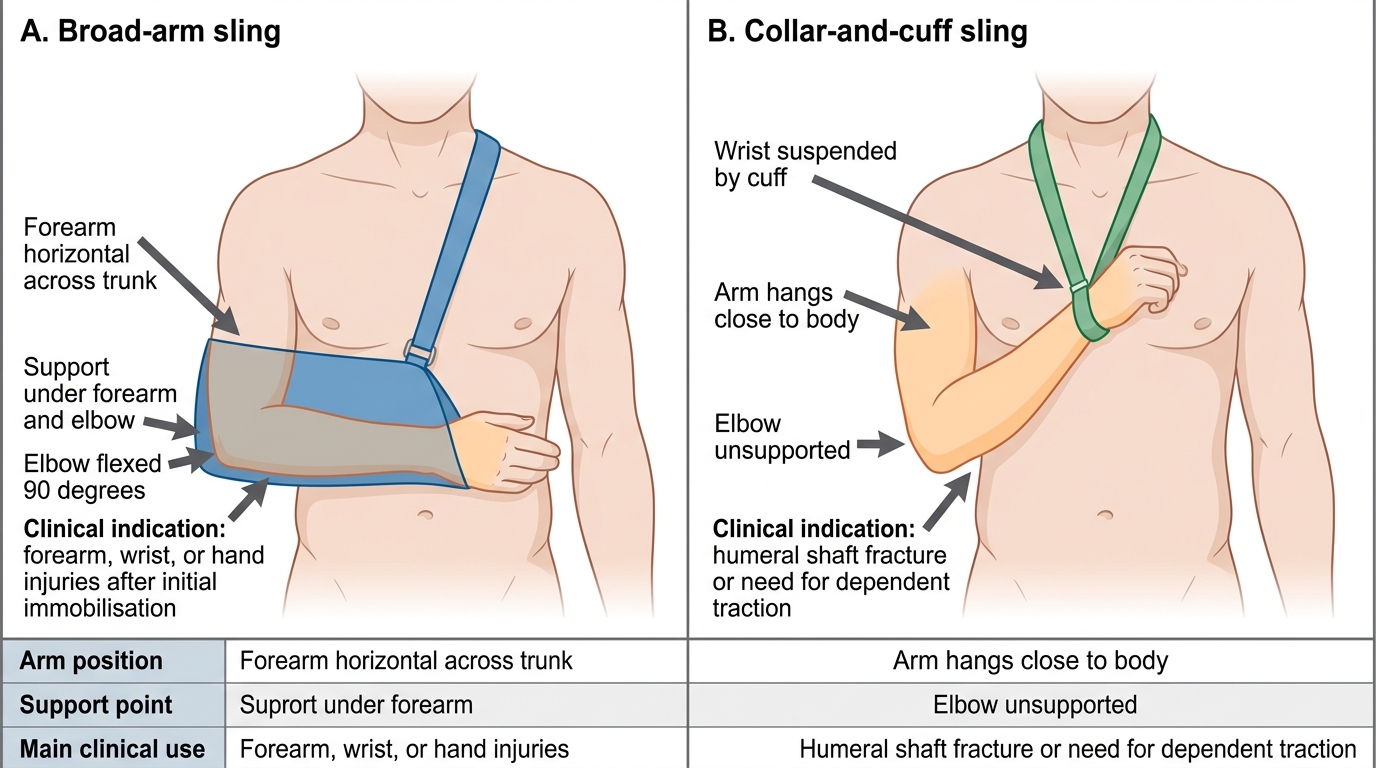
Broad-Arm Sling Versus Collar-and-Cuff
SELF-CHECK
A 20-year-old sustains a shaft-of-radius fracture at the mid-diaphyseal level. Which joints must be spanned by the POP cast?
A. Wrist only
B. Elbow only
C. Both wrist and elbow
D. Shoulder, elbow and wrist
Reveal Answer
Answer: C. Both wrist and elbow
The joint-above-and-below rule requires that BOTH the wrist (distal joint) and the elbow (proximal joint) be included in the cast for a shaft-of-radius fracture. Spanning only one joint allows rotational forces to act at the fracture site and risks loss of reduction. An above-elbow cast is therefore the correct choice for forearm shaft fractures.
Interpretation of Findings: Post-Application Assessment and Complications
After every cast application, a structured assessment must be performed and documented. This is not optional — it is the primary safety check that differentiates a competent operator from a dangerous one. Clinical interpretation of the post-application state requires systematic interrogation of five domains: motor function, sensory integrity, vascular perfusion, skin status, and pain quality. Deviations in any domain demand an immediate, graded response ranging from reassurance and elevation to emergency fasciotomy. The student who understands WHY each parameter is checked — not just WHAT to check — is the one who will detect the first warning sign before irreversible injury occurs. Complications from cast application can be divided into early (within hours to days) and late (weeks to months), and every practitioner must be familiar with the complete spectrum.
Distal neurovascular check (must be performed and recorded at application, at 30 minutes, and at the first follow-up):
- Motor: active movement of the digits distal to the cast
- Sensory: light touch and pinprick over the territories of radial, median, and ulnar nerves (hand) or common peroneal and tibial nerves (foot)
- Vascular: capillary refill time (<2 seconds normal), skin colour (pallor/cyanosis), skin temperature, and pulse palpation (radial/ulnar/dorsalis pedis/posterior tibial)
Early complications:
1. Compartment syndrome — the most serious early complication. The 6 P's are: (a) Pain out of proportion to the injury and pain on passive stretch of muscles in the compartment (EARLIEST signs); (b) Pressure (tense compartment on palpation); (c) Paraesthesia (numbness and tingling in the nerve distribution); (d) Paralysis (weakness of muscles in the compartment — a LATE sign indicating nerve/muscle ischaemia); (e) Pallor; (f) Pulselessness (a VERY LATE sign — the pulse is often present until terminal ischaemia because arterial pressure exceeds compartment pressure for much of the course). A compartment pressure >30 mmHg (or a difference between diastolic pressure and compartment pressure, ΔP, of less than 30 mmHg) mandates immediate fasciotomy. The clinical diagnosis is made on the early signs — never wait for pulselessness.
2. Pressure sores — inadequate padding over bony prominences causes skin necrosis within 24–48 hours; patients complain of localised burning pain at a specific point.
3. Skin maceration — excess moisture trapped under the cast causes superficial skin breakdown; especially common in the web spaces.
4. Thermal injury — hot-water setting of the POP accelerates the exothermic reaction and can burn the underlying skin.
Late complications:
1. Malunion — if the fracture is not adequately reduced or if the cast allows re-angulation, the fracture heals in a malposition.
2. Disuse atrophy and joint stiffness — immobilisation causes loss of joint range of motion and muscle wasting; physiotherapy must begin immediately after cast removal.
3. Disuse osteoporosis — prolonged immobilisation reduces bone density in the immobilised segment.
4. Volkmann's ischaemic contracture — the end-stage of missed compartment syndrome in the forearm, producing a fixed flexion contracture of the fingers and wrist.
Cast splitting and bivalving: when compartment syndrome is suspected, the FIRST action is to split the cast along its full length down to the skin (cast splitting). If this is insufficient, the cast is divided into two halves (bivalved) and the limb is reassessed. If compartment pressures remain elevated, surgical fasciotomy is required.
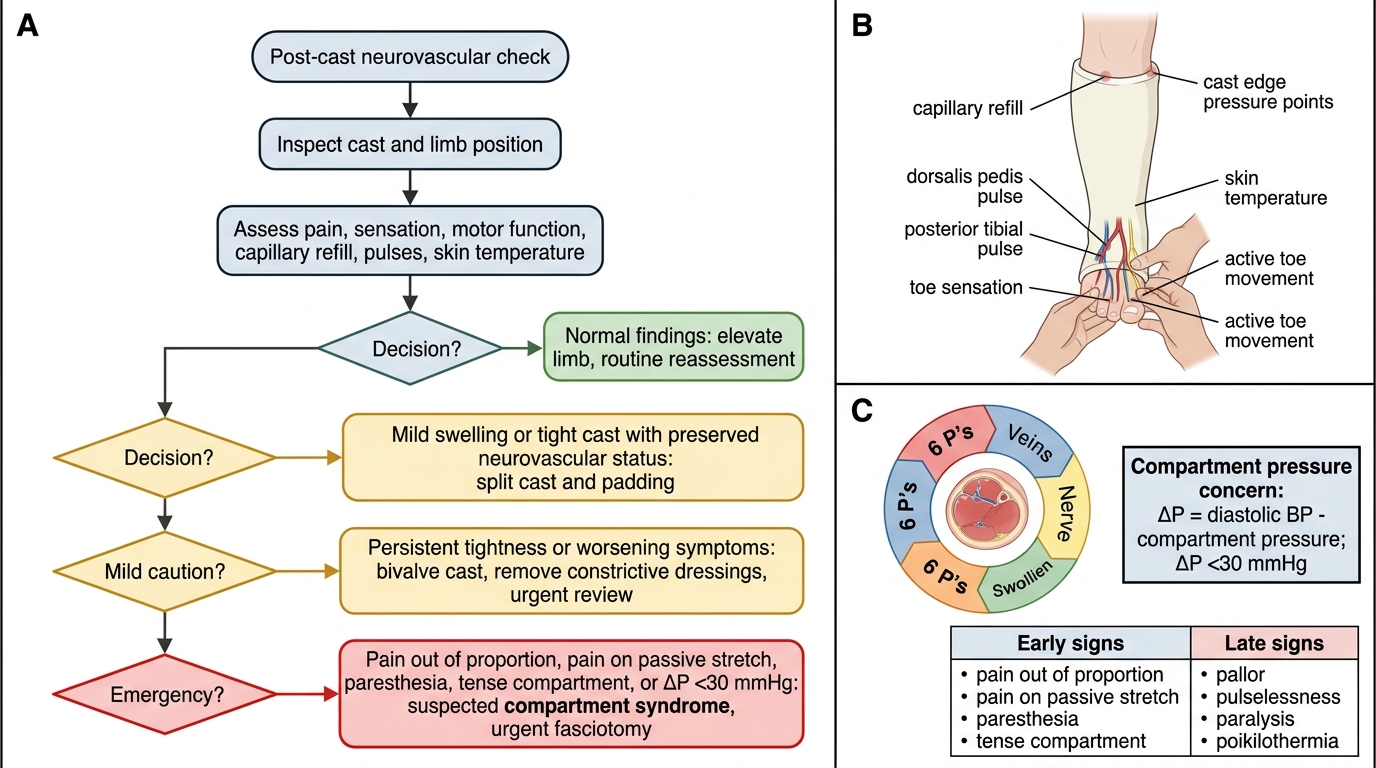
Post-Cast Neurovascular Check and Escalation Algorithm
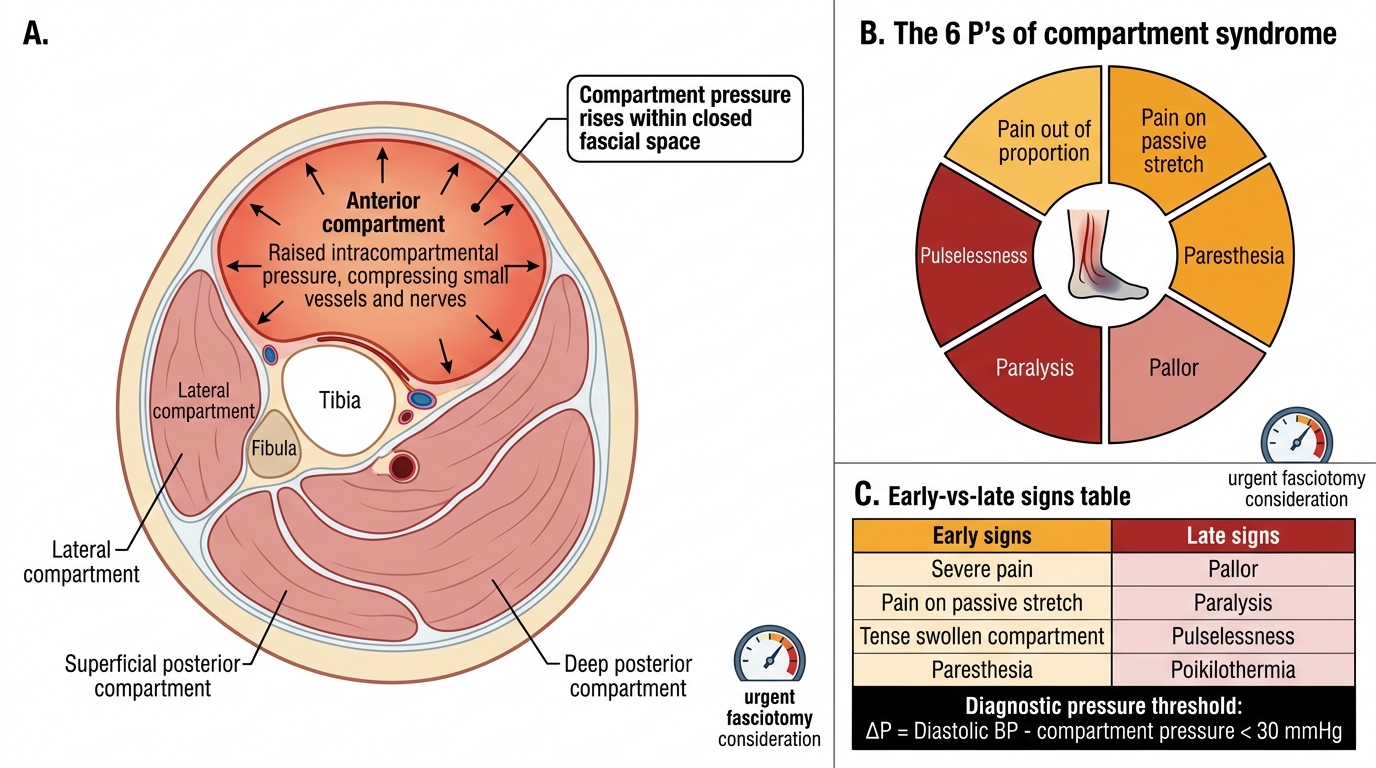
Compartment Syndrome: 6 P's and Pressure Threshold