Page 3 of 14
OR13.1 | Plastering and Splinting Skills — SDL Guide (Part 3)
Applied and Supervised Practice: Simulation and Real-Patient Participation
The competency requirement for OR13.1 is explicitly dual: you must both participate as a team member when casts are applied on real patients under supervision, AND demonstrate the ability to perform the technique on mannequins or simulated patients. These are complementary, not interchangeable, activities. Simulation allows deliberate, repeated practice without patient risk — you can redo the Thomas splint ring selection five times without consequence, but you cannot do that on a patient in pain in the emergency department. The transition from simulation to supervised practice is a cognitive and procedural step that requires self-awareness: recognising that knowing the steps intellectually is not the same as executing them smoothly under real conditions, with a patient in distress, lighting that may be poor, and a senior colleague watching. Deliberate practice theory (Ericsson) shows that technical skills require repetition with feedback, not just observation; your simulation sessions should be structured, timed, and self-assessed against the specific competency checkpoints below.
Simulation practice checklist: Before attending your first real fracture clinic or emergency orthopaedic session, you should practise the following on a simulation mannequin or model:
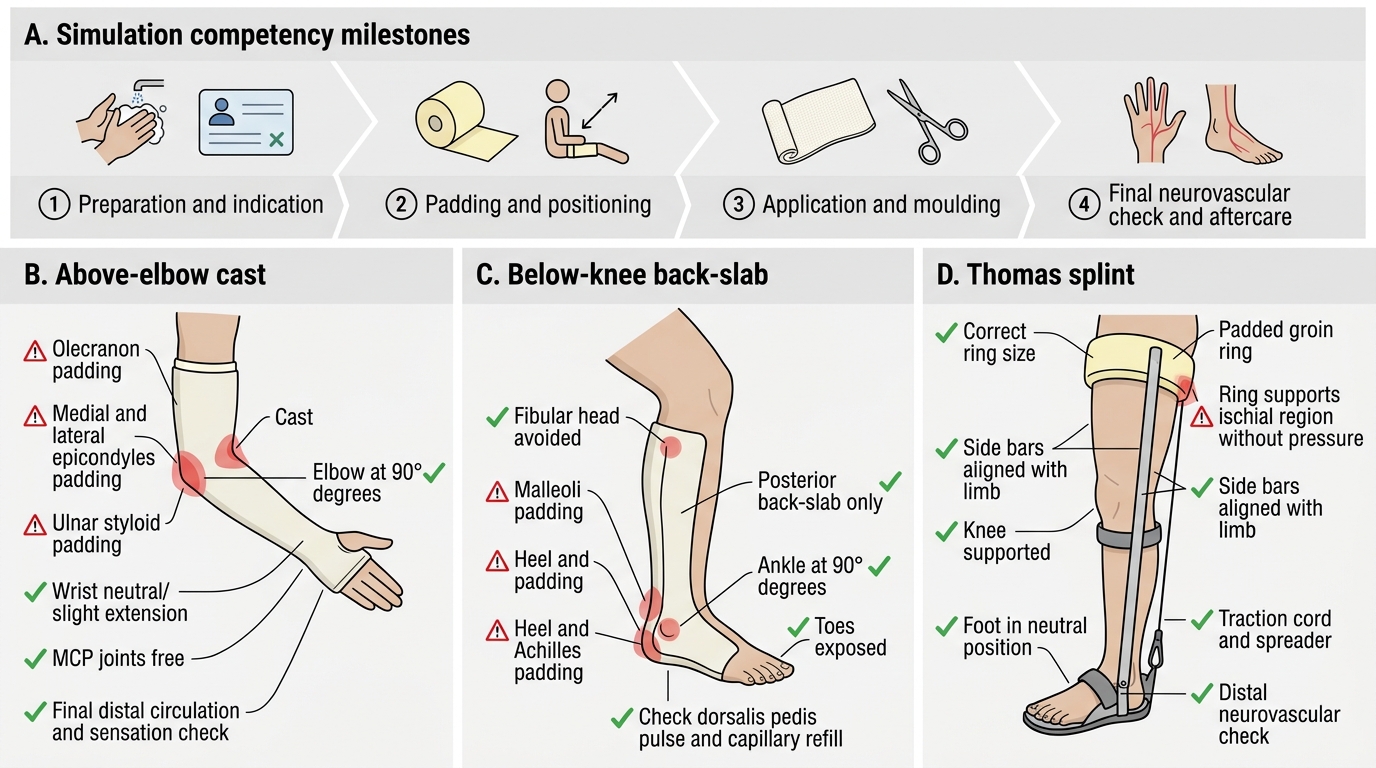
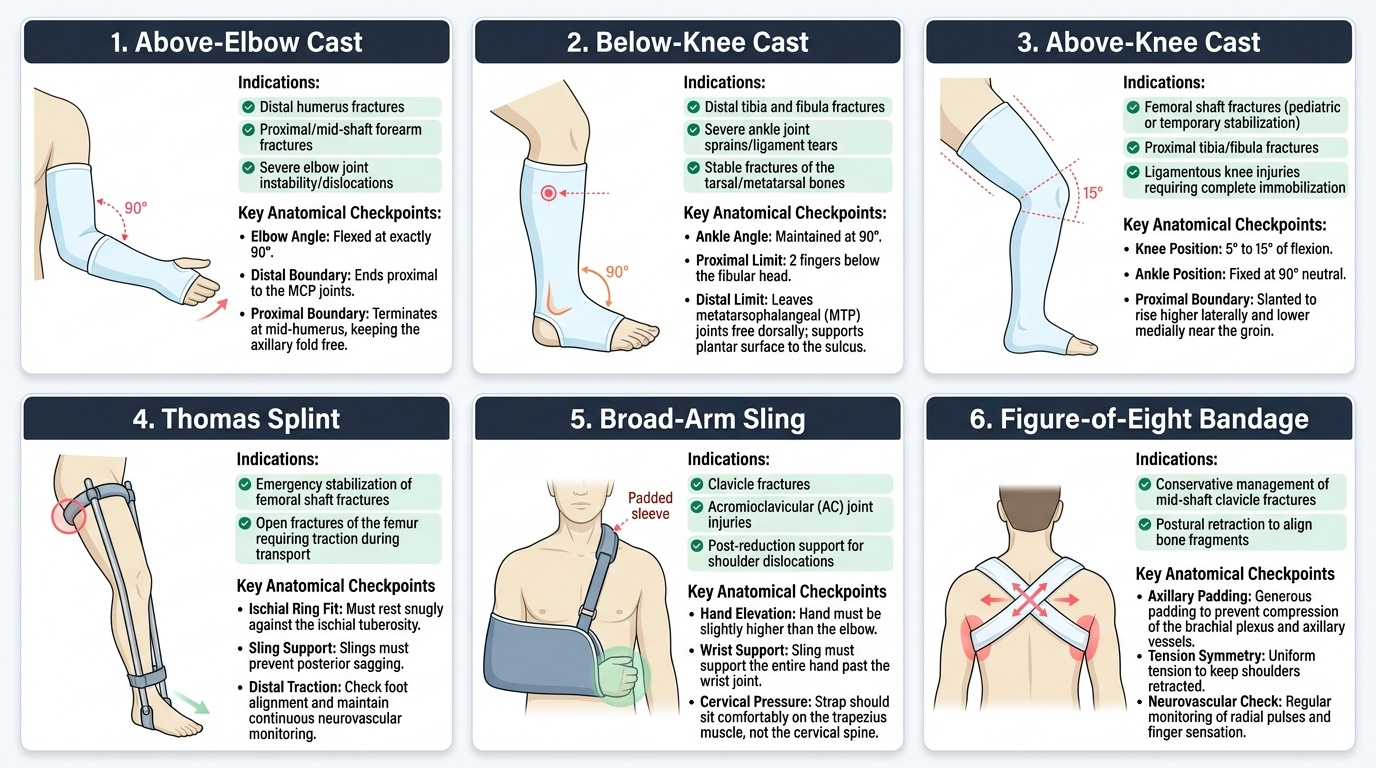
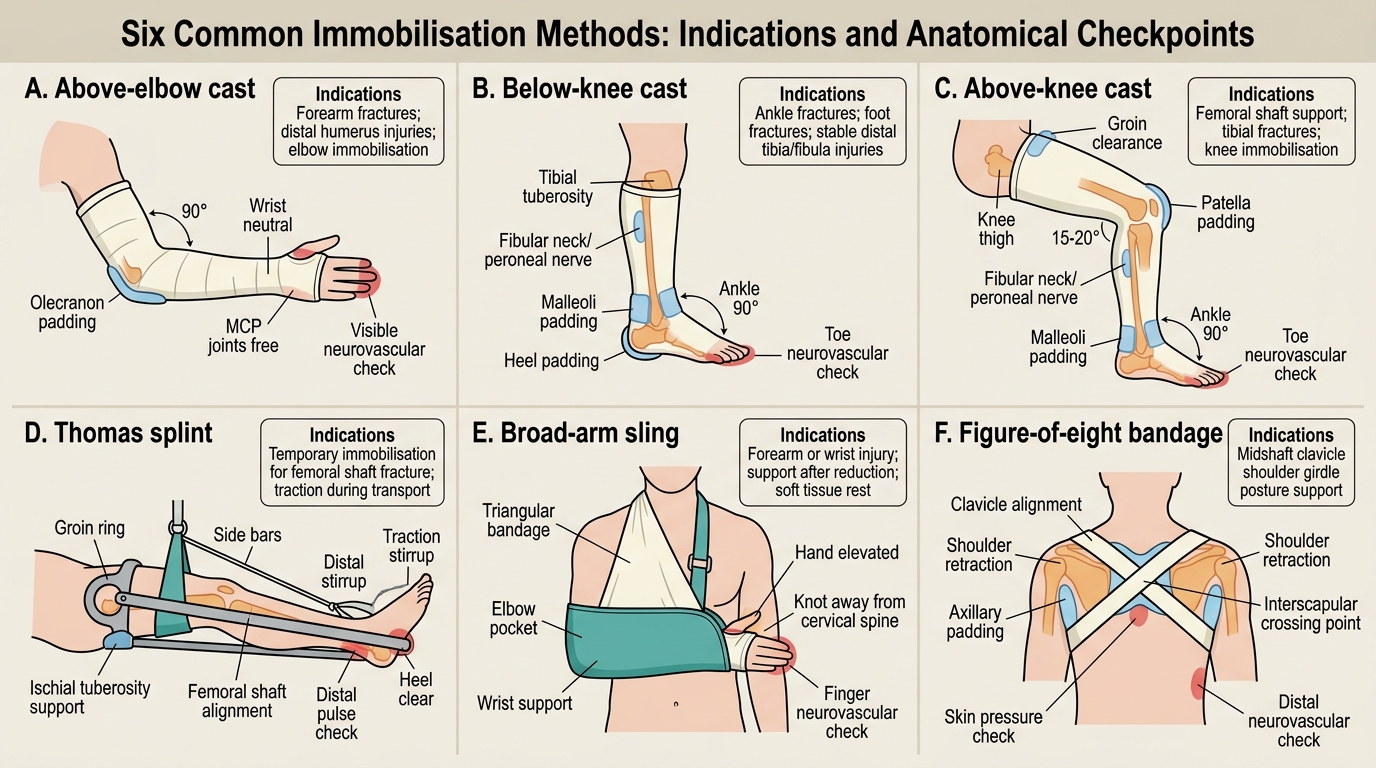
- Above-elbow POP cast: correct ring size at elbow 90° with forearm in neutral rotation; adequate padding over olecranon and lateral epicondyle; no cast-ends cutting into the axilla proximally or the thenar eminence distally.
- Below-knee back-slab: position the ankle at 90° (not plantar-flexed); full posterior slab from metatarsal heads to fibular head; fibular neck padded.
- Thomas splint: select ring by thigh circumference plus 5 cm; canvas slings correctly spanning the frame; traction cord secured with sufficient tension to keep the fracture aligned.
Real-patient participation roles: as a Phase III student you are expected to:
1. Assist the resident by dipping, squeezing, and handing POP bandages.
2. Apply the stockinette and padding under supervision.
3. Perform the post-application neurovascular check independently and document it in the case notes.
4. Counsel the patient on cast-care precautions and warning signs requiring emergency return.
Common errors in practice (and how to avoid them):
- Applying the cast too tightly (most dangerous — compresses compartments and neurovascular structures)
- Using hot water (accelerates exotherm and can burn)
- Failing to pad the fibular neck in a below-knee cast (peroneal nerve palsy)
- Positioning the ankle in plantar flexion (equinus contracture if maintained for weeks)
- Finishing the cast at the metacarpal heads rather than the proximal palmar crease (immobilises the MCP joints unnecessarily)
- Starting the figure-of-eight bandage too tight (brachial plexus compression in the axilla)
Simulation Competency Checklist for Casts and Splints
Self-Assessment: Consolidating Plastering and Splinting Knowledge
Provided image
Self-assessment in procedural skills requires you to evaluate both your cognitive knowledge (do you know the indications, anatomy, complications, and thresholds?) and your psychomotor readiness (can you execute the steps in the correct sequence without prompting?). The following structured self-check covers the key domains of this SDL. Work through each question honestly before looking at the answers in the micro-quizzes that follow; identify any domain where your confidence is low and return to the relevant section for targeted re-reading. Research on self-regulated learning (Zimmerman) shows that learners who self-assess before re-exposure to content achieve deeper, more durable encoding than those who simply re-read without reflection. For procedural skills, the most useful self-assessment is a mental walk-through of the procedure from first step to final neurovascular check — performed without notes — followed by identification of the steps where your mental simulation stalled or felt uncertain.
Key self-check questions to work through:
- Can you name all six cast/splint types covered in this SDL and state one specific clinical indication for each?
- For an above-elbow cast, which bony prominences need extra padding, and what nerve injury results from neglecting the olecranon region?
- What is the exact room-temperature rationale for POP dipping, and what happens chemically if hot water is used?
- Recite the 6 P's of compartment syndrome in order from earliest to latest; state the compartment pressure threshold for fasciotomy.
- What is the difference between cast splitting and bivalving, and in what order are they performed?
- For the Thomas splint, how is the ring size determined, and what structure is at risk if the ring is too small?
- Distinguish the broad-arm sling from the collar-and-cuff: which provides traction, and for which fracture type?
Six Immobilisation Methods: Indications and Checkpoints
SELF-CHECK
During a post-cast check at 4 hours, a patient with a below-knee cast complains of severe pain in the calf that is worse on passive dorsiflexion of the toes. His foot feels numb. What is the correct immediate action?
A. Give analgesia and reassure — post-cast discomfort is normal
B. Split the cast down to skin immediately
C. Wait for pulses to disappear before acting
D. Obtain a limb X-ray to confirm fracture position
Reveal Answer
Answer: B. Split the cast down to skin immediately
Pain out of proportion and pain on passive stretch are the EARLIEST and most important signs of compartment syndrome. The correct immediate action is to split the cast down to the skin along the full length. Waiting for pulselessness is dangerous — the pulse is often present until very late because arterial pressure exceeds compartment pressure for most of the course. Analgesia alone masks the warning signal. X-ray does not change the immediate management.
SELF-CHECK
Which water temperature should be used when dipping POP bandages, and why?
A. Hot water — to speed setting and reduce waiting time
B. Cold water — to slow setting and allow more moulding time
C. Room temperature — to balance setting time and exothermic heat generation
D. Any temperature — water temperature does not affect POP chemistry
Reveal Answer
Answer: C. Room temperature — to balance setting time and exothermic heat generation
Room-temperature water is correct. Hot water accelerates the exothermic calcium sulphate hydration reaction and significantly increases heat generation during setting, which can cause thermal burns under the cast. Cold water slows the reaction and prolongs setting time, which may be useful occasionally for complex applications but is not routine. Room temperature provides the standard 10–15 minute setting window with safe heat output.
CLINICAL PEARL
Three facts about cast application that every orthopaedic casualty officer must know by heart:
- The pulse can be present even in early compartment syndrome. Never be falsely reassured by a palpable radial or dorsalis pedis pulse — the key diagnostic signs are pain out of proportion and pain on passive stretch of the muscles in the affected compartment. Wait for pulselessness and the battle is already lost.
- The joint-above-and-below rule is non-negotiable. A fracture at any level of the forearm requires an above-elbow cast; a below-elbow (short arm) cast for a forearm shaft fracture will allow rotational forces to act at the fracture and is a common cause of malunion.
- Plaster-of-Paris means calcium sulphate hemihydrate (CaSO₄ · ½H₂O). The name 'plaster of Paris' comes from the abundant deposits of gypsum (calcium sulphate dihydrate) found in Montmartre, Paris. On adding water, the hemihydrate rehydrates back to the dihydrate in an exothermic reaction, producing the rigid, immobilising cast.