Page 6 of 14
OR13.2 | Polytrauma Resuscitation Team Skills — SDL Guide (Part 2)
Anatomy and Governing Principles: Endotracheal Intubation
Endotracheal intubation (ETI) provides a definitive airway — a cuffed tube placed beyond the vocal cords into the trachea, securing the airway against aspiration and enabling controlled positive-pressure ventilation. In trauma, ETI is indicated when the patient cannot maintain or protect the airway independently, including in: (a) Glasgow Coma Scale ≤8, (b) severe facial or laryngeal trauma with impending obstruction, (c) respiratory failure requiring mechanical ventilation, (d) loss of protective airway reflexes. In the trauma context ETI is performed as Rapid Sequence Intubation (RSI) — pre-oxygenation followed by simultaneous induction and neuromuscular blockade to minimise the aspiration window.
Key anatomical landmarks for laryngoscopy: the glottis is bounded by the paired vocal cords anteriorly and the arytenoid cartilages posteriorly. The epiglottis lies anterior to the glottis and is elevated by the laryngoscope blade to expose the glottic opening. The landmark for tip of a Macintosh (curved) laryngoscope blade is the vallecula (the space between the base of the tongue and the epiglottis). Lifting the blade along the axis of the handle reveals the glottis and the tracheal rings below. The oesophagus lies posterior to the trachea; oesophageal intubation causes gastric insufflation (absent chest rise, absent breath sounds, gurgling in the epigastrium, rapidly falling SpO₂) — the most dangerous intubation error.
In trauma, the cervical spine must be maintained in neutral alignment throughout intubation (manual in-line stabilisation by a dedicated team member — NOT traction). A rigid cervical collar is loosened (not removed) to allow mouth opening.
Confirmation of correct tube placement uses the DOPE mnemonic after each ventilation if doubt arises (Displaced, Obstructed, Pneumothorax, Equipment failure) — but the primary confirmation is bilateral chest rise + equal bilateral breath sounds + end-tidal CO₂ waveform capnography (gold standard).
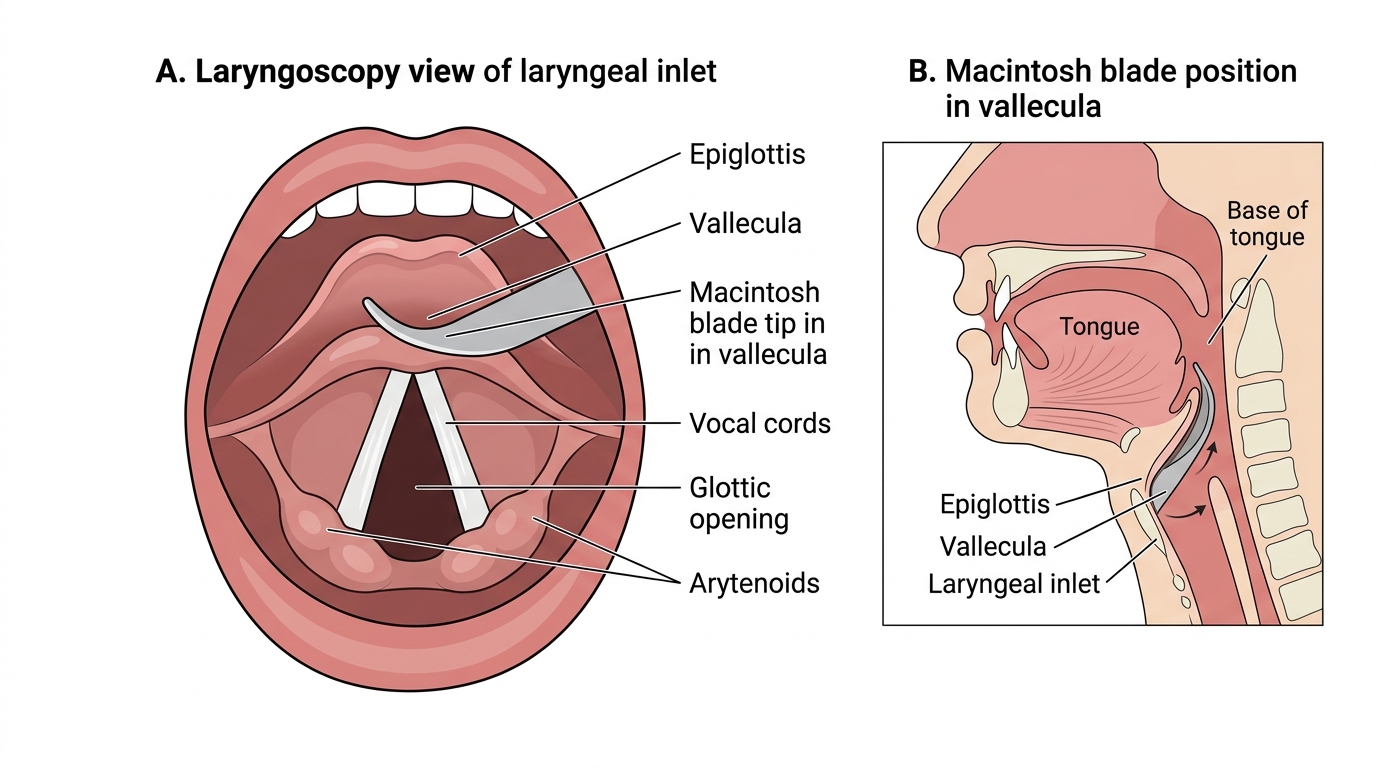
Laryngoscopy View and Macintosh Blade Placement
SELF-CHECK
A 30-year-old male trauma patient has a pelvic fracture on X-ray. Before bladder catheterisation, you examine the perineum and find blood at the urethral meatus. What is the correct action?
A. Proceed with urethral catheterisation carefully using a smaller catheter
B. Do not catheterise transurethrally; prepare for suprapubic catheterisation by the supervising surgeon
C. Perform digital rectal examination first, then decide
D. Insert a catheter and confirm position with urine output
Reveal Answer
Answer: B. Do not catheterise transurethrally; prepare for suprapubic catheterisation by the supervising surgeon
Blood at the urethral meatus is an absolute contraindication to urethral catheterisation in a trauma patient because it indicates urethral injury. Attempting transurethral catheterisation converts a partial urethral tear into a complete disruption and risks infection. The safe alternative is suprapubic catheterisation, which should be performed by the supervising surgeon. Digital rectal examination is a supplementary check, not a replacement for this contraindication rule.
Procedure and Technique: IV Access in Trauma
The procedural sequence for peripheral IV access in the trauma bay is rapid, aseptic, and goal-directed. Speed is critical in haemorrhagic shock, but adequate skin preparation remains essential to prevent cannula-site infection in a patient who may be in the ICU for weeks.
Step 1 — Select site and apply tourniquet: antecubital fossa is the first choice; apply tourniquet 10 cm proximal to the intended site. If veins are collapsed from hypovolaemia, warm the skin briefly, position the arm dependently, or use ultrasound guidance.
Step 2 — Skin preparation: clean the skin with 70% isopropyl alcohol or chlorhexidine swab in a circular motion from centre outward; allow to dry for 30 seconds.
Step 3 — Cannulate: insert a 14G or 16G cannula at 15–30° to the skin, bevel up, until a flashback of blood is seen in the chamber. Advance the cannula off the needle into the vein. Release the tourniquet, withdraw the needle, apply a cap or give set immediately. Confirm position by free flow of flush without swelling.
Step 4 — Secure and label: secure with transparent dressing; label with date, time, and gauge. Connect IV giving set with large-bore tubing (not a butterfly or blood-giving set — standard giving set allows faster flow).
Step 5 — Blood sampling: in the first (golden) cannula, take 20 mL of blood before flushing: for blood group and crossmatch (most critical), FBC, U&E, coagulation screen, lactate. These samples guide resuscitation — delaying them means delayed blood availability.
Fluid therapy in trauma: the current ATLS approach favours permissive hypotension (target systolic BP 80–90 mmHg in penetrating trauma until haemostasis, to avoid diluting clotting factors and dislodging clots) and damage control resuscitation (blood products in 1:1:1 ratio of PRBC:FFP:platelets for massive transfusion, minimising crystalloid). Large volumes of normal saline cause hyperchloraemic acidosis; Hartmann's solution (Ringer's lactate) is preferred for volume expansion.
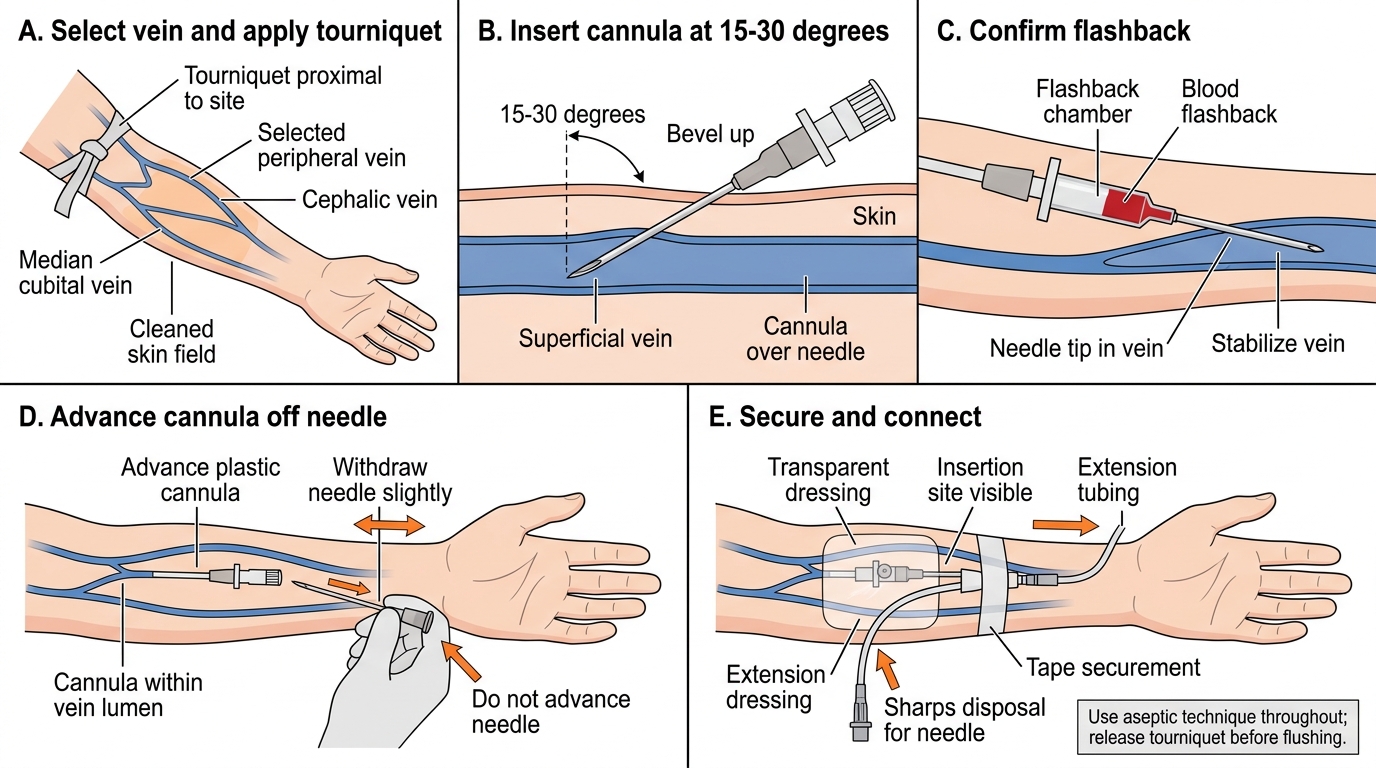
Peripheral IV Cannulation Technique
Procedure and Technique: Bladder Catheterisation
Bladder catheterisation in a trauma patient follows a strict aseptic technique. The procedure must be preceded by inspection of the perineum (blood at meatus, scrotal bruising) and, in men with suspected pelvic fractures, a digital rectal examination. Only when all contraindication checks have been passed should catheterisation proceed. The sequence — check contraindications first, then gather equipment, then execute the technique — is not merely procedural tidiness; skipping the contraindication check and proceeding directly to catheterisation in a patient with a urethral injury is a patient-safety failure with permanent consequences. The male urethra traverses 18–20 cm of variable-diameter tube with two angulations; a catheter forced past a partial urethral tear converts it to a complete disruption and seeds the periurethral haematoma with organisms from the catheter surface. This is why the contraindication check is taught as a reflex — not something to be reasoned through in the moment, but an automatic first step performed before gloves are even opened.
Equipment: a Foley catheter (16 or 18 French for adults), sterile gloves, sterile draping, antiseptic solution (povidone-iodine or chlorhexidine), lubricating gel (10 mL pre-filled syringe), 10 mL syringe with sterile water for balloon inflation, and a catheter bag.
Technique for male catheterisation:
1. Position the patient supine; drape aseptically.
2. Hold the penis perpendicular to the body and retract the foreskin (if present) to expose the meatus.
3. Clean the meatus with antiseptic swabs in a circular outward motion three times.
4. Apply 10 mL of lubricating gel into the urethra via the meatus; wait 2–3 minutes for it to work.
5. Insert the catheter with a steady continuous advance along the whole length of the catheter (18–20 cm) until urine flows freely — do NOT inflate the balloon until urine is seen.
6. Inflate the balloon with 10 mL of sterile water (NOT saline).
7. Gently withdraw the catheter until resistance is felt (balloon seats at bladder neck).
8. Record the initial urine volume (a large volume suggests chronic retention; small or none suggests hypovolaemia or obstruction).
Female catheterisation is technically simpler (urethra 3–4 cm) but may be challenging in a multiply injured patient positioned supine; adequate lighting and appropriate retraction of the labia are essential for meatal identification.
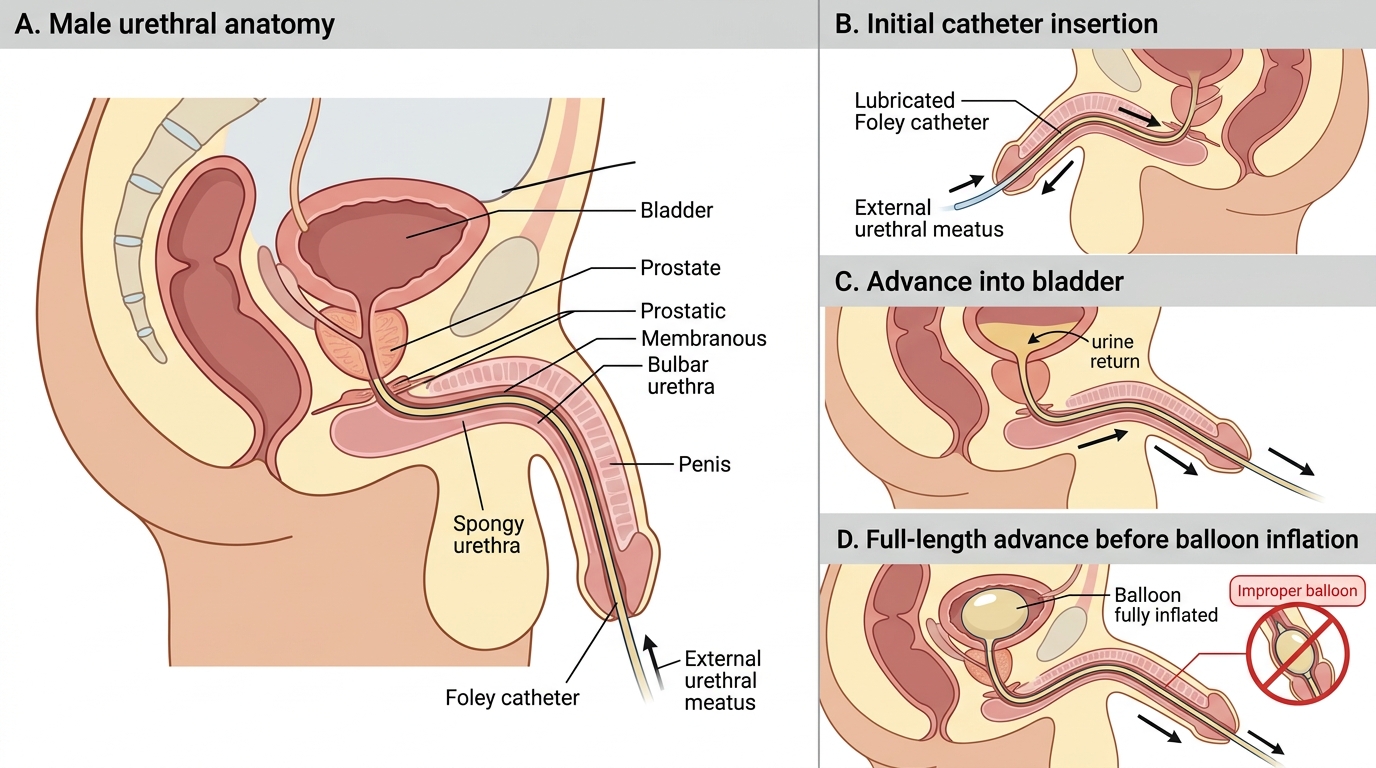
Male Urethral Catheterisation: Correct Balloon Position