Page 7 of 22
OR2.4 | Humeral Shaft Fracture with Neurovascular Risk — SDL Guide
Learning Objectives
- Describe the anatomy of the radial nerve in the radial groove and explain why humeral shaft fractures cause wrist drop
- Identify the Holstein-Lewis fracture pattern and explain its particular risk for radial nerve injury
- Classify humeral shaft fractures and distinguish mechanism differences across fracture levels
- Outline non-operative management (hanging-arm cast, functional brace) and indications for operative fixation
- Apply expectant management principles for primary (closed-fracture) radial nerve palsy and distinguish from post-manipulation palsy requiring exploration
INSTRUCTIONS
Humeral shaft fractures are the classic model for understanding iatrogenic nerve injury risk and the principle of expectant management versus exploration. The radial nerve's intimate relationship with the humeral shaft -- particularly the Holstein-Lewis zone -- means that every practitioner managing these injuries must know where the nerve lies, what wrist drop means, and when exploration is necessary versus when to observe. The intercondylar fracture variant extends to the elbow and adds articular complexity. This module covers the competency OR2.4 in full, including shaft fractures and intercondylar fractures with neurovascular deficit.
References
- Maheshwari's Essential Orthopaedics, 5th ed., Ch 21 -- Fractures of the Shaft of Humerus (textbook)
- Apley & Solomon's System of Orthopaedics and Trauma, 10th ed., Ch 30 -- Injuries of the Elbow (textbook)
Version 2.0 | NMC CBME 2024
CLINICAL SCENARIO
A 30-year-old construction worker sustains a mid-shaft humerus fracture in a direct blow to the arm. In the emergency department, after closed reduction and application of a hanging-arm cast, the orthopaedic resident notices the patient cannot extend the wrist or fingers. The attending asks: 'Was this wrist drop present before the manipulation?' The resident cannot answer. How does this change management, and what is the anatomical basis for radial nerve injury in humeral shaft fractures?
WHY THIS MATTERS
Humeral shaft fractures account for 1-3% of all fractures and are relevant across all age groups. The radial nerve is the most important nerve at risk, and its injury produces wrist drop -- a readily identifiable and potentially reversible deficit. The single most important clinical rule is to document radial nerve status before and after every manipulation: a primary (pre-manipulation) palsy is almost always a neuropraxia that recovers with expectant management, while a secondary (post-manipulation) palsy carries a higher risk of nerve entrapment or laceration requiring exploration. The intercondylar fracture of the humerus, while technically a distal humerus fracture, is covered in OR2.4 because it frequently complicates high-energy humeral injuries and requires a distinct operative strategy.
RECALL
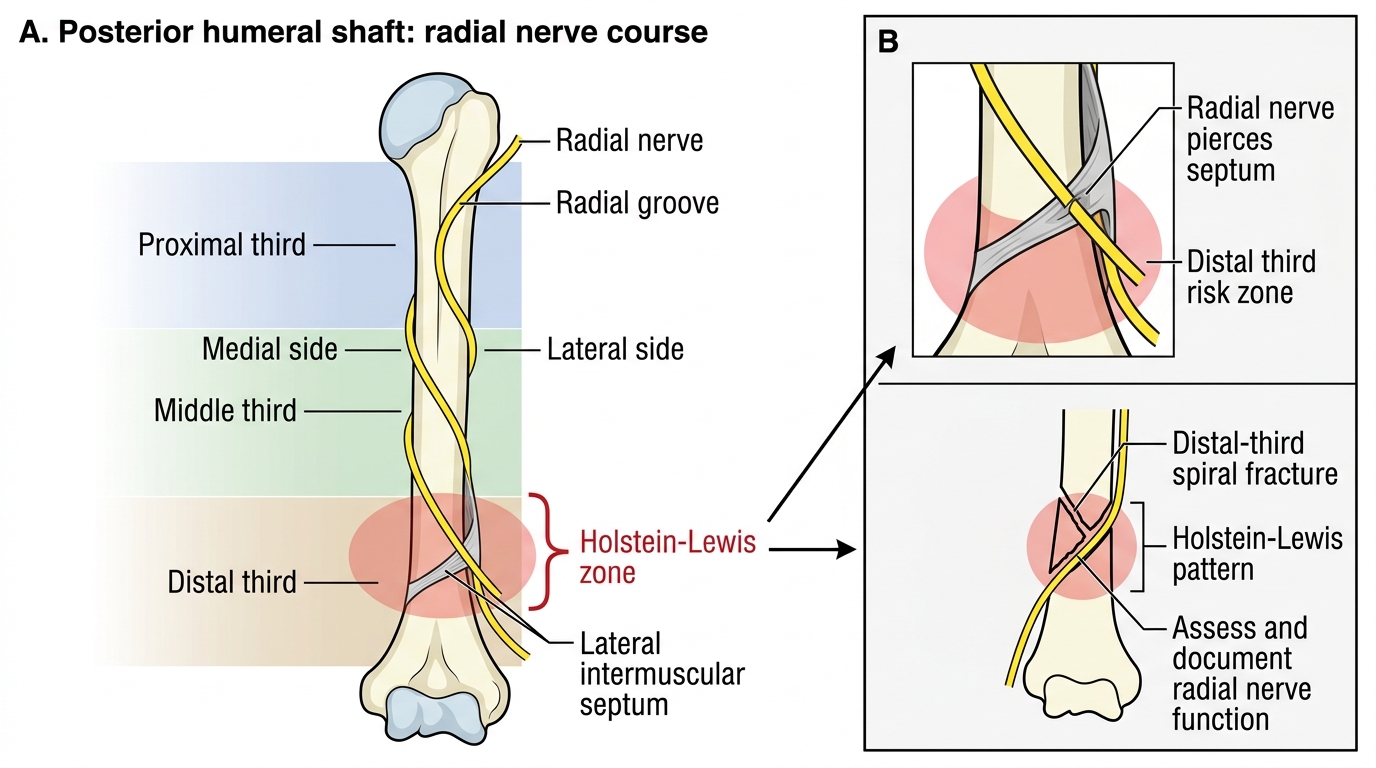
From your anatomy studies, recall that the radial nerve arises from the posterior cord of the brachial plexus (C5-C8, T1), descends posterior to the axillary artery, and enters the posterior compartment of the arm where it spirals in the radial groove (spiral groove) of the posterior humerus from medial to lateral, between the medial and lateral heads of triceps. It pierces the lateral intermuscular septum in the distal third of the humerus to enter the anterior compartment, dividing into the superficial (sensory) radial nerve and the deep posterior interosseous nerve at the level of the lateral epicondyle. The key concept is that the nerve is tethered against the bone in the groove before it pierces the septum -- this is the zone of highest risk.
Applied Anatomy and Mechanism of Injury
The radial nerve runs in intimate contact with the posterior humeral shaft as it spirals through the radial groove from proximal-medial to distal-lateral. This groove is approximately at the junction of the middle and distal thirds of the humerus -- the zone where the nerve is most vulnerable to injury from a fracture. The Holstein-Lewis fracture (1963) is named for the specific fracture pattern -- a spiral fracture of the distal third of the humerus at the level where the radial nerve pierces the lateral intermuscular septum. At this point the nerve is tethered and cannot easily escape a fracture that displaces or spirals at this level; the incidence of radial nerve injury in Holstein-Lewis fractures is approximately 22% (versus ~12% for all humeral shaft fractures). This anatomical choke point is the reason Holstein-Lewis fractures are the highest-risk pattern for nerve injury and historically prompted consideration of exploration over observation -- a practice now moderated by the overwhelming evidence for expectant management of primary palsies.
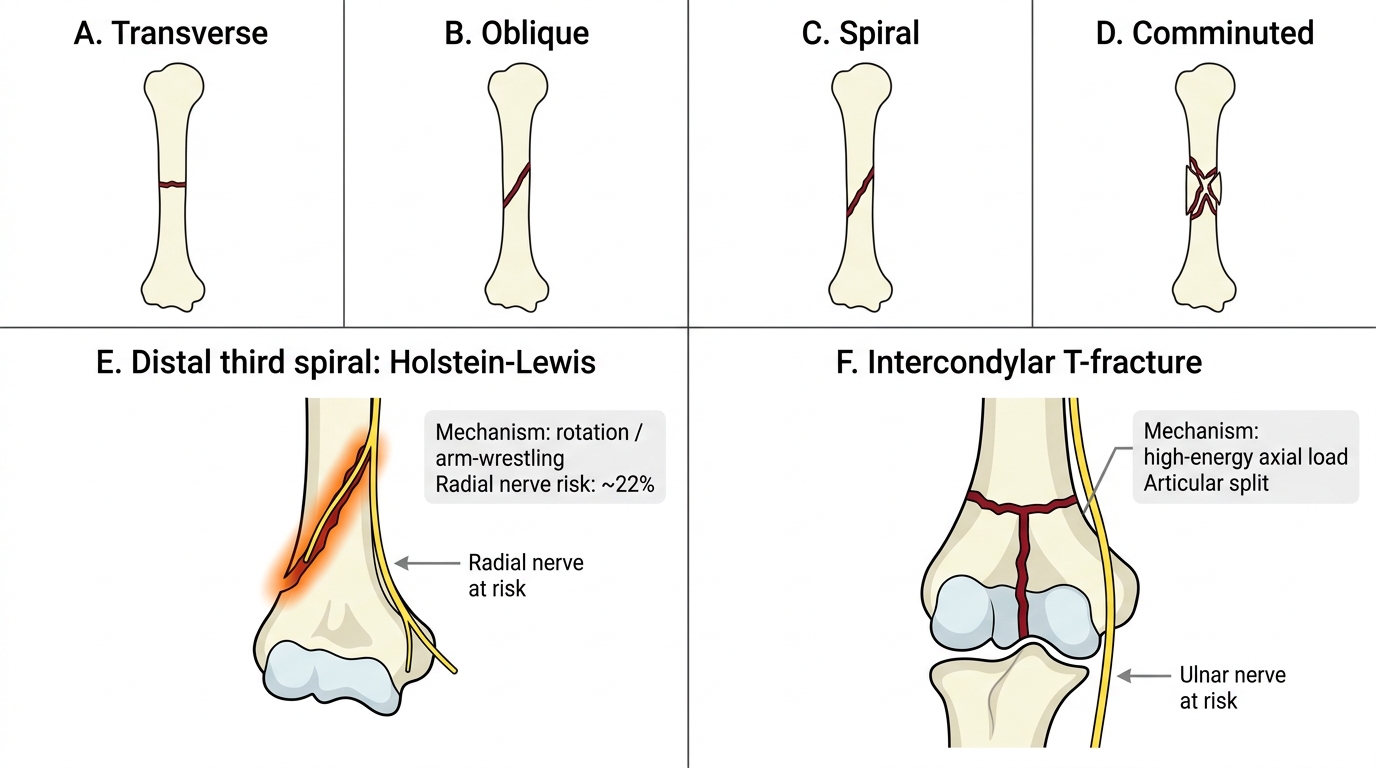
Mechanisms of humeral shaft fracture vary with the level of fracture and the energy of injury. Proximal third fractures typically result from direct trauma or indirect force through a fall. Middle third fractures are the most common and arise from direct blows, falls on an outstretched hand, or arm-wrestling ('straddle fractures'). Distal third fractures, including the Holstein-Lewis pattern, follow direct blows or high-energy mechanisms. Pathological fractures -- from metastatic disease, primary bone tumours, or osteoporosis -- can occur with trivial trauma and must be considered, especially in patients over 50 with known malignancy.
Radial Nerve Course and Holstein-Lewis Zone
Fracture Patterns and Classification
Humeral shaft fractures are described by their level (proximal, middle, or distal third), morphology (transverse, oblique, spiral, comminuted, segmental), and whether they are open or closed. The AO/OTA classification is the most widely used: type A = simple (transverse/oblique/spiral), type B = wedge (with a third fragment), type C = complex (comminuted). Spiral fractures are most commonly produced by a rotational mechanism (arm-wrestling, falls); transverse fractures by three-point bending (direct impact). Comminuted fractures indicate high-energy injury.
For the purposes of the radial nerve risk, the most important morphological observation is whether the fracture is a distal-third spiral (Holstein-Lewis pattern). When this pattern is identified on radiograph, the radial nerve must be specifically assessed and documented. Open fractures (Gustilo-Anderson classification) require antibiotics within 1 hour and urgent debridement and stabilisation.
The intercondylar fracture of the humerus (T-condylar or Y-fracture) represents a high-energy distal humerus fracture extending between the condyles and into the elbow joint. It is the most common distal humerus fracture in adults and is classified by the AO system into types A (extra-articular), B (partial articular), and C (complete articular -- the intercondylar 'T'). The key features are articular involvement, the need for anatomical reduction to restore the joint surface, and the proximity of the ulnar nerve at the medial epicondyle (at risk from the fracture or from ulnar nerve transposition during surgery).
Humeral Shaft and Distal Humerus Fracture Patterns
| Fracture type | Typical mechanism | Radial nerve risk |
|---|---|---|
| Proximal third | Direct blow, fall | Low |
| Middle third (transverse) | Direct blow, bending | ~10-15% |
| Distal third spiral (Holstein-Lewis) | Rotation, arm-wrestling | ~22% |
| Intercondylar T-fracture | High-energy axial load | Ulnar nerve at risk |
Clinical Examination and Investigations
The clinical examination of a humeral shaft fracture must proceed in a systematic, stepwise fashion. In high-energy polytrauma, a full primary survey takes priority and the humeral fracture is a secondary injury until life-threatening conditions are addressed. Once the patient is stabilised, attention turns to the injured arm. Deformity, swelling, and shortening of the upper arm are usually clinically apparent. Crepitus should not be actively elicited during examination as this causes unnecessary pain and may displace fragments. The skin must be inspected for open wounds, abrasions, and contusions, and the wound classified using the Gustilo-Anderson system if the fracture is open. The single most critical and time-sensitive examination step is the radial nerve assessment, which must be performed, recorded, and documented before any manipulation, reduction, or immobilisation is applied.
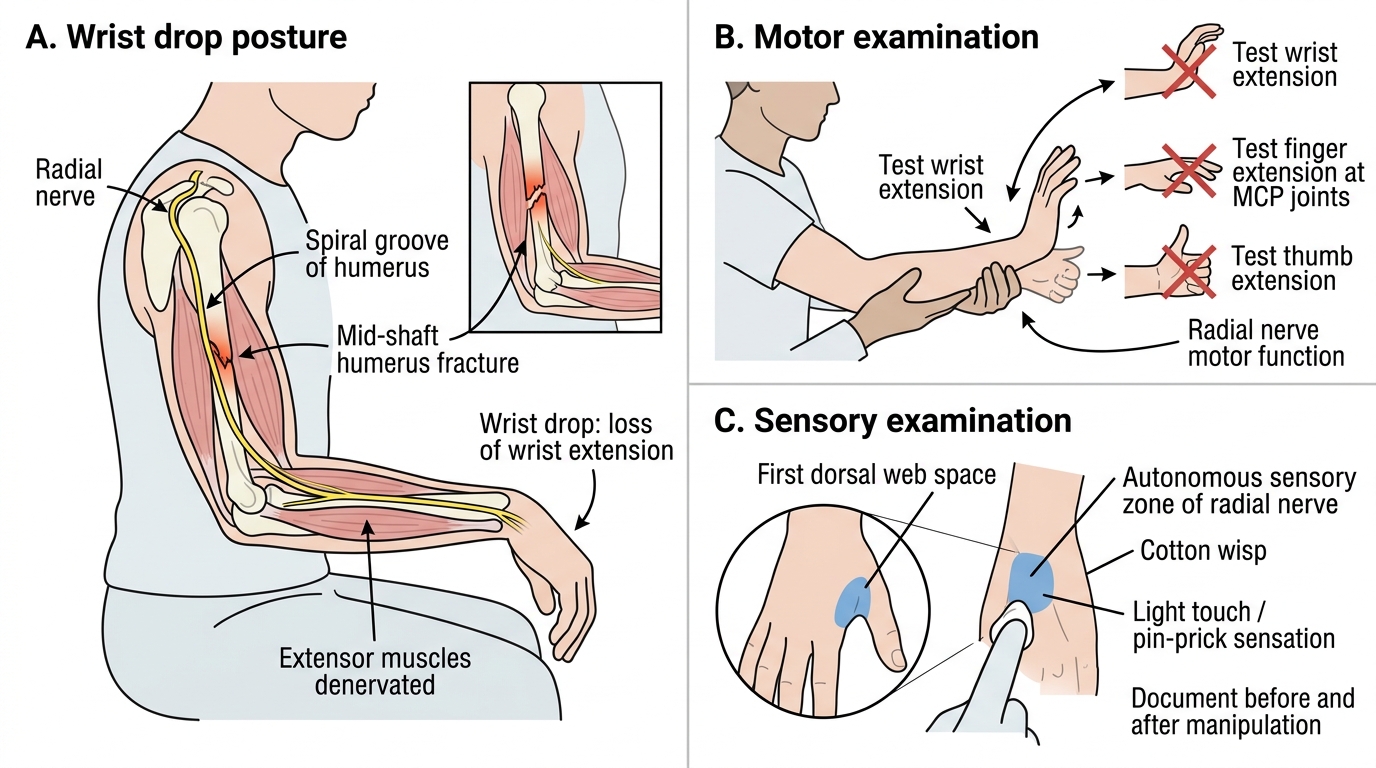
- Motor: ask the patient to extend the wrist (extensor carpi radialis longus/brevis) and extend the fingers at the metacarpophalangeal joints (extensor digitorum communis). Wrist drop -- the inability to extend the wrist against gravity -- is the hallmark of radial nerve palsy at the level of the radial groove. Note that the triceps (elbow extension) is supplied by branches of the radial nerve proximal to the groove, so in a mid-shaft fracture triceps power is usually preserved -- this distinguishes a radial groove lesion from a more proximal radial nerve injury.
- Sensory: test the autonomous zone of the radial nerve -- the dorsum of the first web space (between thumb and index finger). Anaesthesia here confirms radial nerve injury.
The assessment must be repeated and re-documented after every manipulation or application of a cast. A post-manipulation deficit that was not present before is a secondary palsy and requires prompt evaluation for nerve entrapment.
Vascular assessment: palpate the radial and ulnar pulses; check the brachial pulse in the antecubital fossa. The brachial artery can be injured in high-energy humeral fractures; a cold, pale limb without a radial pulse requires urgent vascular assessment (Doppler, CT angiography) and potential vascular repair.
Radial Nerve Bedside Examination
Investigations:
- AP and lateral radiographs of the entire humerus (including elbow and shoulder)
- CT is needed for intercondylar fractures (articular mapping, operative planning)
- EMG/nerve conduction studies: not required acutely; reserved for radial nerve palsies not recovering by 3 months
SELF-CHECK
A patient with a mid-shaft humerus fracture is found to have wrist drop after closed manipulation. Pre-manipulation documentation showed intact radial nerve function. How does this change management compared to a pre-existing palsy?
A. No change -- all radial nerve palsies in humeral shaft fractures are managed expectantly
B. The post-manipulation secondary palsy requires urgent exploration, as the nerve may be entrapped in the fracture or caught in the cast
C. The post-manipulation palsy is more likely a neuropraxia and can be observed longer
D. Both types require immediate EMG before any decision
Reveal Answer
Answer: B. The post-manipulation secondary palsy requires urgent exploration, as the nerve may be entrapped in the fracture or caught in the cast
A primary radial nerve palsy (present before manipulation) is almost always a neuropraxia that recovers spontaneously with expectant management -- exploration rates of recovery approach 70-90%. A secondary palsy (occurring after manipulation) suggests the nerve has been entrapped in the fracture site or caught in soft tissues during reduction; this mandates prompt exploration and surgical decompression/repair. This distinction is why pre-manipulation documentation is obligatory.