Page 3 of 8
AN13.1-8 | General Features, Joints, radiographs & surface marking (Upper Limb) — SDL Guide (Part 3)
Reading Upper Limb Radiographs
An X-ray (radiograph) uses electromagnetic radiation that passes through soft tissues but is absorbed by dense structures like bone. Bones appear white (radiopaque), soft tissues appear grey, and air appears black.

Figure: Wrist and hand radiograph (AP/PA and lateral views)

Figure: Shoulder radiograph (AP view)

Figure: Reading Upper Limb Radiographs
When reading an upper limb radiograph, always follow a systematic approach — the ABCs method:
- A — Adequacy & Alignment: Is the entire region visible? Are the bones properly aligned?
- B — Bones: Trace the outline (cortex) of each bone. Look for breaks, irregularities, or abnormal densities.
- C — Cartilage & joints: Check joint spaces — they should be uniform. Narrowing suggests arthritis; widening suggests ligament injury.
- S — Soft tissues: Look for swelling, foreign bodies, or abnormal calcifications.
Shoulder radiograph (AP view):
• Identify: clavicle, acromion, coracoid process, head of humerus, greater and lesser tuberosities, glenoid cavity
• The humeral head should sit neatly in the glenoid — displacement suggests dislocation
• The acromioclavicular joint space should be <5 mm
Elbow radiograph (AP and lateral views):
• AP view: Identify the medial and lateral epicondyles, olecranon fossa, radial head, and coronoid process
• Lateral view: Look for the anterior humeral line (a line drawn along the anterior cortex of the humerus should pass through the middle third of the capitulum — if not, suspect a supracondylar fracture)
• In children, look for ossification centres — they appear in a predictable order: CRITOE — Capitulum (1 yr), Radial head (3 yr), Internal (medial) epicondyle (5 yr), Trochlea (7 yr), Olecranon (9 yr), External (lateral) epicondyle (11 yr)
Wrist and hand radiograph (AP/PA and lateral views):
• Trace the three smooth arcs of Gilula through the carpal bones — disruption of any arc suggests carpal instability or fracture
• The scaphoid is best seen on a dedicated scaphoid view (PA with ulnar deviation)
• In the lateral view, the radius, lunate, and capitate should be collinear — misalignment suggests a perilunate dislocation
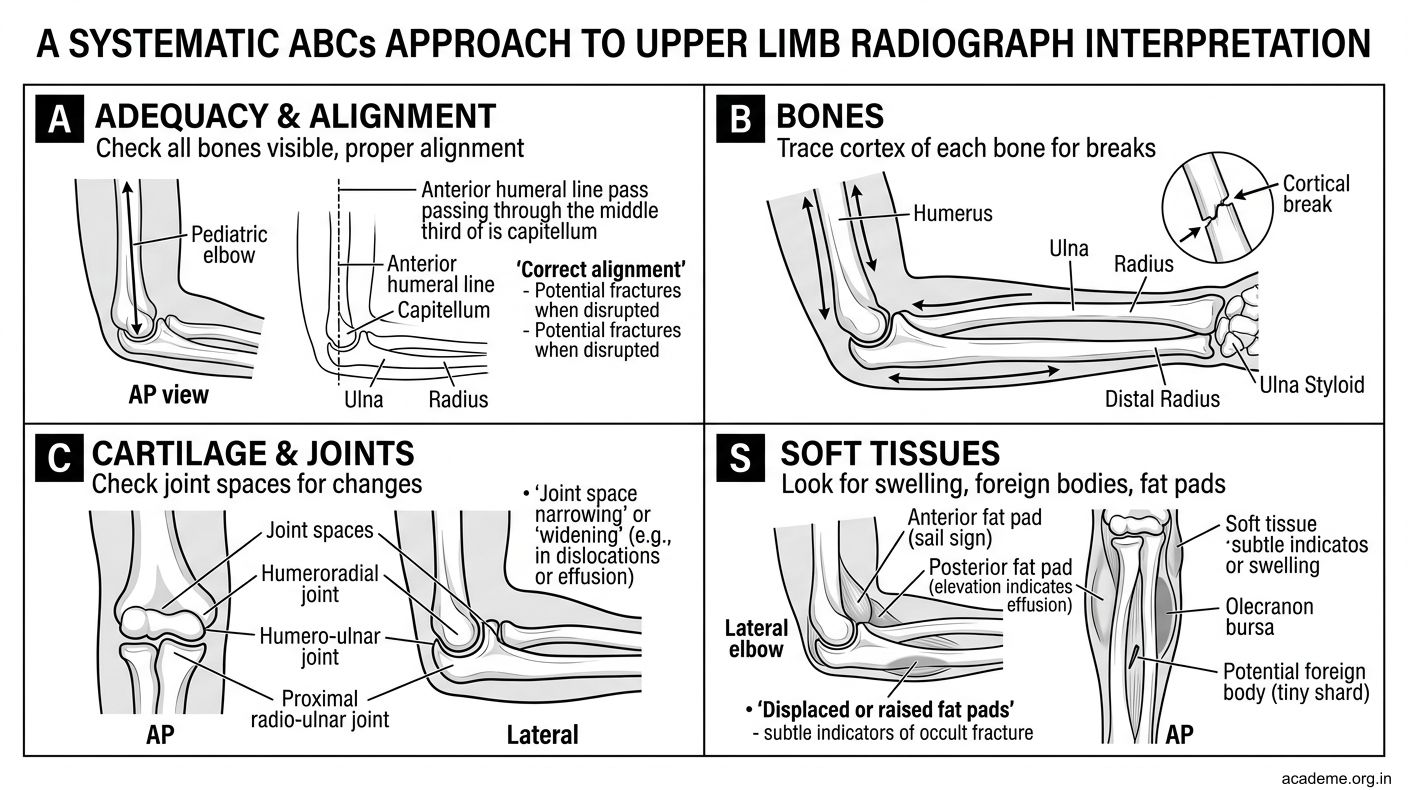
Figure: Reading Upper Limb Radiographs
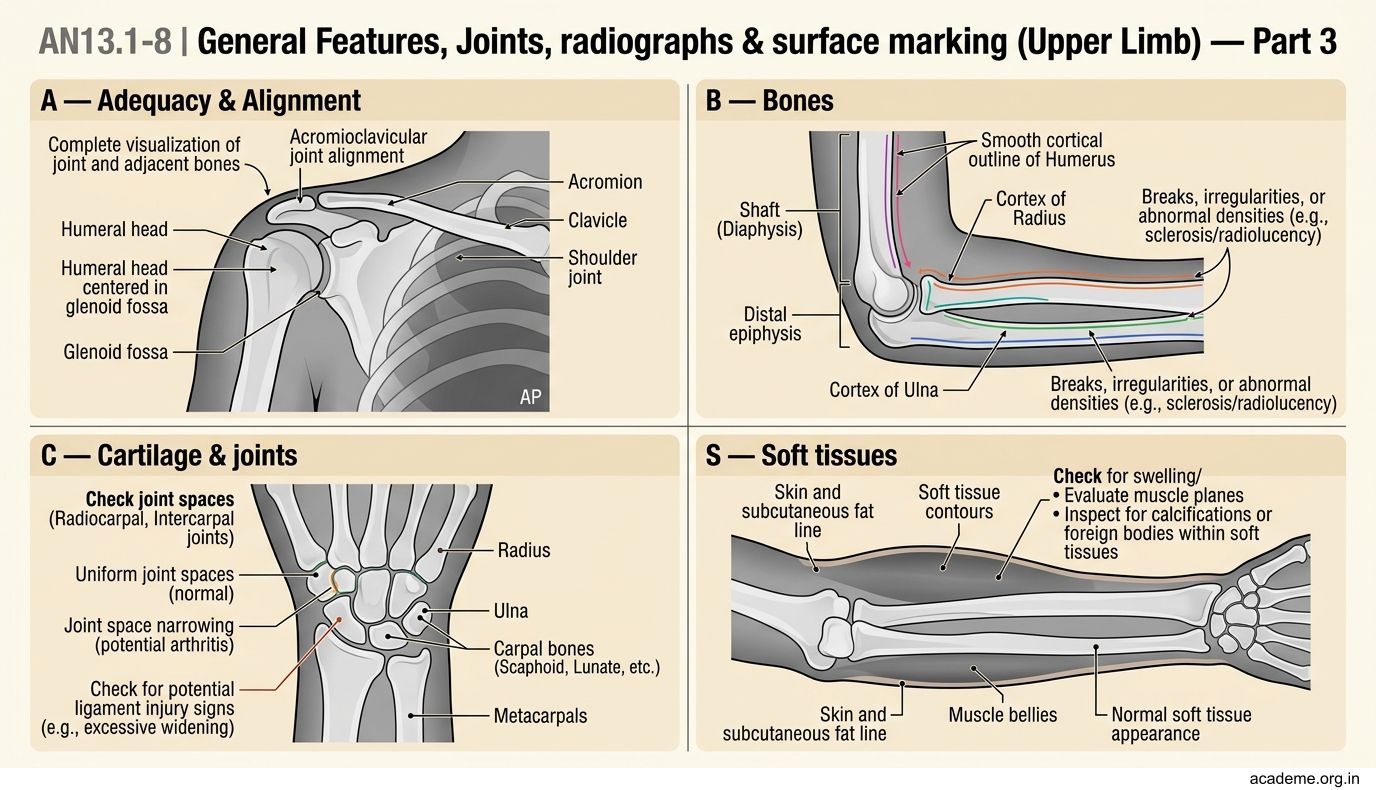
Figure: Shoulder radiograph (AP view)

Figure: Elbow radiograph (AP and lateral views)
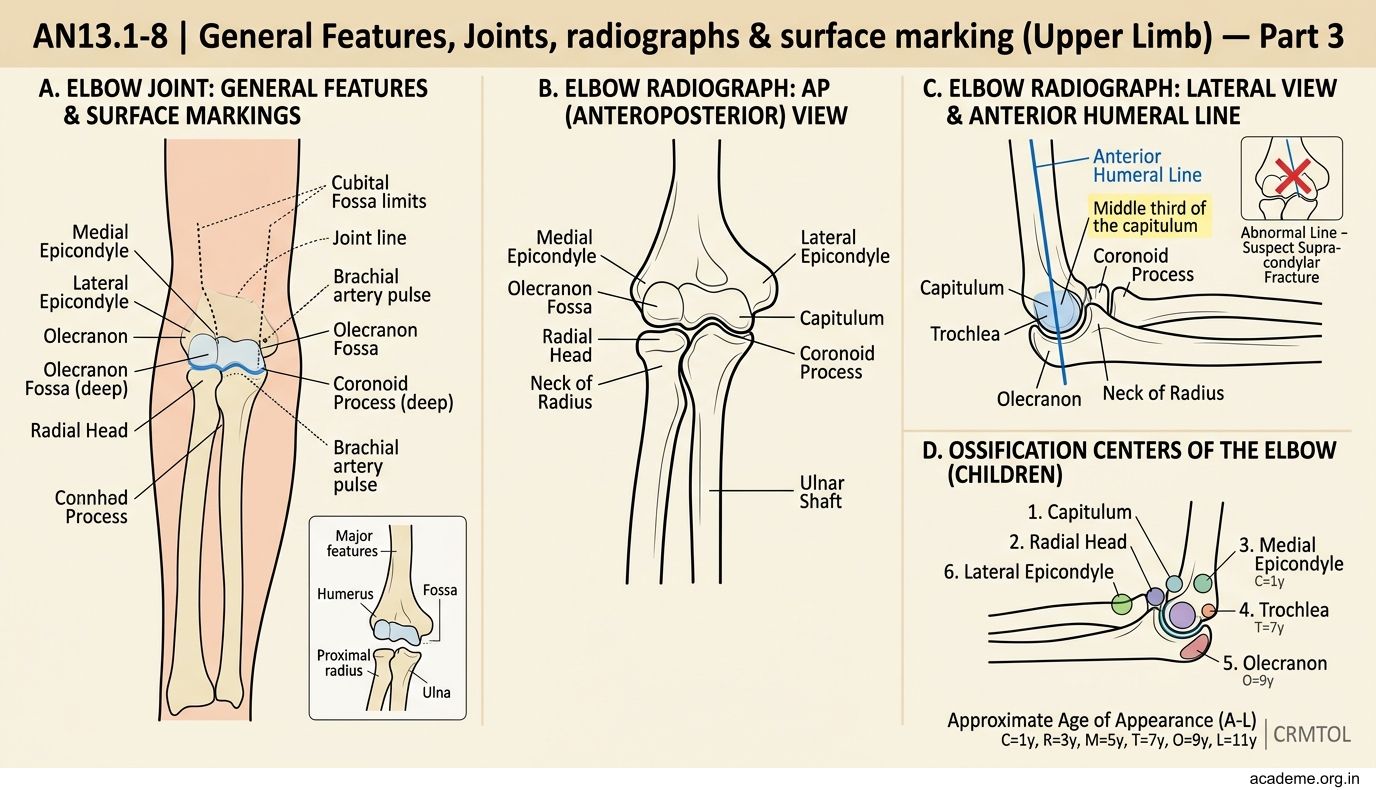
Figure: Elbow radiograph (AP and lateral views)
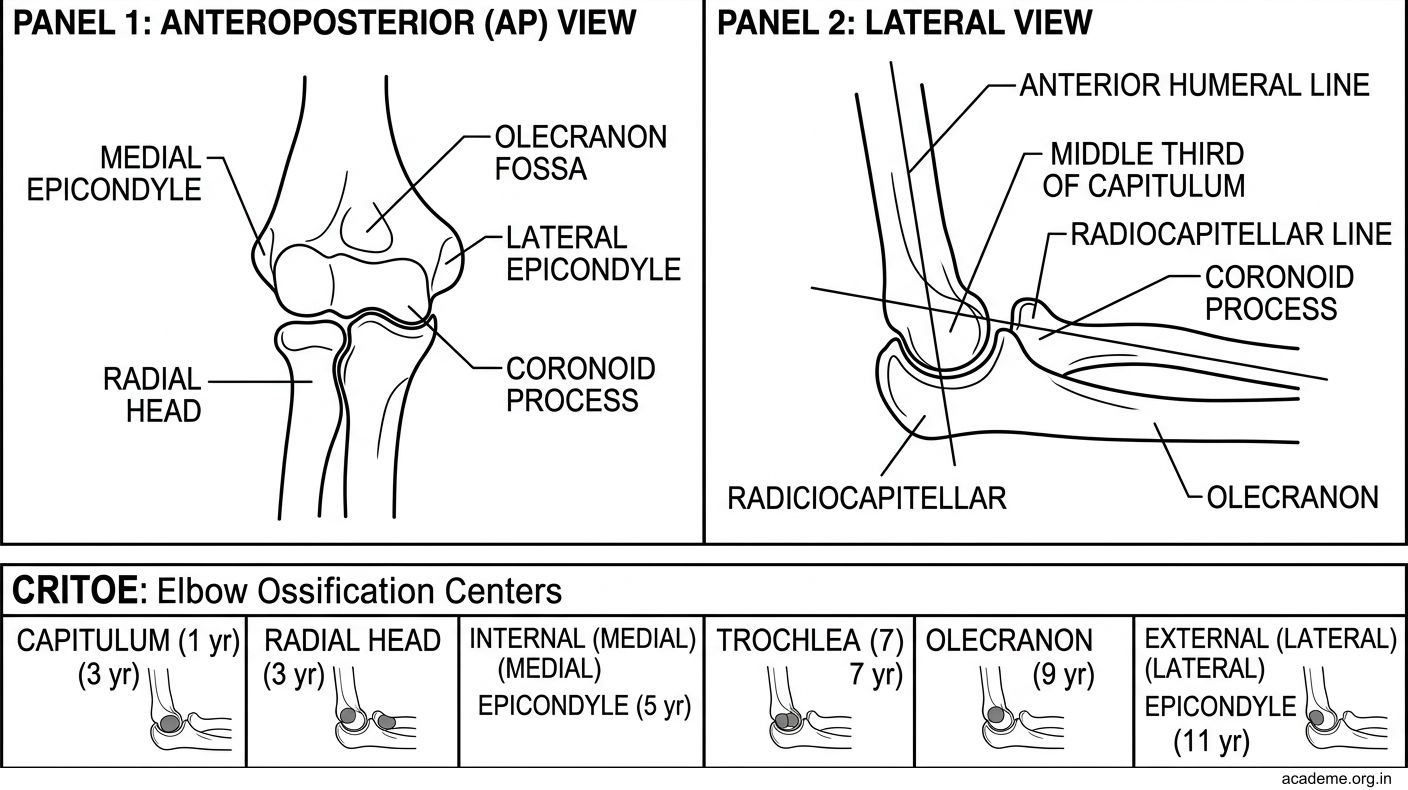
Figure: Elbow radiograph (AP and lateral views)
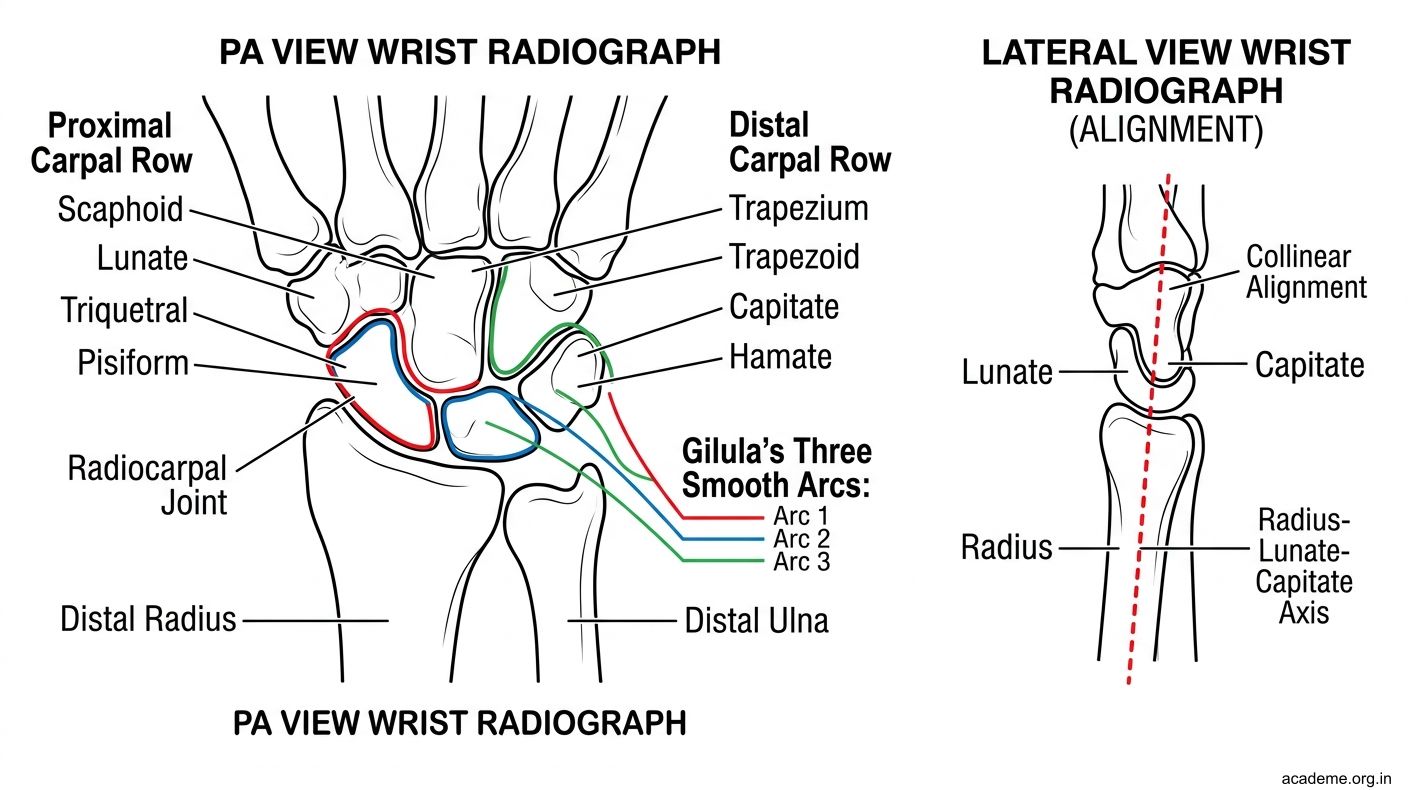
Figure: Wrist and hand radiograph (AP/PA and lateral views)
Bony Landmarks of the Upper Limb
Bony landmarks are points on bones that can be felt (palpated) through the skin. They are essential reference points for clinical examination, giving injections, and performing procedures.

Figure: Bony Landmarks of the Upper Limb
You can practise all of these on yourself or a classmate right now:
At the root of the neck and shoulder:
• Jugular (suprasternal) notch: The hollow at the top of the sternum between the two clavicles. Place your finger in the dip between your collarbones — that's T2 vertebral level.
• Sternal angle (angle of Louis): The horizontal ridge where the manubrium meets the body of the sternum, at the level of the 2nd rib and T4/5 vertebra. It marks where the trachea bifurcates.
• Acromial angle: The point where the spine of the scapula meets the acromion — feel the bony prominence at the tip of your shoulder.
• Spine of the scapula: Run your fingers along the back of your shoulder blade — you'll feel a prominent ridge. Its medial end lies at the level of the T3 vertebral spine.
• Medial end of the spine of scapula: At T3 level
• Inferior angle of the scapula: The lowermost point of the scapula, at the level of T7 vertebral spine and the 7th rib. Ask a friend to adduct their arm — you'll see and feel this point clearly.
At the elbow:
• Medial epicondyle: The bony bump on the inner side of the elbow. The ulnar nerve runs behind it — that's why hitting it causes a tingling "funny bone" sensation.
• Lateral epicondyle: Smaller bump on the outer side — site of origin of extensor muscles (involved in "tennis elbow")
• Olecranon: The point of the elbow (top of the ulna). These three landmarks form an equilateral triangle when the elbow is flexed at 90° — if this relationship is disrupted, suspect a fracture or dislocation.
At the wrist:
• Styloid process of the radius: On the lateral (thumb) side, about 1 cm more distal than the ulnar styloid
• Styloid process of the ulna: On the medial (little finger) side
• Anatomical snuffbox: The triangular depression on the lateral side of the wrist when the thumb is extended. The scaphoid bone lies in its floor — tenderness here after a fall suggests a scaphoid fracture.
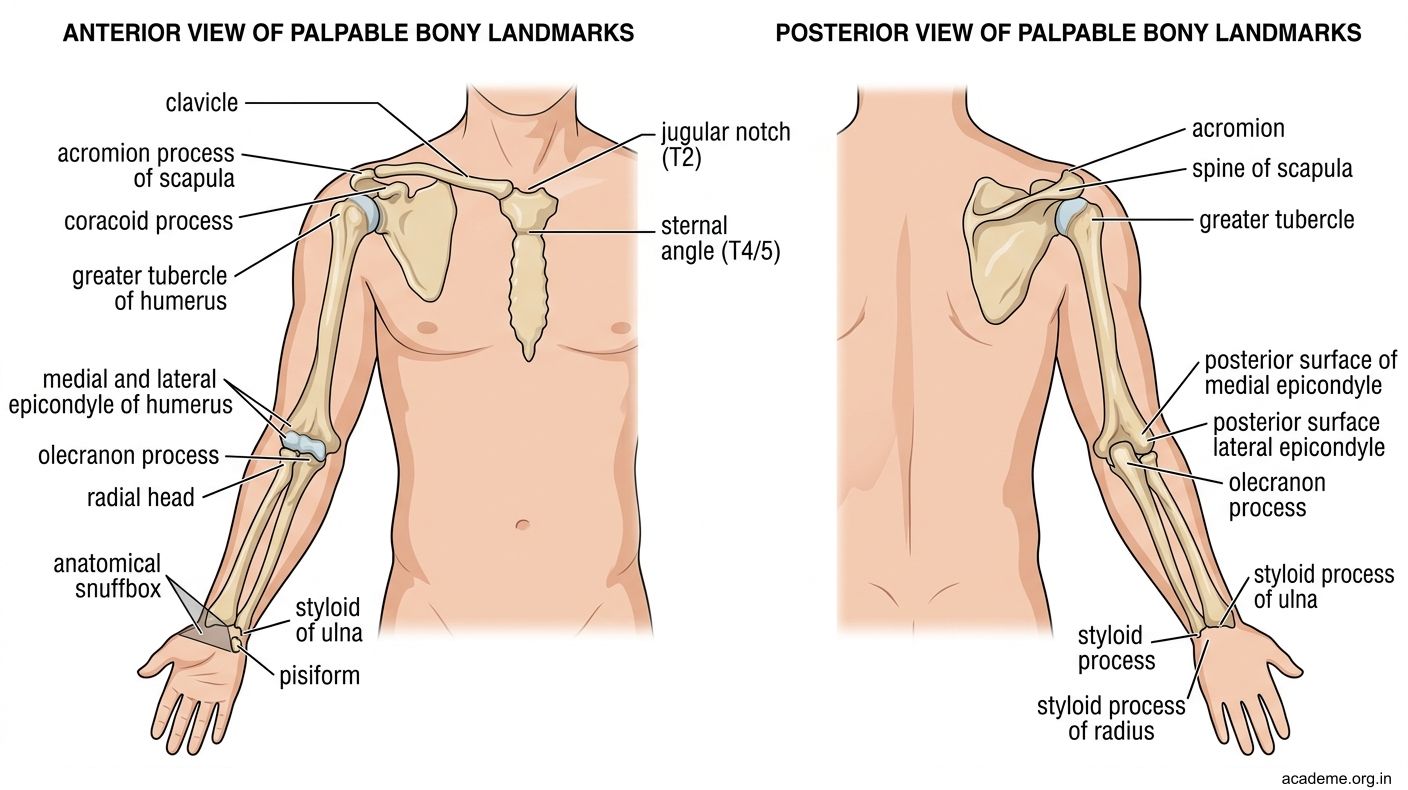
Figure: Bony Landmarks of the Upper Limb
SELF-CHECK — Radiographs & Landmarks
On a lateral elbow radiograph of a child, the anterior humeral line passes anterior to the capitulum. What fracture should you suspect?
A. Lateral condyle fracture
B. Olecranon fracture
C. Supracondylar fracture
D. Radial head fracture
Reveal Answer
Answer: C. Supracondylar fracture
The inferior angle of the scapula is at the level of which vertebral spine?
A. T3
B. T5
C. T7
D. T9
Reveal Answer
Answer: C. T7
Surface Projections and Arterial Palpation
Surface anatomy is the art of identifying deep structures through the skin. In clinical practice, you'll use this constantly — from taking a blood pressure reading to inserting an intravenous cannula.

Figure: Surface Projections and Arterial Palpation
Vein projection:
• Cephalic vein: Trace from the anatomical snuffbox, up the lateral (radial) side of the forearm, into the deltopectoral groove, and into the infraclavicular fossa where it dives deep to join the axillary vein
• Basilic vein: Trace from the dorsal venous arch on the medial side of the hand, up the medial (ulnar) side of the forearm, piercing the deep fascia at the mid-arm level
• Median cubital vein: Crosses the cubital fossa obliquely from the cephalic (lateral) to the basilic (medial) vein — this is where you'll draw blood most often
Arterial palpation:
• Brachial artery: Palpate in the medial bicipital groove (between biceps and triceps) in the upper arm. This is where you place your stethoscope to measure blood pressure. It can also be compressed against the humerus to control upper limb bleeding.
• Radial artery: Palpate just lateral to the flexor carpi radialis tendon at the wrist, where the artery lies on the distal radius. This is where you routinely take the pulse. Press gently with your index and middle fingers — never use your thumb (your thumb has its own pulse that can confuse the reading).
• Ulnar artery: Palpate lateral to the flexor carpi ulnaris tendon at the wrist, though it's deeper and harder to feel than the radial
Allen's test: Before performing radial artery cannulation (e.g., for arterial blood gas sampling), compress both radial and ulnar arteries at the wrist, ask the patient to make a fist several times (the hand blanches), then release the ulnar artery. If the hand flushes pink within 5-7 seconds, the ulnar artery supply is adequate and it's safe to cannulate the radial artery.
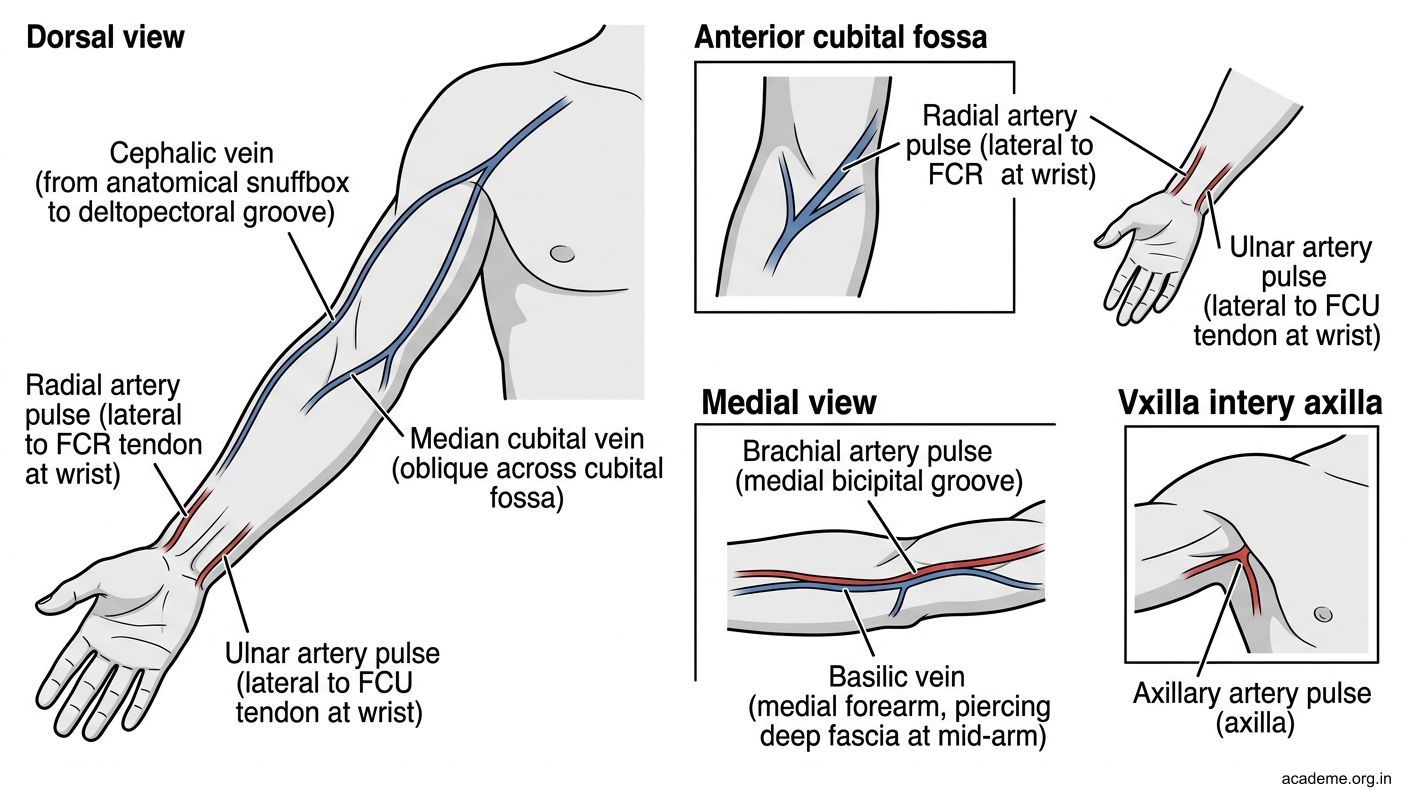
Figure: Surface Projections and Arterial Palpation